DD 430
-
Posts
25 -
Joined
-
Last visited
Content Type
Profiles
Forums
Gallery
Everything posted by DD 430
-
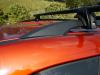
Driver and front Passenger Doors not flush
DD 430 replied to iliketoliveontheedge's topic in 2008 Edge & MKX
-
Driver and front Passenger Doors not flush
DD 430 replied to iliketoliveontheedge's topic in 2008 Edge & MKX
The driver's side front door on my '08 also has a noticeable 'offset'. It's especially noticeable when looking 'backwards' through the sideview mirror. I tried to adjust it myself and got the feeling that bolt had been either set with Loctite or was partially stripped to begin with. My adjustment didn't work. I brought it back to Ford. They tried with no success either. All-in-all I'd say that the fit and finish of the car is slightly below par. (With that being said I like the car very much.) My wife has an '07 Mazda CX-7. Everything 'lines up' on that car and closing the doors sounds like a bank vault - very tight and sound. The Mazda does a better job of assembly than does Ford although I can envision a higher probability of problems with the turbocharged 2.3L engine in the CX-7 than I can with the naturally aspirated 3.5L in the Edge. -
I've got an '08 AWD. The radio shuts off quite often. I'd say once every other day. I've noticed something else as well: I've got an XM radio that is powered through the accessory port. The XM turns itself off as well with about the same frequency. (When I use the XM at home in the cradle it only turns off when I 'turn' it off.) The rest of the 'electrics' in the car seem to be fine.
-
Anyone else hear wind noise from passenger side Edge?
DD 430 replied to ActionBastard's topic in 2008 Edge & MKX
My Edge suffers from the same problem. In my case it's a matter of poorly fitting front doors. In fact, while sitting in the driver's seat I can look into the mirrors on the doors and see that the black trim 'strip' at the bottom of the windows don't line up: they rear portion of both front doors protrude slightly. Normally the striker plate can be adjusted in order to 'pull' the doors back into alignment. I've tried it myself as has Ford with no luck. At this point I just live with it. As a side note: my wife has a Mazda CX-7. The build quality of the Mazda is much better than that of the Edge. For example, the doors on Mazda actually 'fit' the car. Additionally, the Mazda was fully coated with paint whereas the Edge has a couple of spots on the door jambs where there is a total absence of finish coat and the primer is very evident. I like the Edge but fit and finish is a problem. -
I agree. Modern vehicles have styrofoam 'pads' built inside of the bumper covers. The foam can be compressed or otherwise damaged in a collision. A number of years ago my old Miata was rearended. I replaced the bumper cover myself. When I installed the part it was very apparent that the underlying foam was damaged as well. I replaced both parts.
-
I just had the battery replaced (warranty) in my '08 Edge last week. The car had about 21K miles. The battery showed 'green' in the indicator. I cleaned the terminals (which were pretty clean already). Then I pried off the cap and checked the cells with a hydrometer: the number 1 cell (front) was totally dead. The dealer replaced the battery after running a scan on the car.
-
I'm sure that fix will be covered under the warranty. My Edge doesn't have a sun roof but I have had other cars that did have them. On car in particular had a similar problem: If I parked the car on a hill with the rear-end sloping 'down' and it happened to rain, the area around the sun roof would fill with water. My first stop at a light or stop sign would be heralded with what sounded like a tidal wave. Next would come the water itself - it was always exciting! (Especially if I had a date with me.) The problem was blocked up drains which were located under the car. I blew a couple of bursts of compressed air into the drains and forced the 'crap' out of them - problem solved. Again, I'm sure that the dealer can fix the problem easily!
-
Chuck, That's good news about the part from Cowles. Too bad that the dealer in Butler was so clueless. I'm also surprised that the part was only $16.61 (also good news)! When the part 'popped' off on my car I had a Yakima Rocket Box on the car. I would estimate that the box and contents probably weighed in at about 85LBS. Obviously, since the car was being driven at highway speeds, there was additional force on the system as well. My two kayaks have also caused the covers to loosen as well. In fact, the Yakima cross bars themselves seem to have deformed the system a bit even when they're unloaded. It'll be interesting to see how the Thule works out for you. Keep us posted. Mark
-
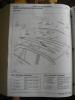
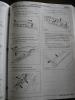
Folks, Those numbers came from the "WORKSHOP MANUAL 2008 EDGE, MKX - VOUME 1" Pages 501-08-3, 501-08-4. If you 'hit' "Ctrl" "+" or "-" you can enlarge or reduce the photo size. All the best, Mark
-
It looks like an interesting system. It'd be nice to see one that is actually installed on a vehicle or at least some actual photos on an installation. By the way what was the price of the cover that fell off?
-
Chuck, The part numbers for the rear covers are: PN's 551A92-3, 551A92-4. I can't remember which is the RH and LH but I suspect the -3 is LH. Mark
-
Actually, the covers are a symptom of the problem. The portion of the rack that is thru-bolted on to the car is made out of plastic. This is the 'bearing' point and the deflection in the mount causes the cover to come off. So it's the mounting part (I can't find a part number in my service manual) that's the real problem.
-
Chuck, The missing cover is also a PITA to replace, too. And, yes, the Perrycraft look like the racks that came standard on all of my other cars. Mark
-
The front covers are essentially the same as those used on the rear. It's really too bad that Ford chose to use the materials that they used for the system - cast aluminum would have been the way to go, a bit more expensive but it would be much sturdier. The racks at Perrycraft look like the way to go. They appear to be screwed to the flat portion of the roof much like on the old Astrovan. I guess that, first, the stock rack has to be removed and, second, the black vinyl seam filler strip has to be replaced and then the Perrycraft units can be mounted. Ford could have done better on this portion of the car. But, so far, it's the only gripe that I have. Actually, though, they may end up with a legal liability issue with this one if anyone is hurt due a failure.
-
I use a hitch rack as well for bikes but, from time-to-time, I'll put them on the roof, too. The reason that I use this type of roof rack is that I'm a bit of a nut with regards to using a tower because they tend to screw up the paint. And, yes, the rack howls like my ex-wife if I don't use the fairing. I think that Perry Craft (www.perrycraft.com) make a replacement rack for the Edge that will hold (I think) 185LBS. I haven't seen an installation drawing for the part but I may check it out. The stock rack, I fear, is going to cause some real problems.
-
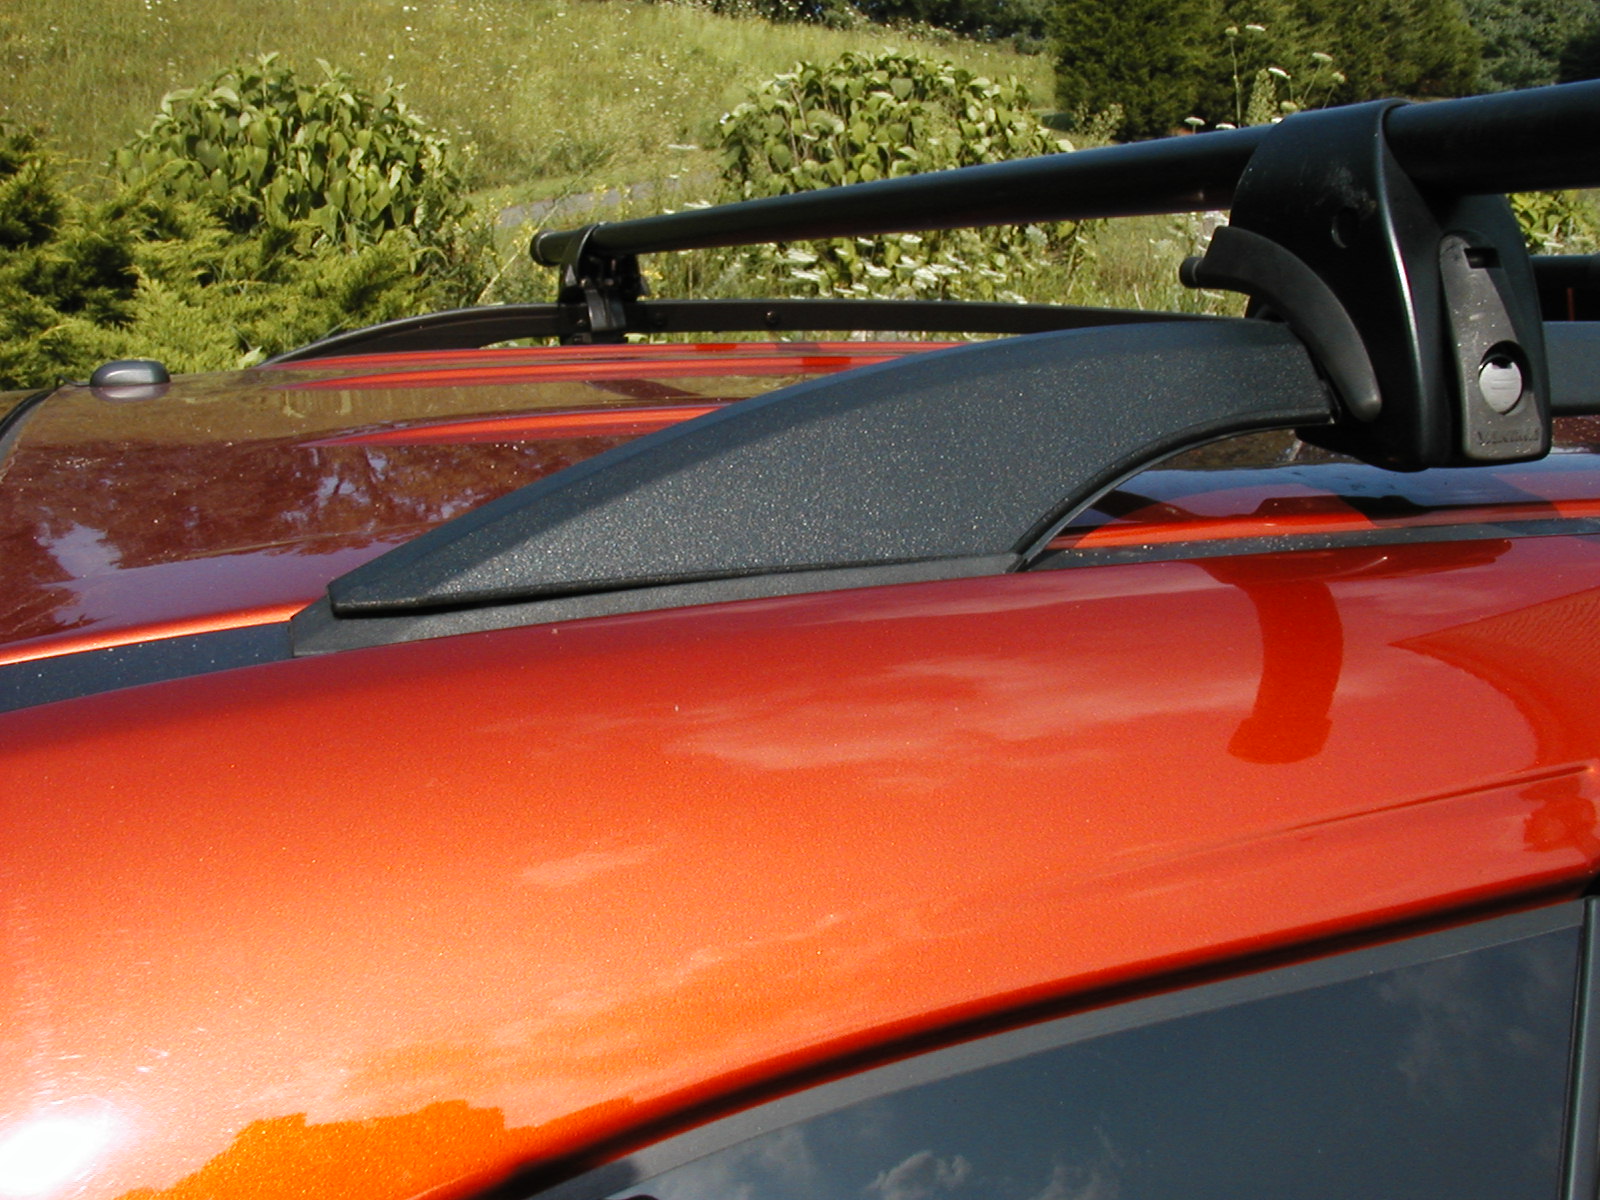
I'm using a Yakima roof rack system in conjunction with the 'stock' Ford rack on my '08 Edge. I use it to carry a number of different accessories such as bike racks, kayak racks, or a Rocket Box (all Yakima products). I've used the exact same setup on the following cars: 1990 Volvo 240, 1990 Plymouth Voyager, 1995 GMC S-15 Jimmy, 2002 Chevrolet Astro Van, 2005 VW Passat. The system has worked flawlessly on all of the vehicles but I believe that I'm developing a problem on the Edge. I think that the problem originates in the material that Ford uses to tie their factory 'stock' rack back into the roof which seems to be manufactured using an engineered plastic. The plastic tends to deform under load to the point that the part (PN's 551A92-3, 551A92-4) that covers the bolts begins to lift in the rear and, if you're not paying attention, could fall off. Losing the covers would be a PITA in that I'd wager that the parts are difficult to obtain. My more serious concern is that if deformation is present it may be just a matter of time before kayaks, bicycles, and Rocket Boxes are launched off of the roof of the car - a problem for those following closely behind at worse or a totally fouled-up vacation at best. The difference between the mounts on the Ford and the rest of the 'fleet' is probably that the other cars used anodized aluminum mounts that did not deform. I've carried the same weight in all of the similar setups. The photos that I've attached show the rear of the covers beginning to lift. (They are also a PITA to replace.) Have any of you folks experienced the same problem?

-
I picked up my used '08 a couple of months ago. A day or so later I noticed a drip or two on the driveway. I finally took a look and found that the filter had never been tightened. It was at least on thread away from fully contacting the block. Thank goodness that I found it (both for the dealership and for me!)
-
I'm not sure where the sensor is wired as an OEM piece but, as I did with the hitch wiring, you could probably wire it back to the accessory port on the LH rear panel. It's a good 12V source.
-
John, Thanks for the reply. Yes, Ford does offer an OEM package that includes the harness. It essentially is setup like the after market harnesses in that they're both wired back to the battery. I was looking for an easier way to get power to the hitch harness. I did spy a connector (empty) in the area of the spare tire and I was hoping that I could tie into it - that it was installed in order to tie the hitch in to. I found that it was for the installation of the Sirius sat. radio. I ended up tieing the wiring back into the accessory port which is located on the driver's side rear in the cargo area.
-
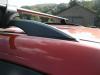
Just installed a 2" reciver trailer hitch. (Picture)
DD 430 replied to edging's topic in Interior, A.C., Heat, Interior Trim
Jeff, I just completed the wiring installation using the kit that I purchased with the hitch from etrailer. The kit took some 'studying' to make sense of things. First, remove the 'ground' (negative connection) on the battery. Essentially, it's a matter of removing both tail lights. The lights are held in using two 8mm bolts that are on the tailgate side of the units. The lights have to be sort of 'wiggled' straight out from the body and they have two what are termed 'locator' pins on the outboard side that complete their attachment to the car. Remove the rear carpeting (it's easy as it is attached to the floor and it just lifts out). Remove the two black foam inserts that surround the spare tire. (They, too, just lift out.) I also removed the spare tire to give myself more room. Now remove the plastic threshold. (It is clipped into the body and is simply lifted up to remove.) Now, remove the four plastic fasteners (there are two on each side) that hold the side trim panels to the floor. Next, gently pull on the driver's side trim panel - it's also clipped in - so it'll 'snap' out. I did not remove mine completely - just the rear - I left it attached on the front. Repeat with the passenger's side. Now, push the grommets that contain the side, tail, and backup lights out of the body. Use a very sharp knife or razor blade to split the grommets longitudinally. This really takes some care since there is a load of electrical tape on both the wires and the grommets. The wiring harness essentially has five major sections: driver's side, passanger side, power, ground. and a four-wire - flat hitch connector. It's a matter of removing the car's wiring connections to the tail lights (the 'large' bulbs) and connecting the driver's and passanger's side of the new wiring harness. It's a little confusing but, as I say, study it for a bit and it'll make sense to you. Then, replace the now-sliced grommets over the wires on both side and reinsert them into the body so that the wires dangle on the outside. I used a shot of clear silicone caulk on both grommets in order to seal the 'slices'. Now you can reinstall the tail lights. There is a white ground wire on the driver's side that can now be connected to the body. (There is an existing 'ground' connection with a couple of black wire next the taillights. The white ground can be attached to the same location.) The kit comes with a very long wire that is intended to be attached to the battery. In my estimation, that is a waste of time and energy. The system is looking for 12V power from a power source that has a high enough amperage. It doesn't care where it comes from. Here's what I used: On the driver's side rear panel there is an accessory outlet that remans 'hot' whether the car is 'on' or 'off'. It's really a cigarette lighter outlet (not politically correct but that's what it is!) I clipped the yellow and red striped wire and soldered the power wire from the new wiring harness to that wire with a 10A fuse in line. (The rear outlet still works when the wires are put back together.) Now, it's a matter of taking care of the four-wired flat hitch connector: There is a grommet in the floor of the car near the threshold that contains a bundle of wires. That grommet needs to be pulled into the car and split as was done with the tail light grommets. Once done, the hitch wire can be pushed down and 'threaded' to the hitch. Now, the grommet can be replaced and 'siliconed'. I used a short length of split, flexible conduit that I bought at Home Depot to enclose the hitch wires. I also used an ABS 'box' that I purchased from etrailer (that I'd attached the hitch) in which I placed the connector in order to protect it when it's not in use. I also shot some silicone into the back of the box in order seal it to the weather. All-in-all, it took me about 3 hours to install the wiring. It's a bit tedious but not too bad. I'm not sure what the relays are that you mentioned - the wiring from etrailer didn't require that I use any. -
Just installed a 2" reciver trailer hitch. (Picture)
DD 430 replied to edging's topic in Interior, A.C., Heat, Interior Trim
Carbonedge, Yes sir, that's the piece. I didn't know that Draw Tite used the same 'two hole' set up. The anti-rattle piece works great. The only improvement that I could suggest would be to use two nuts to tighten the piece - one nut is used as a 'jamb' nut against the one that actually holds the unit together. Also, make sure that you use the cylindrical lock as a failsafe/anti-theft device. Another anti-rattle idea is a shim device that you can see at the followng website: http://www.hitchshim.com/index-1.html. I'm going to wire the hitch today (now that the rain has finally stopped). Have you wired yours? If so, how did you 'power' the thing? Did you run a hot wire back fro the battery? I'm tempted to tap into the accessory port that is located on the panel on the driver's side rear of the cargo compartment. -
Just installed a 2" reciver trailer hitch. (Picture)
DD 430 replied to edging's topic in Interior, A.C., Heat, Interior Trim
I've just installed a Hidden Hitch as well. This is the third HH that I've used over the years. The first on the old Astro Van, the second on my wife's '08 CX 7 and now this one on my '08 Edge. The first two were very easy to install. The one on the Edge was a little more difficult due to the need to fish the bolt in through the end of the frame rails. Not too bad, though. The reason that I used the Hidden Hitch were two-fold. First, it has a 2" receiver and I have a lot of accessories for that size unit. The second reason is this: the Hidden Hitch comes with two through-drilled holes in the receiver. The larger hole is used to simply 'pin' the tow bar into the receiver. A special 'pin' is made for the HH - that is U-shaped. The larger diameter portion of the pin simply attaches the bar to the receiver. The U-portion of the pin 'wraps' back and is placed into the smaller of the two receiver holes. The entire set-up is held on with a nut rather than with a cotter pin. The purpose for the nut is to allow the user to really 'tighten' the entire unit. Hitches are simply fabricated, they are not machined. Consequently, there is a little bit of 'slop' built into them. In addition to using the hitch for a bike rack I also use it to pull a Kendon tip-up motorcycle trailer. The 'slop' on a normal setup (after a 10-hour trip) really begins to jangle my nerves. This U-shaped pin that I use largely stops this by almost making the tow bar/receiver unit one piece. By the way, the pin also has a lock that slips over the end and is keyed for security. -
What is the 'extra' electical connector used for?
DD 430 replied to DD 430's topic in Cargo, Hauling, Roof Racks & Towing
Thanks! -
I've got an '08 Edge with a backup sensor installed on the car. I'm in the process of installing a Hidden Hitch on the car. Preparing for the installation, I've notice that positioned on the floor pan of the car just to the rear of the spare tire there is an electrical connection on the end of wiring harness. Do any of you folks know what this connector 'feeds'? I'm hoping that the factory hitch harness (PN: 7T4Z-15A416-B-E09) plugs into it. What are the odds of this being the case?
-
I do have the reverse sensing option and no factory installed hitch. I also have the connector. Has anyone figured out what it is used for yet? I've actually discovered a Ford wiring harness that is supposed to be 'plug and play'. The part is described as "2009 Ford Edge Trailer Hitch Wiring Harness". The PN is: 7T4Z-15A416-B-E09. I'm going to track one down in the morning and see what it looks like. By the way, I just got rid of a 2005 Passat 4-Motion wagon. With the exception of the heated seats that the VW had (and I don't have in the Edge) the Edge beats the VW hands-down.