BMWR1200c
-
Posts
36 -
Joined
-
Last visited
-
Days Won
3
Content Type
Profiles
Forums
Gallery
Everything posted by BMWR1200c
-
Rubber Splash Shield (maybe???)
BMWR1200c replied to BMWR1200c's topic in Accessories & Modifications
This is the pail I bought in case anyone else is really, really bored and wants to do this: https://www.lowes.com/pd/MOXIE-2-Gallons-Black-Plastic-Touchless-Kitchen-Trash-Can-Indoor/5014118767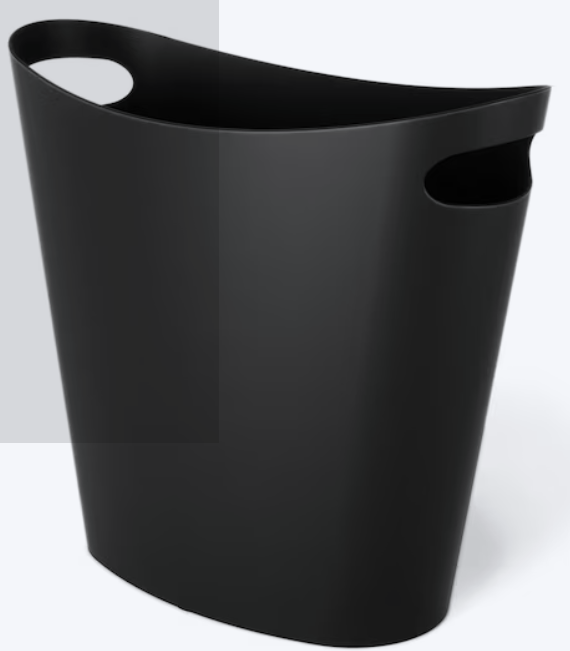
-
Rubber Splash Shield (maybe???)
BMWR1200c replied to BMWR1200c's topic in Accessories & Modifications
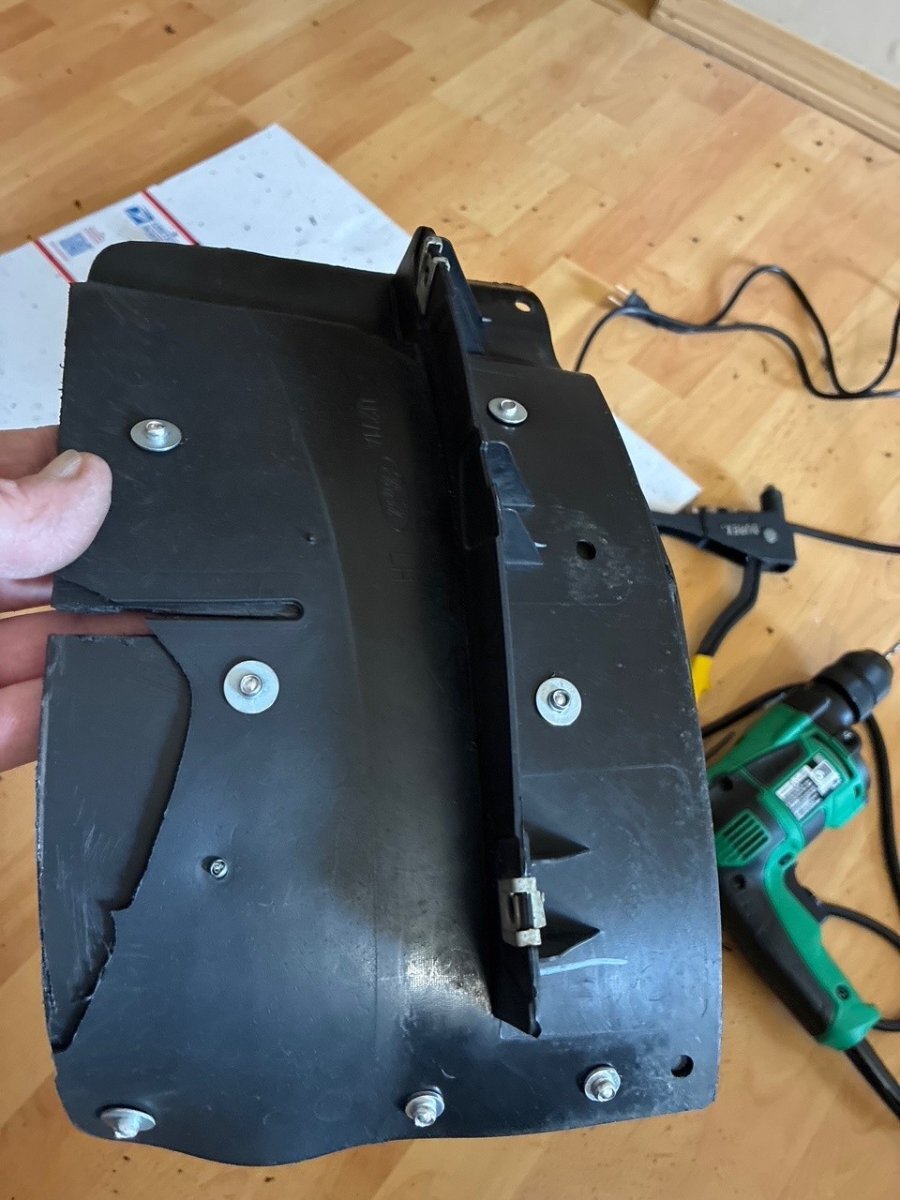
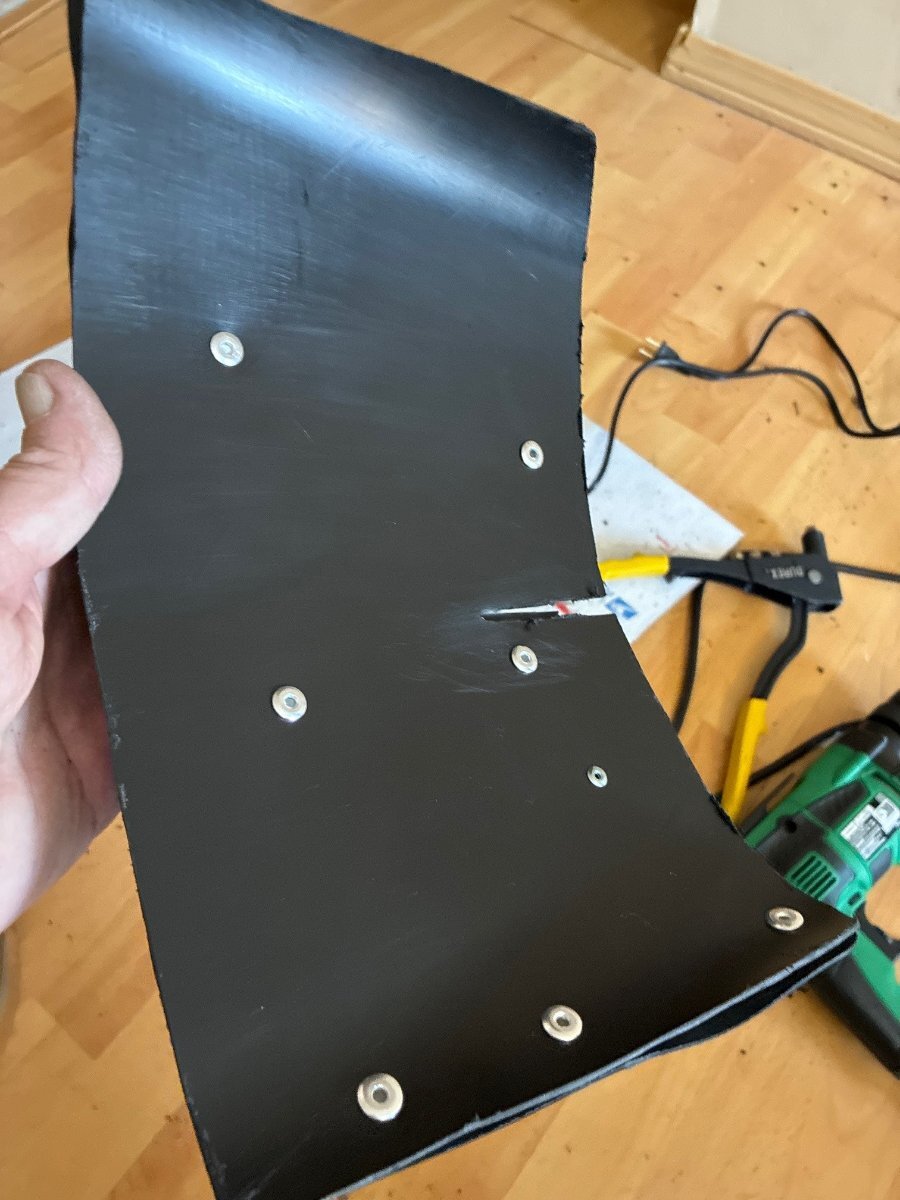
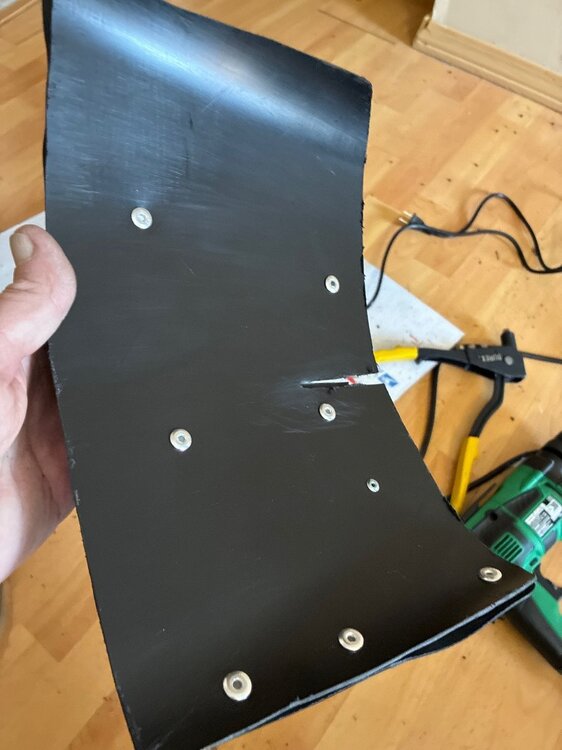
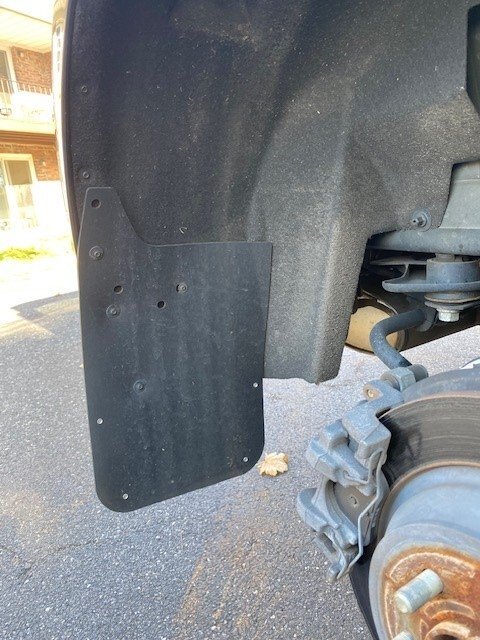
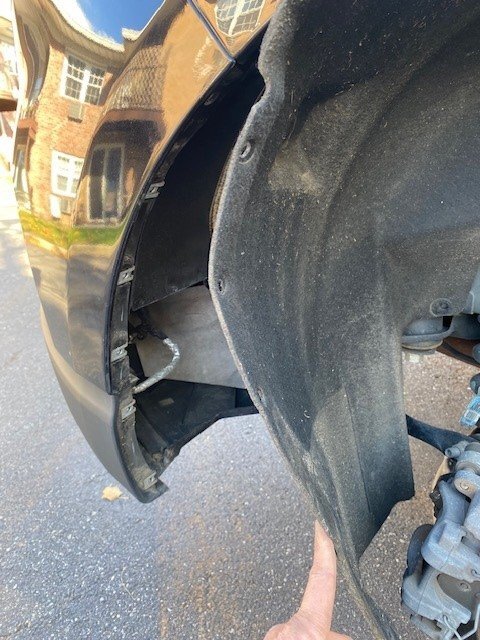
Finally got to this project today. As previously stated, the splash shield is not sold separately. It is sold as part of the front fender liner. There are 3 plastic rivets attaching the shield to the liner, as well as two 9/32" bolts underneath. For easier access I also removed 2 plastic push pins and two 7/32" bolts attaching the liner to the fender. Used a pair of snips to break and remove the 3 plastic rivets inside the liner. Went to Lowe's and bought a black plastic bathroom garbage pail for around $8 that appeared to be the same thickness and material as the splash shield and was almost the same curvature/radius. Cut the pail in half the long way, flattened it out and traced the outline of the OEM splash shield on the garbage pail and used a dremel to cut it out. Smoothed all the edges and used about 10 aluminum pop rivets with small washers on the back side to attach the new plastic to the OEM shield. Used a heat gun to sort of melt part of the plastic to conform to a couple of curves in the OEM shield. Bought a Pittsburgh 7" Poly hand riveter kit for $12 at Harbor Freight, which came with an assortment of plastic rivets. Used that to re-attach the assembly to the fender liner. All in all about an hour's work, spent around $20 and its better than new, twice as thick as the original and looks fine. I even spray painted the aluminum rivets black, just because. And no need to remove the wheel/tire. With the steering wheel tuned full left there was plenty of easy access. Done and done!
-
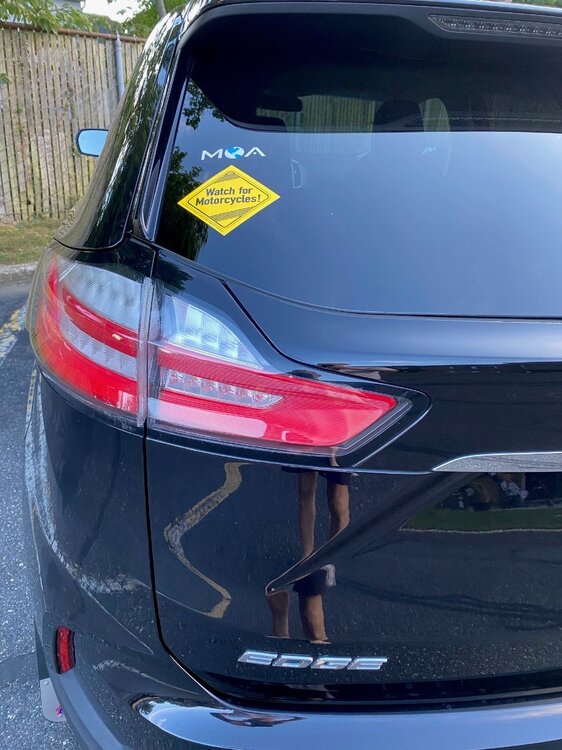
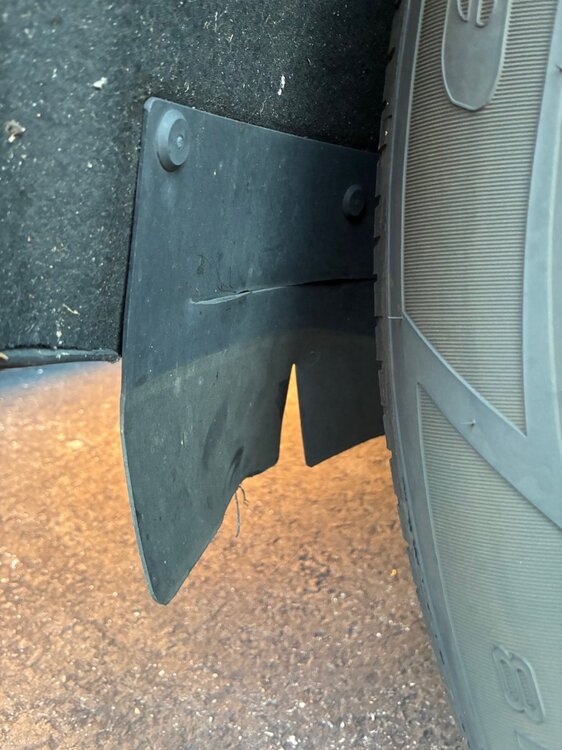
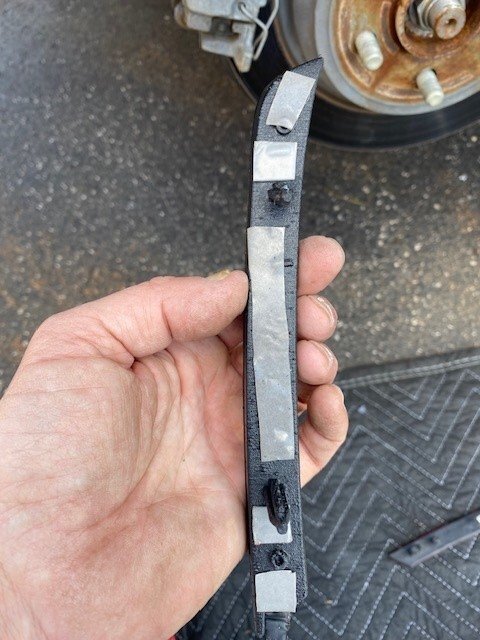
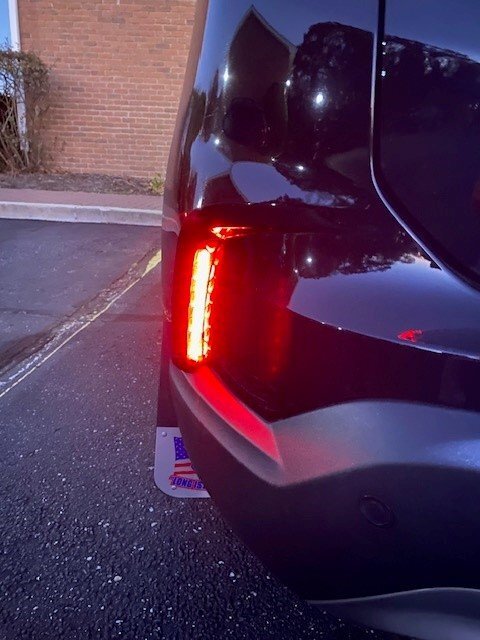
I need a part number and/or description for a part I need to replace on my 2020 Ford Edge SEL. Best I can say its in the left front wheel well, attached close to the bottom of the front of the wheel well liner with either 3 or 4 push pins, feels like its made out of rubber and has what looks like a factory vertical split about mid-way. Looks like a rubber splash or gravel guard, I guess. Searched the microfiche for fender and body parts and couldn't find it. Thanks much in advance. Here it is in all its beauty......
-
@fishx65 Taken just now...

-
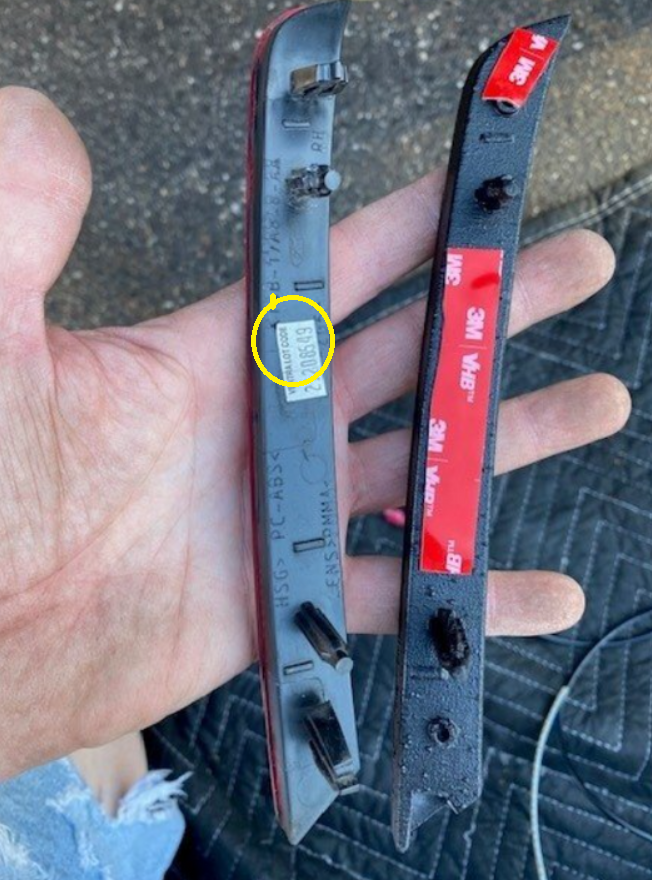
They look the same as in the photos above. I just cut the same notch in the bottom of the OEM reflectors as the 3D printed ones had. They look exactly as bright when lit, just normal red reflector color when not lit. And totally no need to remove the rear wheel. Only did that on the first one until I realized it wasn't necessary. Just had to carefully drill a hole where the yellow circle is using a 3/8" drill making sure to just go through the back black side, not go deep enough to cut into the red and stay centered to not hit the edges, and not crack the whole thing in half. Then used a small file and pick to get rid of some plastic mold stuff inside the 2 halves of the reflector that was in the way. Sounds more complicated than it really was. Slow and easy was the trick. Don't get a second chance with these things. If you attempt this, try installing the LED strip first to see if you can get away without drilling the hole. That will depend on the thickness of your strip. A hair makes a big difference as space is limited. BTW, once the drill bit is almost through, it bites or grabs, and the piece wants to start spinning. Be careful not to crack the assembly. Next one I might try melting a hole with a soldering iron to avoid the stress making sure the scrap pieces don't fall inside. Then deburr the surface so it lays flat against the bumper insert.

-
It's been a while and unfortunately I can't recommend this vendor anymore. I had multiple LEDs fail in his light strips. He was nice enough to send me replacement strips free of charge but they soon failed as well. When I tried to remove his 3D printed parts, the double sided tape was so strong it ended up breaking them into multiple pieces. When asked why his lights failed he said they weren't intended for use as running lights, and said maybe they'd be better suited as additional turn signals, as they wouldn't be on as long, although his ad doesn't say that. I ended up purchasing a new strip of LED waterproof lights from these guys in Vermont: https://www.ledsupply.com/led-strips/waterproof-12v-led-strip I got 3 feet, red, and 60 LED high density. They are waterproof rated to IP65 and were only $19.99. They are the same width as what I originally had but about a hair thicker. I did use his idea but with the factory reflectors this time. I notched out the bottom of the red OEM reflectors enough to slide the new LEDs in (after I cut them to length), but had to drill a hole in the back side (which afterwards I covered with waterproof tape) in order to file out a small interior factory manufactured seam. After that the strip slid right it, wired it up, and it has been working absolutely perfectly. And now I have the best of both worlds.....running lights and reflectors!
-
A local auto body repair shop hooked me up. I'm good to go. 😁

-
Thank you again!
-
Thanks much for that info. Thread topic title corrected from "push nut". Guess I just need the correct inner diameter to fit the pins.
-
Anyone have the Ford OEM part number for a 2020 SEL bumper reflector speed nut? Just need the speed nut part number. Dealer couldn't find it. Thanks!


-
My lights are off in the daytime when the reflectors serve no real purpose. Since a car behind me can only light up my reflectors at night when their headlights are on, and both our lights are off during daylight (when there is no reflectivity), I see no issues since my ex-reflectors now light up. But I understand your point.
-
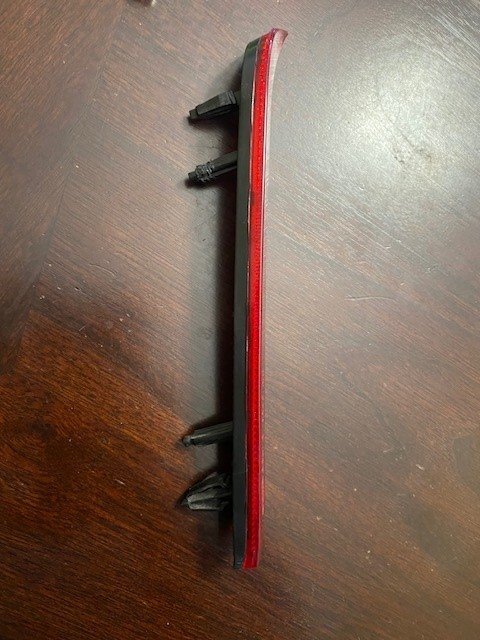
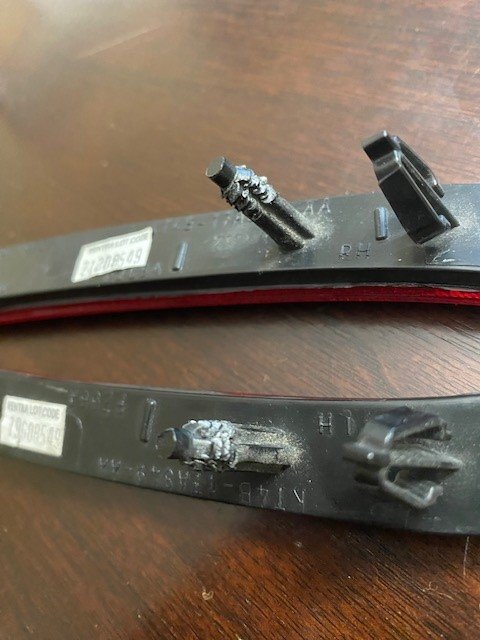
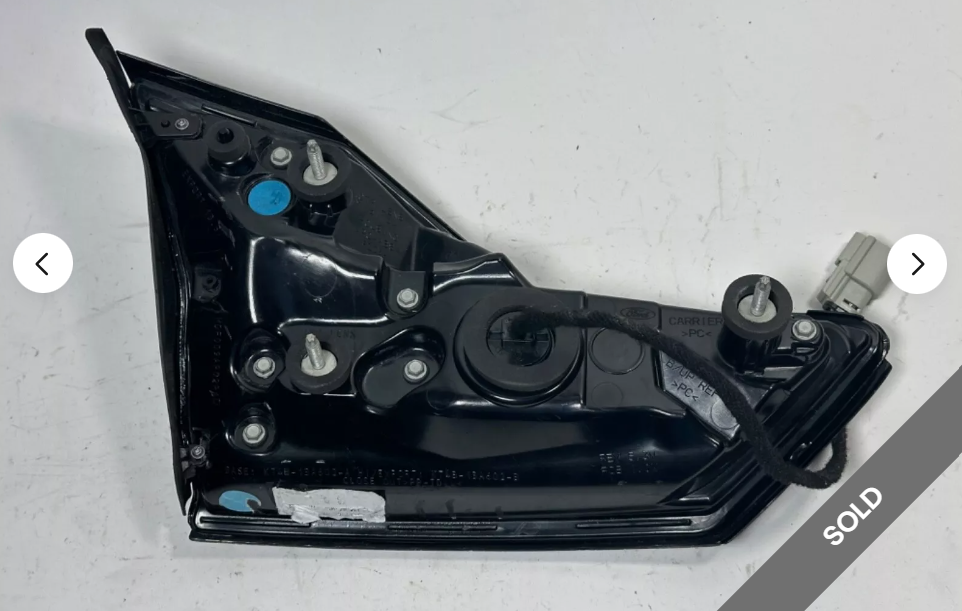
The new lights are not reflectors. They are solid matt black with an LED strip inserted inside. Not sure about the legality but in my opinion they serve the same purpose if not improve why reflectors were installed there in the first place. Here's the stock reflector: They are 3/8" thick. I suppose if one were motivated enough, one could slice it open to see if there's enough room to insert an LED strip in-between the halves since it looks hollow inside, then glue it back together. Guess it would be both a reflector and light then. I'm not inclined to do that right now. Or perhaps use a Dremel and just cut a notch in just the bottom end of the the reflector to insert the LED strip? I would also add that it seems only one push nut was installed by Ford on one pin of each reflector (even though the service manual shows 2), as can be clearly seen by the cut-in threads on one post, and no marks at all on the second one:


-
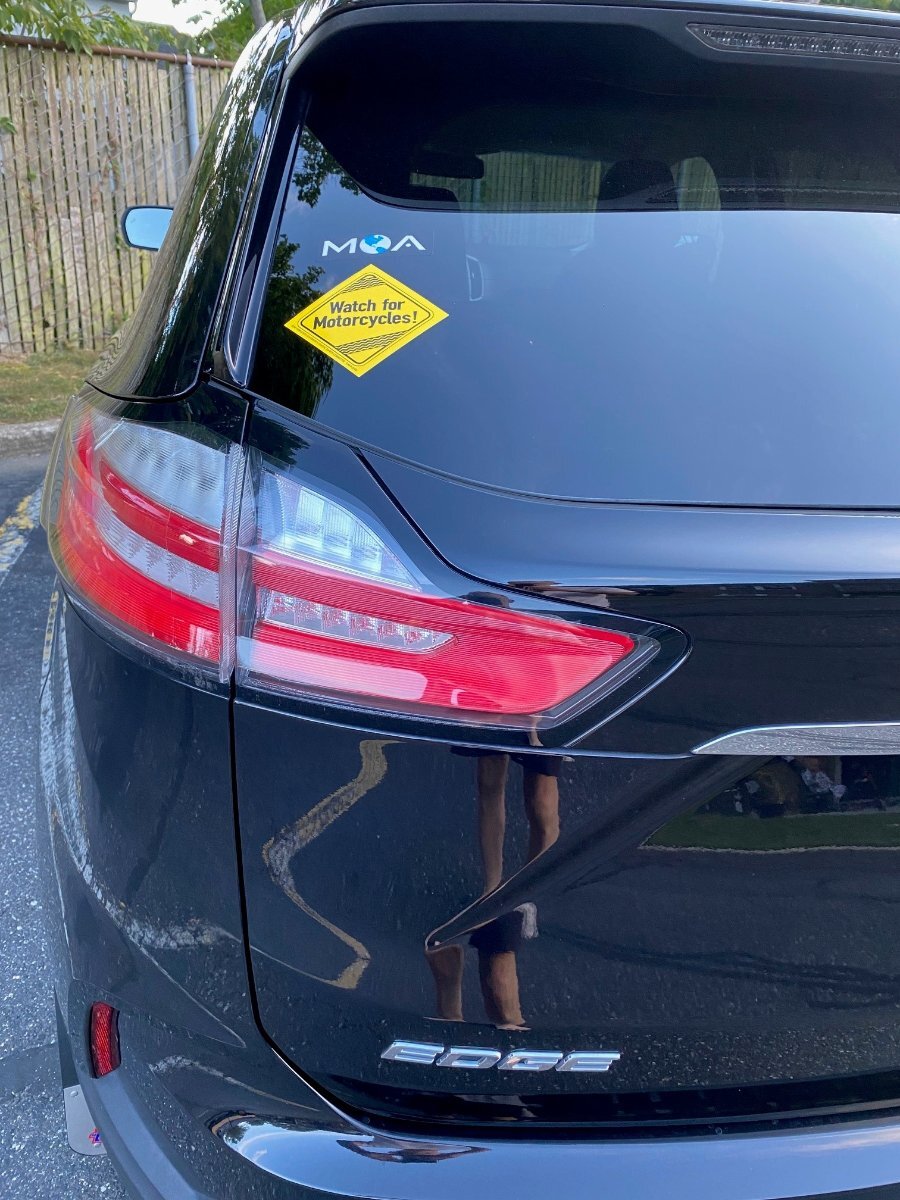
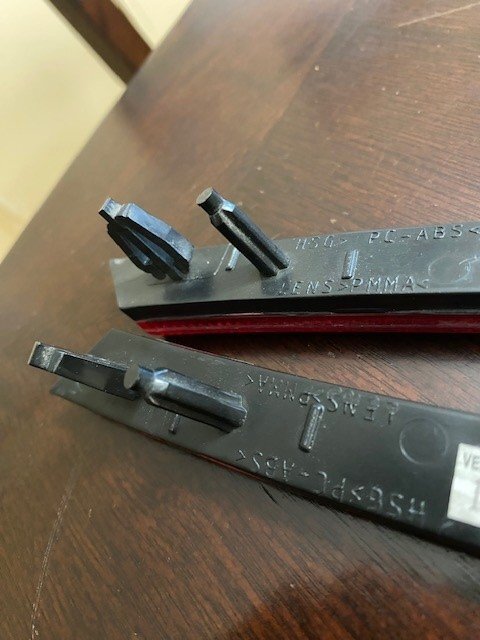
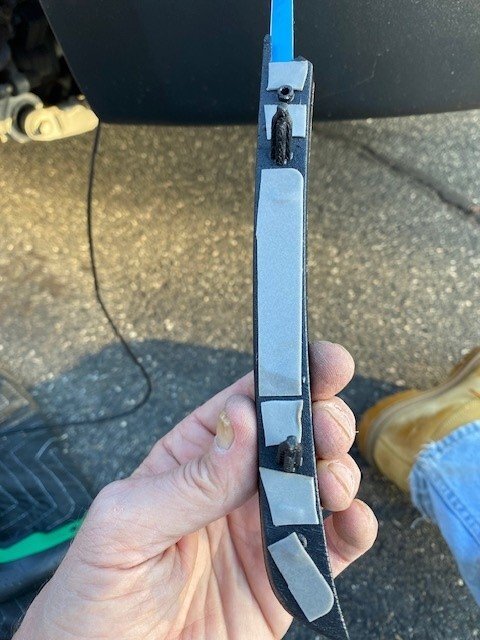
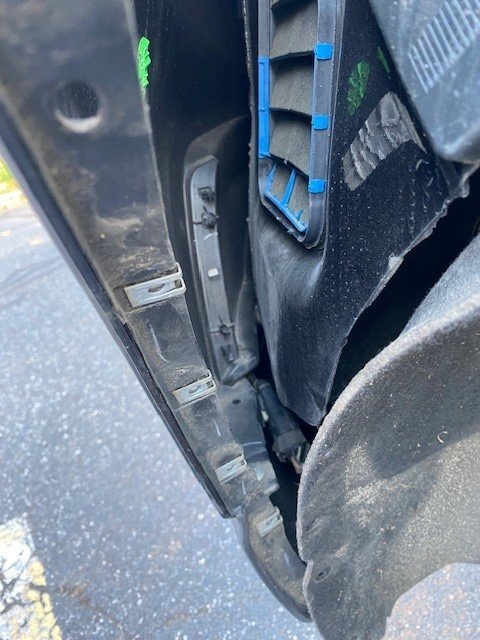
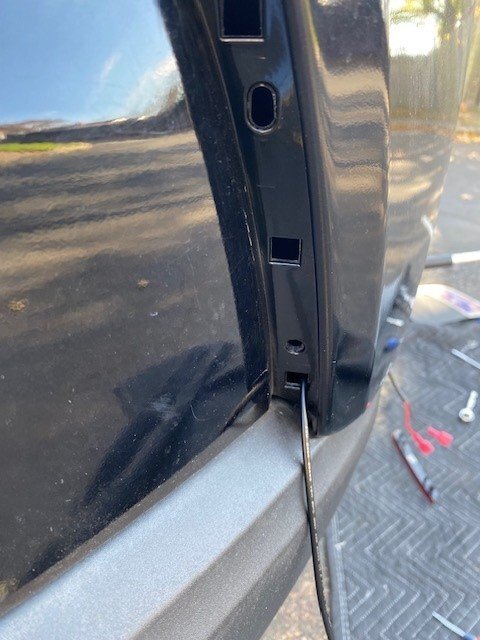
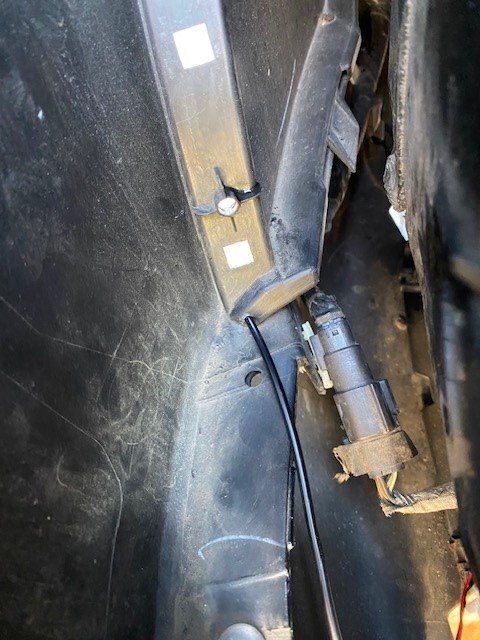
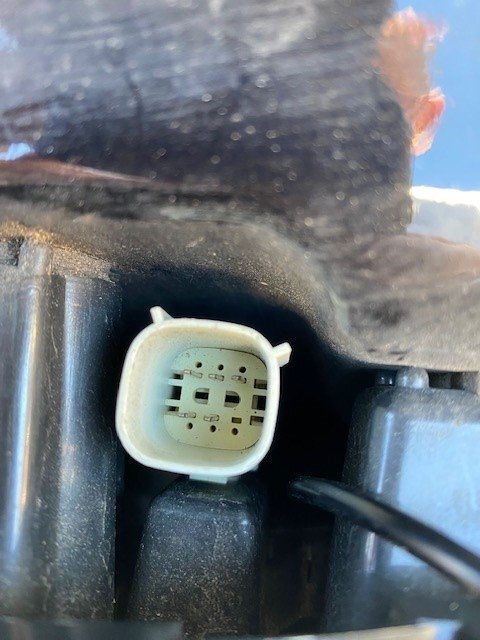
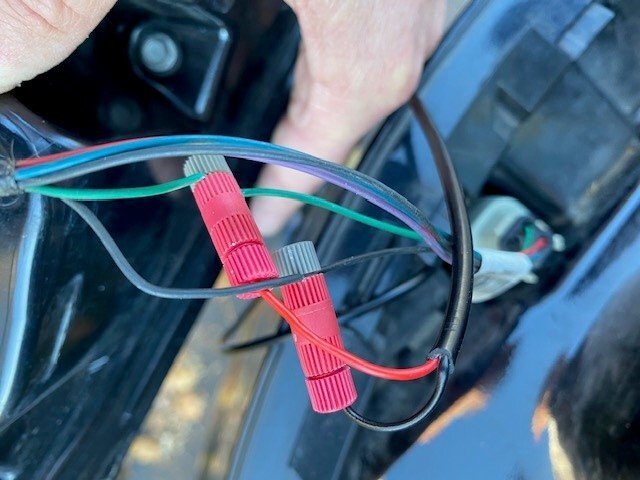
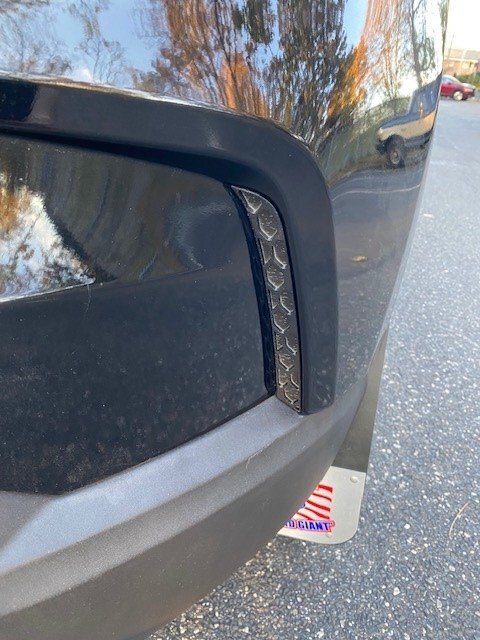
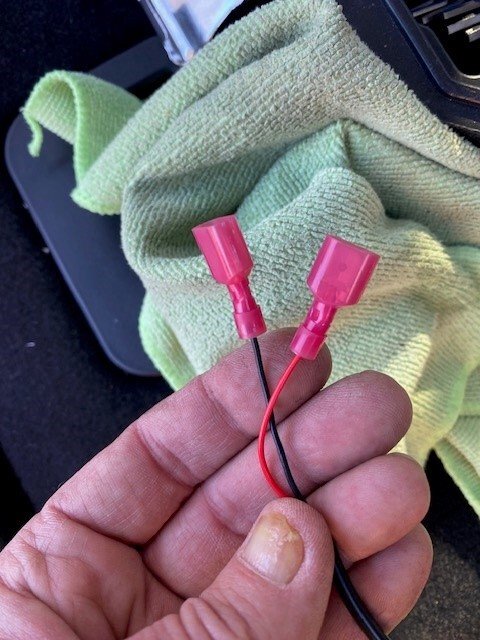
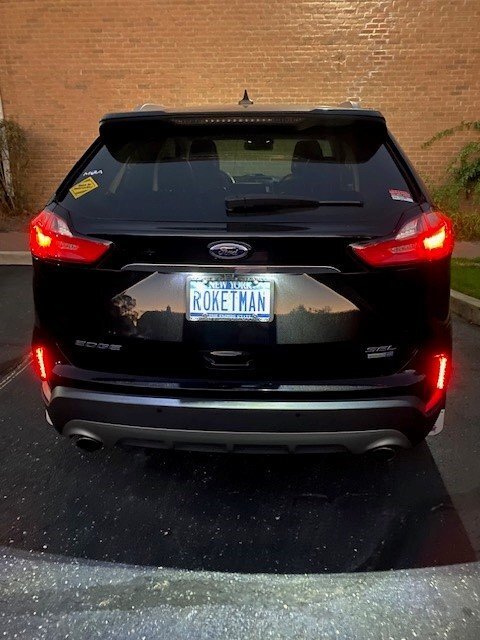
I bought this car in July and like a lot about it. There's other things I don't like so much, but have been addressing and improving these things over time. One of the worst design features of this car is the absolute anemic rear lighting. With the rear hatch lights not functional in this 2020 SEL trim model, and the cost to upgrade to Titanium or ST hatch lights, I knew there had to be a better solution. I needed more "rear facing" lights mostly for safety reasons, as opposed to "side lighting", which is mostly what the current tail lights give me. Came across Zeus 3D Printing in Clearwater, Florida owned by Emil Katzarski quite accidentally during an extensive Google search: https://zeus3d.net/?srsltid=AfmBOorO0O2DjTbDAtMV25AiJb1mms3rWaBZ3b_Lf2Hg2sQetAp7yW8u After several phone conversations and e-mails, I pulled the trigger on a pair of his "ST Rear Reflector Replacements": https://zeus3d.net/products/2019-ford-edge-rear-reflector-replacement Ordered them on 10/4/2024 and received them today on 11/7/2024. They're custom made, not sitting on a shelf, and I suppose the recent hurricane didn't help. I ordered "custom color with LED strips" which got me the matt black version. Cost was $60 for the set of two, and there's a discount code for free shipping. Here's a pictorial of how I did the installation, and why I did it the way I did. First side took me about an hour or an hour and a half, as there was a learning curve. Second side took all of maybe 15 minutes. First, tail lights need to be removed. There's a little square shaped plastic plug which is (gently) and easily pried off with a small flat head screwdriver. Under that is a T25 torx head screw that needs to be removed. I put some painter's tape inside that recess prior to removing that screw, so if I dropped it, it wouldn't disappear into the abyss. Then I followed a YouTube video (there are several) to slide the tail light rearward and remove it. There are simply pins in the housing that go into recessed holes in the body. Only thing is I tried masking tape like the guy in the video did, and it immediately ripped. Duct tape worked much better. Once the light has been removed from the body, just unplug the connector coming out of the light from the other connector fixed to the body. Set the light aside. Next I had to remove the OEM reflector. Its got 2 plastic pins and 2 "springy" plastic clips. Each pin is supposed to have a metal push nut on it, but mine only had the one push nut on the top pin. Either it fell off many years ago, or was never installed. Either way, here's a photo of what's supposed to be there: Here's what the push nut looks like: Even though I know it was pushed on, I used a 10mm deep socket on a 1/4" drive ratchet with an extension to unscrew it. Used the same method to reinstall it although you might want to try actually pushing it back on to avoid the possibility of breaking one of the new pins. Thankfully I broke nothing today (for a change)! Here's a comparison of the OEM reflector and the new LED light (more later): For the installation of the new lights I added a bit of extra 3M double sided tape just for insurance, and wiped down the recess that it fits into with rubbing alcohol first: Now.....how do you get to said OEM reflector? Well I'll tell you it's MUCH easier removing the rear wheels first. Gives you much easier access to what you'll need to get at. Also, I removed all the bolts holding in the rear wheel well/fender liners. I think there were like 6 or 7 of those (7/32") around the perimeter of the liner, and two 10mm cap nuts (one towards the front of the well, and one straight ahead over the brake rotor. I did not remove the liner......just took all the fasteners off so I could bend the liner out of my way without creasing or breaking it. However that only allows you to access the lower part of the OEM reflector. To access the upper part (in my case to access the push nut), I partially removed the top of the quarter panel where its simply held in with 4 tabs under the tail light assembly, and then the part that goes around the wheel wheel (I think there were 4 metal clips that just popped out there). I did the top first (pretty gently) then slid my fingers towards the front, and the remaining clips around the wheel well popped easily out. I expected cheap plastic that was bound to break, but they're all pretty robust. I wouldn't yank on them, but easy prying with fingertip pressure was more than enough. Here's a few pics: Inner wheel well..... Inner wheel well after fastener removal..... Top quarter panel tabs under tail light.... Quarter panel wheel well tabs...... Views of OEM reflector from inside Used one hand to gently pull the quarter panel away from the body and the other to remove the push nut, and squeeze the 2 plastic retainer ends together. Then the reflector simply pushes out. When installing the replacement, you'll need to feed the 2 wires from the LED strip up towards the OEM tail light plug. DO NOT make the mistakes I did..... DO NOT try to feed the wires through EITHER of these holes: If you do this, there's not enough room for the new light to lay flat in the recess. On one side I drilled a tiny hole UNDER the bottom square one, and fed the wires through there. On the other side (for some reason) there was enough space to feed them in without drilling. Can't see the hole I drilled anyway, so I'm over it. Also, clip the connectors off the ends of the new light. You don't need them, and they're too large to fit through a small hole (if indeed you choose to drill): Here's a few pics of that process with inside and outside views: Also, the LED strip slides into the bottom of the new 3D printed housing. DON'T FORGET to insert the LED strip into that B-E-F-O-R-E pressing the fixture into the body. Double-sided tape is a bear to remove if you forget. At this stage, assuming you've fed the new wires up towards where you need them, you can reinstall the fender liner. Electrical-wise. I used a test light on the harness that remained in the body to check for grounds and hots. There's 6 wires coming out of the light fixture, but only 5 pins in the onboard socket. The delivery came with a bunch of plastic snap splices, but I prefer Posi-Taps. The 20-22g ones worked fine. I bought them on Amazon but you can buy them direct or shop around. You only need four. Two for the grounds and two for the hots. https://www.amazon.com/dp/B0B3815XSG?ref=ppx_yo2ov_dt_b_fed_asin_title&th=1 In the harness plug, there's 3 pins on one side, and 2 on the other (with a blank space next to them). The pin closest to the empty space matched up with one of the black ground wires coming out of the tail light housing harness. The pin next to that matched up with a solid green wire coming out of the tail light housing harness. Here's how and where I tapped into them: Socket that stays in the car with 2 pins on bottom, and 3 on top.... Posi-Taps: (22g)...... Once the wires are tapped, good idea to plug the tail light back in, turn on your parking lights or headlights and make sure everything is working. If so, slide the headlight pins back into the holes, replace the T25 screw (shove something in the hole in case you drop it), push the plastic trim piece back over the hole, and you're all done. Here's how they look unlit (they are available in most any custom color you want): Here's how horrible my car's rear lighting was before: And here's the after: I gotta say, it was worth the wait, worth the money and worth the time I spent today. Oh yeah, no bumper removal was required. No body parts were actually removed at all. Just loosened and pushed out of the way. All in all, maybe 2 to 2-1/2 hours. Basic hand tools and a little patience went a long way. I highly recommend this relatively easy, inexpensive upgrade if you have the same feelings I did. Beats the heck out of trying to find reasonably priced used Titanium or ST lights, or the European fog light thing, then trying to figure out how to get them to work. I tried to summarize this as best I could. Feel free to ask any additional questions if you think I missed something......... P.S. These serve as "running" lights and are on when either the parking lights or headlights are turned on. They are not spliced into, nor function as turn signals or brake lights. If you choose you can figure out which wire feeds the brake lights or turn signals and tap into either of those lines instead, but these replacements are SINGLE feature lights.


-
When a 2020 SEL windshield with the rain sensors is replaced, does the rain sensor need to be calibrated or recalibrated, or is it simply replace, plug and play? And are the rain sensors integrated in the glass, or just replace the windshield and re-use the old sensors? Thanks!
-
European rear fog lights
BMWR1200c replied to scorpionking0102's topic in Accessories & Modifications
Also, what's the correct lug nut torque? Thanks! -
European rear fog lights
BMWR1200c replied to scorpionking0102's topic in Accessories & Modifications
Thanks. Same instructions for my 2020 SEL? -
European rear fog lights
BMWR1200c replied to scorpionking0102's topic in Accessories & Modifications
@WilkiST I ordered these a few weeks ago for my 2020 SEL. I think I paid $60 for the set of two lights in matt black. They should be arriving soon. Gotta figure out how to get the old reflectors out first. Risky way is to remove the tail light and pull the rear quarter out a bit, but risk breaking the tabs. Gonna try removing a few screws from the rear wheel well liner and see if I can access the reflectors. Probably less destructive. Then tapping into the hot and ground for the tail lights and I should have rear running lights. This car is severely lacking in rear lights. https://zeus3d.net/products/2019-ford-edge-rear-reflector-replacement?srsltid=AfmBOoqC4C6BEDD2f_Ky6cmSY3ZnLJ8kEZ4oxtcuLtSbwlix69o2GPG2 -
Heated Mirror Question
BMWR1200c replied to BMWR1200c's topic in Glass, Lenses, Lighting, Mirrors, Sunroof (BAMR), Wipers
You sure are helpful. -
Heated Mirror Question
BMWR1200c replied to BMWR1200c's topic in Glass, Lenses, Lighting, Mirrors, Sunroof (BAMR), Wipers
Thanks to both of you. -
Found another rear light enhancement option. Waiting to hear back to see if it will fit an SEL..... https://zeus3d.net/products/2019-ford-edge-rear-reflector-replacement?srsltid=AfmBOoqC4C6BEDD2f_Ky6cmSY3ZnLJ8kEZ4oxtcuLtSbwlix69o2GPG2
-
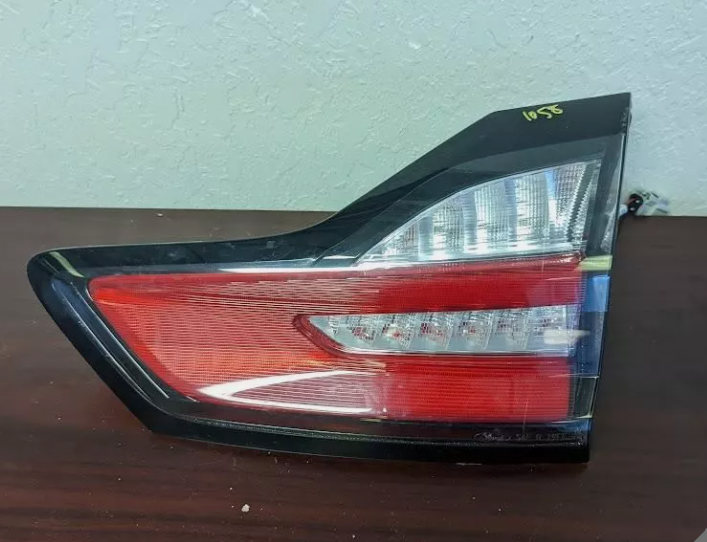
So here's a screen grab from Fleabay. There's gotta be a simple way to slice this puppy open, insert a couple of LED strips under the red reflectors and simply tap into the license plate wiring which is a couple of feet away, to at least get rear centered running lights since the license plate lights are always on with the headlights at night.
-
Should I assume low series are plain Edges and SEL's, and High Series are ST, Titanium and Sports?
-
2020 Edge SEL. Based on these FCIM results in FORScan is there any reason to believe my heated side mirrors and rear defroster are not functional and need to be enabled? Just got the car in July and still too warm out to test. I've seen FORScan say things are not enabled when they are, and vice-versa. Thanks!


-
It would help a lot if someone could post the wiring diagram of the lift gate wiring for a 2020 SEL and a 2020 Titanium to at least see if the wiring harness is even in the SEL, if I choose to add Titanium lift gate lights either with or without the center light bar.
-
Has there been a definitive answer whether Titanium (or other model) hatch lights can be installed in place of the SEL non-lighting "reflectors" and if so, what's needed to make them functional? From what I've read, SEL's only have the outside tail lights light up, but the hatch lights are non-illuminated. Last night I got flashed from behind by someone who thought my lights were out, which they obviously weren't. Can't imagine keeping safety in mind that it would have cost Ford much more to add functional LED's in the hatch. Here's mine.....