


Scarrz
-
Posts
18 -
Joined
-
Last visited
-
Days Won
2
About Scarrz
Scarrz's Achievements
")
Newbie (1/14)
-
 Rare
Rare
-
 Rare
Rare
-
 Rare
Rare
-
 Rare
Rare
-
 Rare
Rare
Recent Badges
-
100,000 miles on Gingie Did some PM on it today... -- Spark plugs (SP520A) and coil boots (WR-6135), thermostat (RT1228) and o-ring seal (RG571), filters, and cooling fan (tow package RF269). Spark plugs always take some time to get to the back 3 plugs. I noticed the boots were whitish at the tip, glad I'm replacing them. DONE -- Thermostat and o-ring is super easy to replace, about 10 minutes (would be 15min if I had to remove the intake filter assembly). DONE -- cabin and engine filter DONE -- Cooling fan assembly. I bought this Edge used, so no idea what was done to it. Since I now live in the south (a lot hotter), figured better pm this cooling fan before it dies (also why thermostat replacement). It comes out and goes back in fairly easy. When I compared the old and new, there is a difference. The old one is not the one for a towing Edge. It is now. DONE. -- Radiator flush. DONE
-
What have you done to/with your Edge/MKX today?
Scarrz replied to WWWPerfA_ZN0W's topic in Accessories & Modifications
Got the code... 0456 First I replaced the vapor purge valve with a ford oem I found on sale for $25, reset the check engine. Code came back... so tried several times to clean the fuel filler 'capless fuel' flapper. Still got the code. Replaced the fuel filler pipe $230 and the code did not return. Fairly easy diy... but expensive. Fyi, you can replace it by just removing the left rear wheel in about an hour. -
Code 0456 That code is back again and the check engine light. Opted to replace that dorman purge valve with a ford oem valve I found on sale for $25. I read a lot of folks having issue with that dorman, so I opted to just go oem. I cleared the code and in short order the check engine light back on again. Yup, the Capless Fuel Filler system died. This is just my opinion, but what was wrong with a twist off fuel cap? I have used them for 50 years, only took 5 seconds to remove, and if something went wrong with it or you lost it, only cost you about $10 for a new one. Seems to me auto manufactures wanted to have a steady stream of parts income.... so the capless fuel filler was designed. LoL. It is NOT cheap. Ford lists this for $270. Yes, I have read issues with the fuel filler capless 'flapper'... be it caused by dust and dirt, or old age (like me and my flapper... tmi.). I saw videos of people spraying lubricants and cleaners on the flapper to get it to seal again, sometimes it worked, but for me... NOT. Well, after a month of trying all of these 'fixes', and resetting the check engine light a few more times... decided to just get a new fuel filler pipe. I opted to go with ford oem and found some dealers selling them for about $230. You know, ford could have made this easier and cheaper by just making it short, about one foot long. You could then easily remove the left rear plastic wheel fender skirt, undo a clamp, remove the old one and reinstall a new one.... but it isn't. Ford's filler pipe is about four feet long with twists going to the fuel tank. Thanks a lot Ford! I saw a couple of videos replacing this part... one mechanic lifted the entire car, removed the exhaust mounts on both sides to lower the exhaust to get to twisted filler pipe, then he partially removed the skirt (not the wheel), and finally was able to get the filler pipe to come out. Ugh. I also saw another video of a diy'er attempting that same thing but at home. Probably other videos out there. It sure looked like a pain in the hinny! I opted to do it a bit differently, by only removing the left rear wheel: 1. I did this with about 1/4 tank of fuel in tank. 2. Block up the front wheels (both sides) for safety, and also set the ebrake. 3. Jack up and add a jack stand (leave both) for more safety, then remove the left rear wheel. 4. Partially remove the plastic fender skirt. I removed about 3/4 of the bolts and plugs to peel it back and expose the filler pipe. 5. There are only 2 bolts that hold the filler pipe. I used a lot of 'nocker lose' spray on those, then worked the bolts back and forth, spray, repeat, and they came off. 6. There is a rubber pipe, attached by clamps, that connect the metal filler pipe to the fuel tank. I only loosened the clamp attached to the filler pipe and twisted the filler pipe off. 7. Now you can pull that plastic fender skirt back to get to the fuel filler neck. You simply pull the filler pipe and it will pop out of the fender. Now you can remove the pipe. 8. Install the new filler pipe. This took me about an hour to do. It has been a couple weeks and still no check engine light. Hope this helps others. It is not hard to do. Ford does make it expensive though.
-
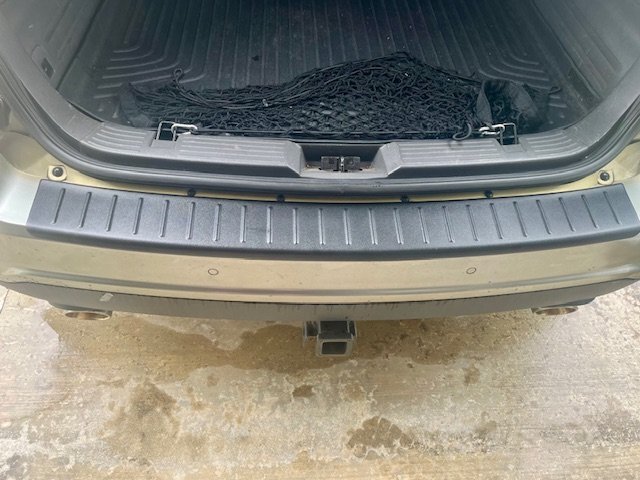
Update to this old thread... The check engine light came on. Read a bit and figured it was the infamous Vapor Purge Valve, easy suction test found it was bad. Replaced it with a Dorman #911-222 off amazon. Then got a tech at O'Reilly to reset the check engine for me so the light would turn off. The back bumper was getting some scratches and paint fading, so found that an AVS Bumper Protector (part # 114001) would work. This AVS is hard plastic, not flexible rubbery material. Install was easy... I notched it a smidge, around four bolts of the bumper, to get a tighter fit. Wow, that looks good... like it was made for the Edge (yeah, fitment says this Protector is for a 08-10 Scion XB) ! Rear Camera picture getting hazy and the camera started becoming intermittent mostly when outside temps got high. I replaced it with one off amazon. Dang, I should have done that a couple years ago! Sooo much better... it has a wider field of view, picture is so much clearer, and the camera lines turn with the steering.
-
Yeah, tis an old thread... but in case someone has an old Edge like mine and is interested in a Interior Light Switch Mod that turns off the puddle lights, interior lights, and trunk/hatch... this is what I did ---> HERE
-
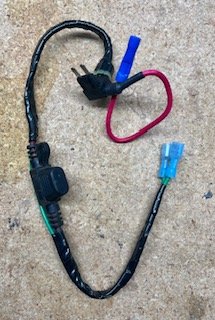
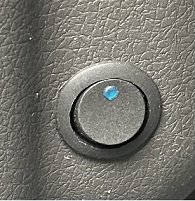
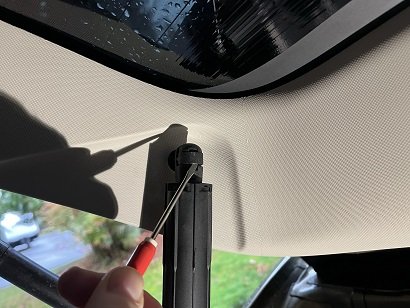
Time to get Gingie ready for some night outings this summer and I want to be able to easily turn on-off the interior lights and puddle lights... 'Dark Mode'. I found an old post ( HERE ) and decided to put my take on that mod for my 2013 Edge. Note: this mod does not turn off the exterior turn/parking lights when opening a door or using the remote. Interior Light On-Off Switch On my 2013 Edge SEL fuse #12 powers the puddle, interior domes, and hatch/trunk. So... one fuse does them all! Just need to pull fuse #12 and put in an add-a-circuit, inline fuse, and switch. Note: your Edge may have different fuse, so check your owners manual. Parts: ATM Add-a-Circuit (like HERE), in-line ATM fuse holder (like HERE), 16g wire (length depends on where you mount your switch), 20amp SPST switch (like HERE), and a couple female terminal connectors (like HERE). Tools: soldering iron, solder, crimping tool, and drill and bit to mount the switch. Okay, lets begin: -- Tin two ends of the 16g wire (about 1/2 inch), then use the hot soldering iron to flatten the soldered wire into a 'blade shape'. The goal here is to make these two ends be like the ATM fuse blades, to be able to tightly fit them into the Add-a-Circuit (where the ATM fuse would go). I then a protective cover over the two wires and taped it up. ---NOTE: I used an add-a-circuit because I wanted to have the option to add an additional electronic device later; but one could also other methods, like solder wires on a burnt fuse or other metal strips, or solder the wires directly into the add-a-circuit, etc. -- Solder in the 'inline fuse holder' (and put in a 15amp fuse in it), crimp on the female terminal connectors, drill a hole for your switch, and install the switch. Time: I already had these parts in my garage shop, so it took less than an hour to do. ( It took more time to put this mod on the forum than do the mod ? ) Edit: forgot to mention that all the 'map lights' work when the switch is off too. ?
.jpg.12863166b4092378ddbf3fa9fdada937.jpg)
.jpg.c4db6321b7a8f38daad7bb6aef779948.jpg)
.jpg.eaa8e6cfda7f50aa0c513bd6ad54f758.jpg)
-
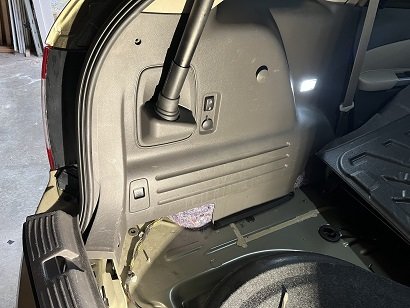
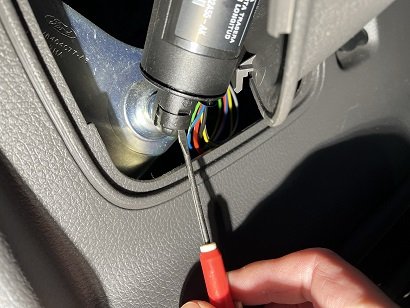
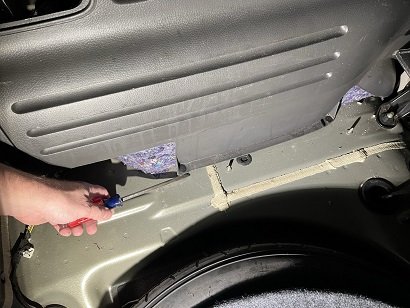
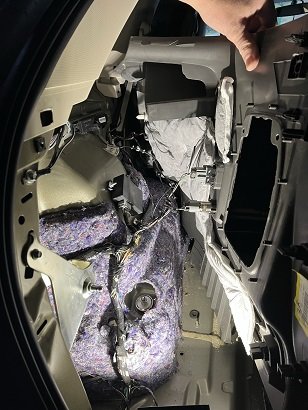
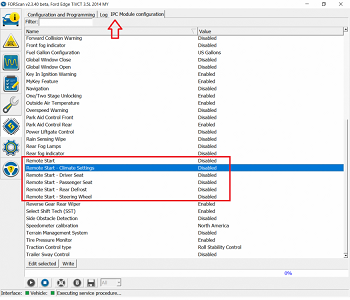
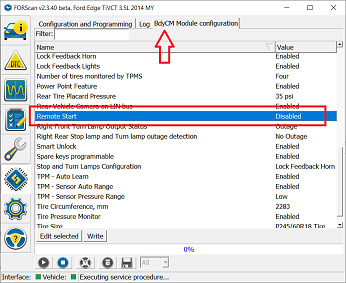
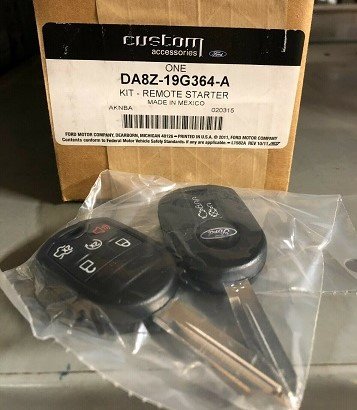
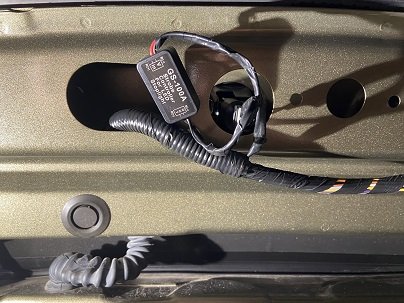
I decided to add the oem remote start to my 2013 Edge SEL. I did a bit of searching on here and found a few threads, and also found good info on other Ford forums. Then I saw where "thesavo" posted some FORScan info ( HERE ) . Just what I needed, as I didn't want to go pay the stealership. Since my Edge has the electronic rear lift gate, so it needed a 5-button remote. There is probably info on this forum to program a 5-button remote, but I didn't find an install. Hopefully this post will help others. After I got the keys cut, tried programming my 5-button remote via the typical "8 times on and off" with the ignition switch that I have read on many posts and forums. I tried it a few times, and it did not work for me. All I got was a horn beep. It didn't matter what button I pressed on the new remote.... a horn beep. Same thing with the other new remote. After more searching online websites... I found the 5-button remote is programmed differently (see programming below). Everything installed in about an hour and works! -------------------------------- Here's what I did for my 2013 Edge SEL (with electronic rear lift gate): Remote Start Parts - 5-Button Key (IKT): DA8Z-19G364-A ($140 + tax) FYI, I got the keys from HERE. Think there are 3 sets left. - Antenna Kit: DA8Z-15603-A ($40 + tax) - Hood Switch: BT4Z-19G366-A ($20 + tax) FYI, the hood switch could be eliminated with a jumper wire. --- Getting the new keys cut: this was not as easy (or cheap) as others have posted in the forum. I went to Lowes, then Ace, then Home Depot, and all of them stated they only cut their own keys. They actually seemed upset I was asking them to cut my keys. Scheesh. Maybe it's just this area, best o luck for others. I then went to a locksmith and he cut them both for $13. A really nice guy, and when I asked which method programmed the 5-button remote, he confirmed you have to use two programmed keys (see below). Tools - large screwdriver and small screwdriver - alcohol prep pad (to get best adhesion for double sided tape to stick on the antenna) - jumper wire (if you opt to eliminate the hood switch or need it to temporarily work) Programming the 5-Button IKT key/fob (you must have TWO programmed keys) Insert the first previously programmed coded key into the ignition. Turn the ignition from off to on. Keep the ignition on for at least three seconds, but no more than 10 seconds. Turn the ignition off and remove the first coded key from the ignition. After three seconds, but within ten seconds of turning off the ignition, insert the second previously coded key. Turn the ignition from off to on. Keep the ignition on for at least three seconds, but no more than 10 seconds. Turn the ignition off and remove the second previously programmed coded key. After three seconds, but within 20 seconds of turning the ignition off and removing the previously coded key, insert the new unprogrammed key. Turn the ignition from off to on. Keep the ignition on for at least six seconds. Remove the newly programmed coded key. NOTE: If programming was not successful, wait 10 seconds and repeat Steps 1 through 9. FYI, I had two new keys to program and needed to do the above for EACH key. FORScan (to program the Edge 'computer') BCM: Change “Remote Start” from Disabled to Enabled. This will change 726-19-01 from 0047 to 0148. IPC: Change “Remote Start” from Disabled to Enabled. This will change 720-01-03 from 002B to F823 FYI, below the “Remote Start” setting in IPC you will see.... Climate Settings, Driver Seat, Passenger Seat, Rear Defrost, and Steering Wheel that you can Enable too. Once these changes are done, you should see these settings on your dash, under Vehicle Settings. IF you do not use FORScan.... will probably have to take it to a stealership. ------------------------- Some photos ? Here's the keys. The new antenna goes behind the left rear panel. It only needs to be partly removed, just need to open it a bit to plug in, then stick on the antenna. Use a small screwdriver to release it on the upper and lower parts. I used a screwdriver to start popping off the panel. Pop up this pin, and pull the panel open enough to attach the antenna and plug it in. This is what you will see after you pull the panel open a bit. Attach the antenna with supplied double back tape and plug it in. This is where the switch will be. If you don't have one here, you'll need to get on. The hood switch is a safety switch. The hood switch connector is already there, just sort of hidden underneath. It is on a plastic 'stay' and swivels out. Unplug it off the 'stay', and attach it to the switch. I added a temp jumper wire (until the switch gets here ). These pics below are from 'thesavo' post I linked above (bigger pics on his post). The FORScan update was about a 10 min job. Then all DONE! ?

-
Thanks for this thread, and thesavo posts... especially the FORScan codes! I ordered some parts and will give it go. Edit: I needed the 5-button remote, and the key programming for the 5-button was different than the '8 times cycling ignition on and off' method. I posted what worked for me and some photos in my build thread---> HERE
-
WOW. I had no idea there was such a thing as…. LAWS…. says no one! ? It is sad that there are people in this social media frenzied world that feel they have the right to dictate their 'beliefs' onto others, with little to no information about the subject, and without knowing the person or ever meeting them! Tell me... would you walk by a someone's car and tell them that their tinting is illegal? Do you carry leaflets with local state laws to hand out after telling the owner their tinting is illegal? I highly doubt you would! So then why do you feel it is appropriate to dictate your beliefs to someone on a forum that you have never met? I am sure you are not the only one lurking in the shadows on this forum, so please, take this advise before you post another thing, and do us all a favor and simply ask yourself this before you post a reply... ----"would I say this to a persons face, especially someone I have never even met? " If not, then don't post it. By the way, if you had posted in a more tactful and appropriate format,... you would have gotten more information on what was actually done. Unfortunately you and other trolls get your jollies without getting a complete picture... and instead make huge assumptions of themselves.
-
Got the windows blacked out with some limo tint. Dang expensive here in the northwest... $410. But then everything seems to be expensive here ?
-
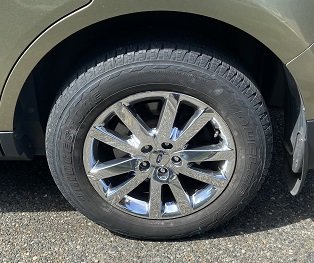
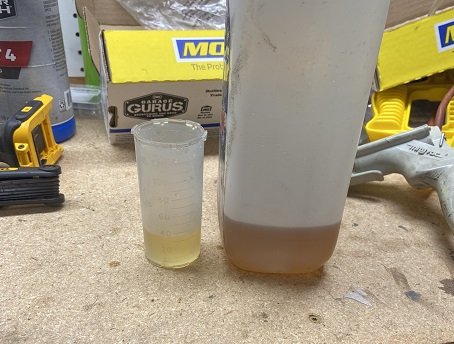
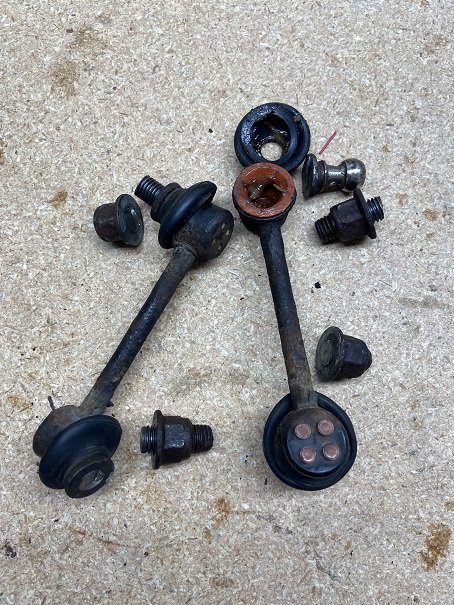
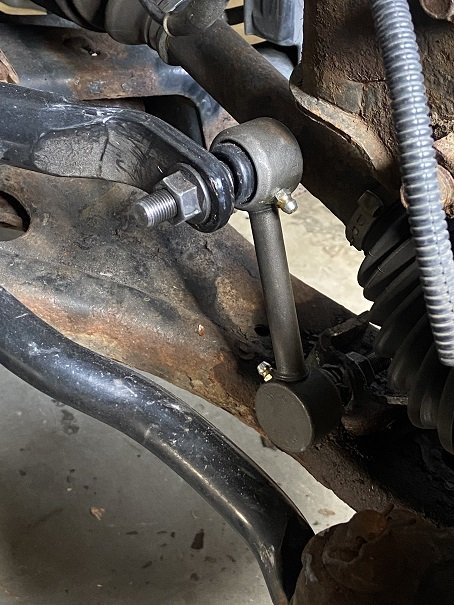
A couple of updates... Finally a nice sunny week here in the 'northwet', so I decided to remove what looked like 9 years worth of neglected chrome cleaning... and shined em up. As I was getting up close and personal with each wheel, I noticed a bit of weather cracking in the tires. There is a lot of tread left, and I 'assumed' tires were good. Date code is not on the outside, so going to need to pull the tire to find it, and since I was already planning on flushing the brake fluid and putting on some new end links, I'll checked it then. The moog stabilizer end links arrived, (best price was on amazon, and the zerks were on the side, not on the ends... much better IMO). So time to jack up the front end to replace them and flush the brake fluid. First thing I did was check the date code on the tires. For those that don't know, the date code is four digits at the end. The first two digits is the week they were manufactured, last two digits is the year. So, 2320, would be the 23rd week of 2020, which is NOT the case with these tires as the date code is 3412! Yeah, I don't roll on old tires. So, just had some Michelin tires shipped to my local installer (michelin has a rebate going on). Moving on to the brake fluid and end links.... Grabbed my can can of PB blaster and soaked the rusted threads and the brake bleeder screws, and went back in to have a cup of coffee, then after a while back out to soaked em all again, went inside and had another cup. Then grabbed my mityvac8000, a 5/16 wrench, and some DOT4 fluid. The bleeder screws easily loosened, and I flushed the right front. Then some more pb blaster on all the end link nuts, and flushed the front driver side side brakes. Yup, new fluid looks good doesn't it? ;-)= Now to see if those 8 year old oem end links were going to be a pita to remove. FWIW, this Edge only has about 70k miles on it, but my gut has been saying I need to replace em. I started on the passenger side and only got the nuts about 1/3 unscrewed, which seems to be pretty common from what I have read. It was enough room to use my old dremel with 1.5" cut-off wheel to cut the old bolts off. Then I installed the moog links and greased em. Then on to the drivers side... Hmm, much tougher to loosen, and not able to get that nut 1/3 unscrewed, but thankfully it was just enough room to get that small cut-off wheel in there. FWIW, I opted to cut the top end link nut off first, then cut the lower as I could move the link arm around to cut the lower easier. On the passenger side, when the bolt was over 3/4 cut, I simply grabbed the link and pulled/wiggled it back n forth to break it off. Well, on the drivers side, I grabbed the link, and the link pretty much fell off the ball joint! Wow, looks like my gut was right about replacing these links! I also have some rear links coming soon.
.jpg.380e39824f6ff5ece4b02ef4311f44a3.jpg)
.jpg.575326f6c020fa7bfd5d60b7f935263e.jpg)
-
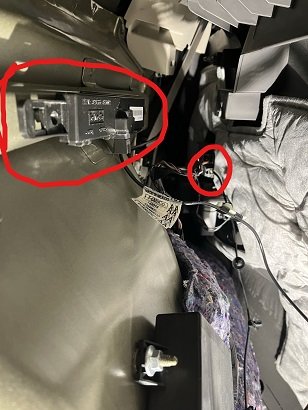
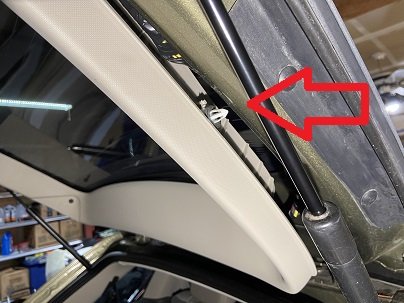
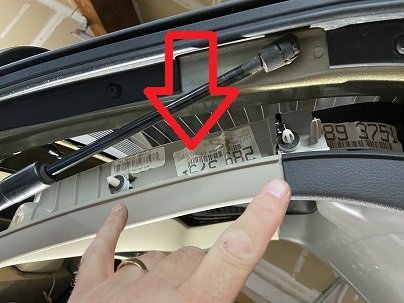
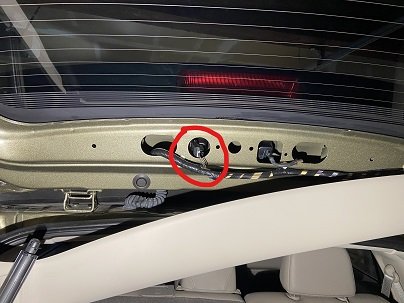
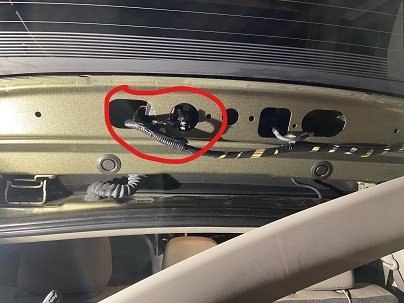
For those interested in how to install Flashing Strobe for the third brake light.... read on. I like do something like this to all my rides, including my mc's. IF lighting mods are not your thing... just skip the post. I will not reply to any tripe about laws and LE. FYI, it's your ride...your choice. Oh, and I was in LE, and many of my brothers would ask me about my lighting mods, especially my mc mods ;-)= Parts: Brake flasher strobe [ like HERE ] Install: This is about a 30 min install, maybe more depending how many beers you have. lol. I did not see an install about a third brake light strobe on this forum. If there is, well, here's another: First, unhook the power lift arm, where it attaches on the hatch door. This needs to be done to remove the upper portion of the plastic molding on the hatch door as that is where you need to access the wires. Removing plastic molding is tricky, no screws on my hatch, just clips. I started by pulling the plastic, near the top of the hatch, and unclipped the top section. Then you need to stop pulling from the top and work on the sides. The sides need to be pushed IN (toward the hatch rear window glass) in order to detach the those clips. It's a bit tricky, just take your time. I only removed the upper half of the molding to gain access the third brake light wires. photo below is the left side of the hatch. You have to push IN toward the rear window glass to unclip the clips in the photos. photo below is the right side of the hatch In the photo below, you can see that I left the molding hanging. All I needed was access to the third brake light wires to attach the Strobe (circled in red below). Photo below, there are two wires that go to the third brake light (pos & neg). Simply cut the two wires and splice in the strobe. Photo below, I used double sided sticky tape to attach the Strobe inside the hatch frame. Then just snap the hatch molding back in place and reattach the power lift arm. DONE !
-
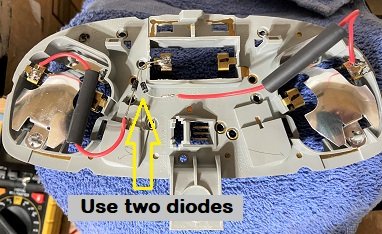
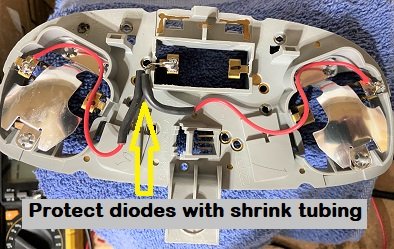
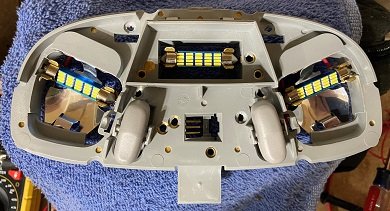
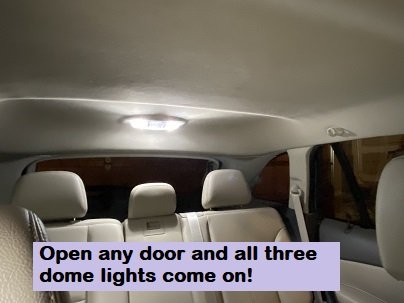
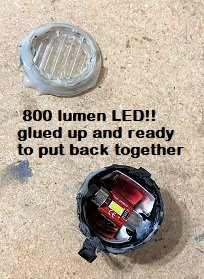
For those readers that prefer to see inside their car... this lighting mod is really easy to do. For those who are single, don't tote any kids around, or those that might be involved in criminal activity and need to keep your interiors dark.... might want to just skip this cool mod ? Light Mods Parts: two diodes [ like here ], a couple of short lengths of 22 gauge wire, shrink tubing, some solder and soldering iron. Here are some of the LEDs I used: Rear dome and map [ HERE ], Vanity Mirror [ HERE ], Front map lights [ HERE ], and Exterior 'puddle' lights [ HERE ]. FYI, I have read that some had lighting issues when switching to LEDs. I have no issues, but that may be because I have all three rear dome lights turn 'on' with the door and hatch, which adds a bit more draw. Dome Light Mod: This dome light mod changes the rear dome light so ALL three rear dome lights light up when any door or hatch is opened as well as all the other lights that normally turn 'on' when door or hatch is opened. This Dome Light Mod does NOT change the normal function of the rear map lights... except when a door or hatch is opened. So... when you are driving and a rear passenger pushes their map light 'on', only that map light turns 'on, NOT all three lights. :-)= So, you will need to remove the rear dome light assembly from the ceiling. It is removed by simply pulling it off the roof or maybe use some pry tools, then unplug the dome light and take it to your bench. ------------------------------- For the rest of the install, I'll let the photos tell most of the story.... In the photo below, you can see where the diodes are to be soldered, and where to solder the other end of the 22g wire. Just make sure you have your shrink tubing on the wire before soldering everything up :-)= Note: it is important to install diodes correctly, so make sure you install them as shown in the photo. If you are a novice using a soldering iron or don't know what to use, here is an example of an IRON and SOLDER. You might want to use a heat sink too. I find it easy enough to just tin the connections and diodes first... then connect them with a quick touch of the iron. Below photos shows the shrink tubing on the diodes. Below photo shows the super bright LEDs (link is in the above parts info) -------------------------------- Puddle light mod There are other posts about this.... but in brief, the puddle light is easily removed from the exterior mirrors with a small screwdriver, then you'll need to 'crack' open the the light, remove the old bulb, insert the new and glue the lens back on. Mine were easy to open.
sm.thumb.jpg.adbd2e456f8718c20cedcf30e255390b.jpg)
-
Makes sense... if I was doing something illegal. LoL. Hmm, am guessing you don't have kids or a wife that drives your car. ?
-
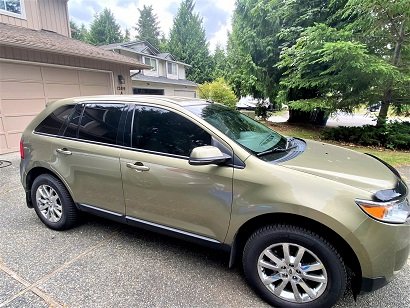
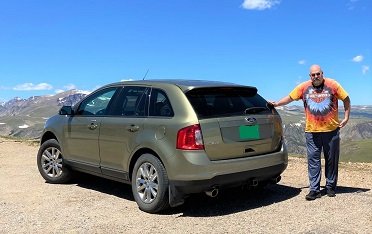
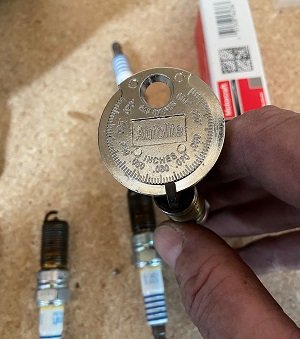
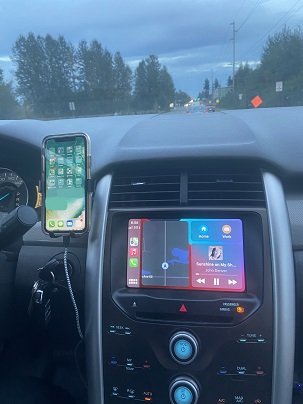
A couple months ago, I picked up a used 2013 Ford Edge with 63K miles. The color is called Ginger Ale, so it soon got nicknamed 'gingie' After driving Gingee around a few thousand miles, I quickly found a few things we didn't like. First, the Sync 2 and Nav is really sloooow, something the wife did not like at all (yeah she's into new tech). Then there's those worthless dim front bumper LEDs that do next to nothing,. Currently this Edge has the parking lights as DRLs. why. Photo below, Gingie on the Beartooth Highway. If you don't know about it, the Beartooth goes from Red Lodge MT into Yellowstone NP. I have ridden it many times in cages and mc's. The mc pic is when I did a coast-to-coast-to coast ride. Yeah, the Beartooth is quite a road! 1. Sound system upgrade. -- I picked up a new-to-me Sync 3... sadly it was DOA, and I returned it (I posted about it on the forum). -- I found another new-to-me Sync 3 (from a 2017 Lincoln). This one powered right up and worked fine, so I updated the APIM with my Edge info, added the heated seat icons to the home screen (wife uses heated seats about every day), and then updated the Sync 3 with the newest software v3.4 and 2019 map. -- While updating the APIM, I was able to change the DRLs from 'parking lights' to the oem white LEDs. FYI, having the parking lights as DRLs was causing the my new white LED switchback DRLs to not function correctly. It is awesome now! -- Also turned off the turn signal "hyper-flash" function so there is no need to add resistors when I will be upgrading to LED turns. 2. Modified a phone holder [ HERE pic below ]. 3. Upgraded the crappy front DRLs with some switchback LEDs. Much brighter now! 4. Flushed entire cooling system, and did a drain and fill on the transmission and power steering 5. Replace the spark plugs at 64k and decided to check the gap on the old plugs, 0.062, FYI, new plugs gap should be 0.051. Yeah, 10 off, so those thinking they should wait til 100k miles, might want to rethink that ;-)= And since the covers were off, popped in a new pvc. 6. Amp and speaker upgrade. Installed a 400amp Sony 4-channel amp that fits under the oem radio (pic below), and upgraded the speakers with some polk 571's. What a difference in sound! 7. Tossed in a new PCB65-750CCA AGM Battery 8. Husky weatherbeater floor liners, rear cargo net, and replaced front and rear original brake rotors and pads. Glad I did, I found (and fixed) three rusted/seized rear brake pins. 9. Exterior lighting completely upgraded to LEDs: headlights, switchback DRL-turns, front and rear turn signals, back up lights, brake lights, and installed some super bright 800 lumen LEDs in the oem mirror 'puddle lights'. Dang talk about lighting up the sides of the car! 10. All interior lights upgraded to LEDs too, and soon more LEDs in the footwell, cubby's, and doors. 11. Interior dome light mod. It converts the three rear passenger map lights to ALL turn on at the same time when you unlock the Edge, or open the door, or turn 'on' the interior light switch! (mod is in this thread). Yeah, those of you with a wife and/or kids who like to see inside the Edge will like this mod, others probably not. 12. Flushed the brake fluid (front and rear) 13. New kyb rear shocks. 14. New moog stabilizer end links (front and rear) 15. New michelin crossclimate II tires. 16. Remote start added (HERE) 17. Interior 'On-Off' light switch (HERE) 18.. TBA Modman ;-)=
.jpg.efa2ed90cb042ef8c728d74f045d25e1.jpg)


sm.jpg.c162d6a0cc05f282e2f8b4fde7a3ab18.jpg)