-
Posts
608 -
Joined
-
Last visited
-
Days Won
58
Content Type
Profiles
Forums
Gallery
Everything posted by Gadgetjq
-
For my '16 pin #1 (blue with orange stripe) is +, pin 10 Black is -. I believe your + wire is the yellow one though. Different years/models have different colors depending on options. If you have a couple of alligator clips connect them with a piece of wire then clip one to the + side of your multitester and the other to a simple pin/needle (household sewing kit). Stick the pin in the pin 1 (likely your yellow) connector (where your probe is too fat to fit) and touch your other multitester lead (-) to ground. With the ignition on you'll see power. Keep the pin and alligator clip extension with the multitester for future adventures in electricity. Edit to add: the mirror + may be connected to the accessory delay circuit so when you shut the car down your accessory may stay on for a few seconds/minutes.....or not, again depending on trim level.
-

Forscan to enable tow lights
Gadgetjq replied to mr_jason's topic in Cargo, Hauling, Roof Racks & Towing
27 Sport Wrote: " 4-way harness that plugs into the empty spot behind the passenger side tire. " Found the part number for the harness. Wire Harness - Ford (F2GZ-13A576-A) Google it and hit several sources for best pricing. Some vendors 'look' like a great price until you get to checkout and they hit you with handling/shipping costs. Here's a pic of the Edge harness tucked up behind the passenger side rear wheel Cheers! -
The strip I used is not but.....it really doesn't need to be. If you have water up to the underside of your hood you have much larger problems than a soaked led. That said there are many many led strips that 'are' waterproof. Search Amazon, eBay or one of the many online stores that specialize in leds. You can even get a colored strip if that's what works for you. Cheers!
-

Double Honk when Locking
Gadgetjq replied to urbanrules86's topic in Alarms, Keyless Entry, Locks & Remote Start
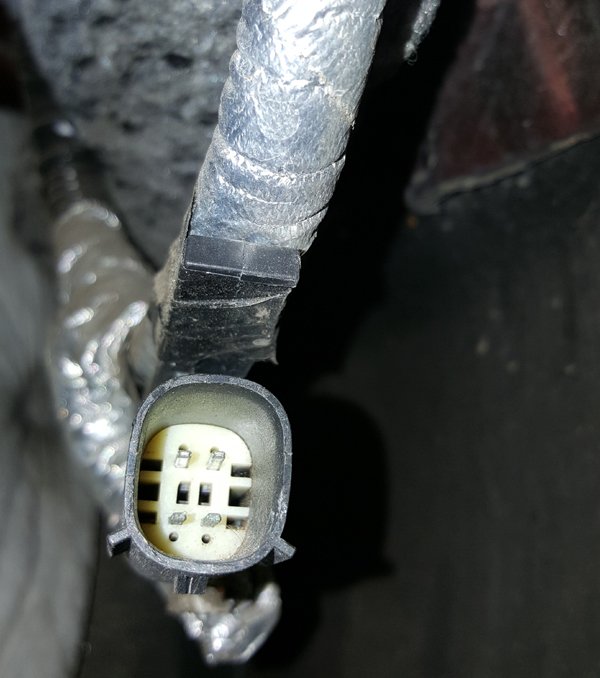
It's probably the device shown in the photo (below). As AK suggested it's a dealer installed tracking device. It's initially for their protection in case someone absconds with the vehicle from their lot (or during a test drive). Dealers typically try to charge the buyer several hundred dollars for it during the sale negotiation. If you refuse it they don't usually bother to remove it. Here's the thing. Before you rip it out by the roots (unless you opted to pay for it), consider taking advantage of the power and ground connections it offers. The trackers are usually attached to the harness someplace under the dash offering you a nice unswitched source at some point in the future. So, look under the dash, pull out the device then 'carefully snip the wires or just pull the plug on the box. Tape the + wire to prevent any chance of shorting out. -

What have you done to/with your Edge/MKX today?
Gadgetjq replied to WWWPerfA_ZN0W's topic in Accessories & Modifications
Hi SK, It isn't a kit, just a couple of easy to find parts (led strip and pin switch) plus a bit of 20 gauge (or whatever you have) wire. You'll find details in this thread: -

Double Honk when Locking
Gadgetjq replied to urbanrules86's topic in Alarms, Keyless Entry, Locks & Remote Start
I'm far from expert but suggest Occam's Razor (the simplest solution is usually the correct one) be applied here. Start troubleshooting with the simple stuff and work your way to the more involved fixes. 1. Try a different remote 2. Disconnect the battery for a few minutes then reconnect and see if the problem vanishes as mysteriously as it appeared. 3. Test the battery, maybe AAA gave you a weak/bad one 4. Try a master reset of the system 5. If you have FORScan and an OBD connection there are many 'horn' related settings 6. The most painful; head to the dealership and keep locking/unlocking the doors until they start paying attention to you Cheers! -

Ford Edge Forum: WHAT HAPPENED?
Gadgetjq replied to robertlane's topic in Forum Help & Site Suggestions
Hey Robert, It's good to hear all is well. I've only been a member for a month but I felt like I'd lost a friend for a couple of days not to mention a great resource. . Upside of your troubles, my PC is much much cleaner now. With all the red flags being thrown up by my browser (Firefox) I thought I'd been infected by something so began a process of multiple virus scans, a purge of cookies and even a browser swap (which should have been a clue since it was acting the same way). All stuff that probably should have been done long ago. Thanks for all your efforts, they're appreciated! Cheers! -

What have you done to/with your Edge/MKX today?
Gadgetjq replied to WWWPerfA_ZN0W's topic in Accessories & Modifications
Second ATF and coolant change. Once you've done each it's much easier and you don't end up removing unnecessary panels ? A tip (for gen2 based on my experience) don't remove the front under panel (and it's many many fasteners) 'do' completely remove the second panel on the driver's side. It's only 3 or 4 screws and a plastic keeper. You'll still be able to reach the radiator petcock and draining the transaxle is a snap. Cheers! -
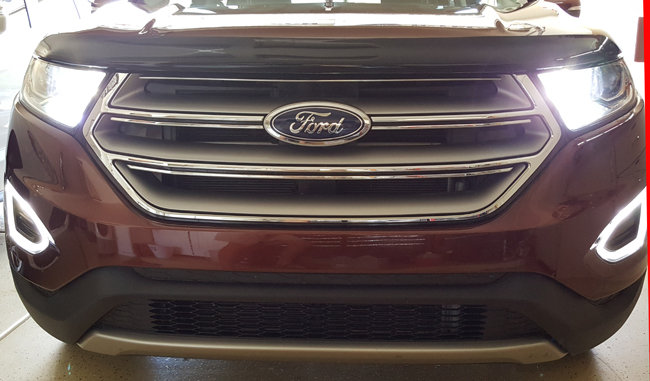
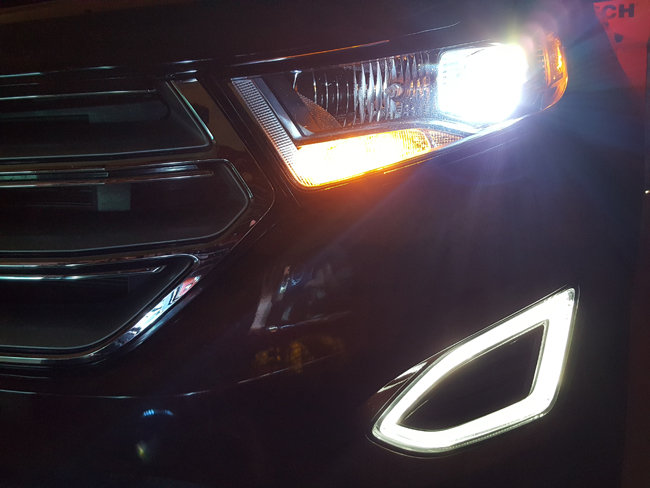
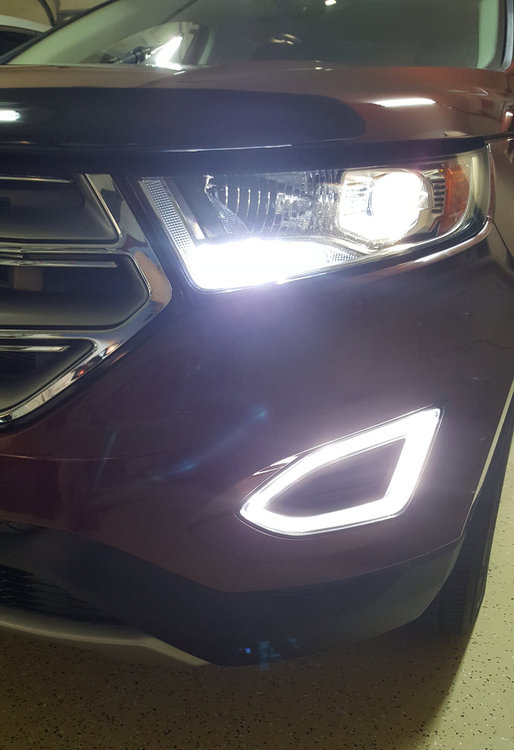
For the 16's one month anniversary (under my stewardship) the front lighting re-do....is done. I dumped the Halogen headlight bulb in favor of an HID kit (6000k) left over from a previous project. A Diode Dynamics HD Relay Kit was used to be sure both HIDs power up (they're powered directly from the battery now) and never flicker. An easy install. The high beam Halogen has been replaced by an LED from Oxylam. This is actually designed to be a 6000k fog bulb which is fine because the high beam is now.....wait for it......my DRL. Thanks to a little trick with FORScan you can set the front facing bulb you want to be your DRL and HIDs are not suitable (they'd stay on 'all' the time at full brightness). So, end result: A 6000k HID now lives in each headlight, a very bright LED (also 6000k) is in the high beam socket (so operates during the day when the headlight is off as a DRL) and in the turn signal sockets are Switchback LEDs (detailed in an earlier post) which show 6000k bright right beside the DRLs during the day, amber when turning or at night (headlights on). Downside? One. The LED isn't as bright as the original 9005 Halogen when used as a high beam but I'm a city/freeway driver and haven't needed a 'real' high beam in many years so this will work out fine. It might be an issue if you're a rural driver in need of every high beam lumen to spot suicidal wildlife. The 'Night' look with amber switchbacks and HIDs on. The 'Day' Look with Switchback turn signals showing white and DRL (former high beam) on Comin' at cha Cheers!
-

What have you done to/with your Edge/MKX today?
Gadgetjq replied to WWWPerfA_ZN0W's topic in Accessories & Modifications
Front End Lighting Change I dumped the Halogen headlight bulb in favor of an HID kit (6000k). A Diode Dynamics HD Relay Kit was used to be sure both HIDs power up (they're powered directly from the battery) and never flicker. An easy install. This completes replacement of all front end lighting (except the signature leds). -

What have you done to/with your Edge/MKX today?
Gadgetjq replied to WWWPerfA_ZN0W's topic in Accessories & Modifications
-
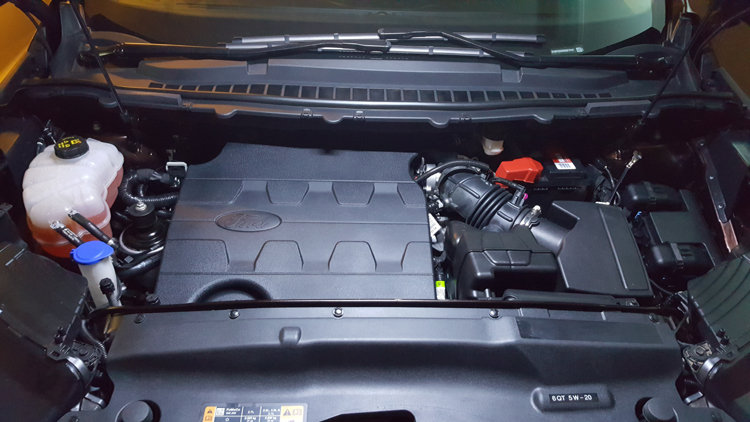
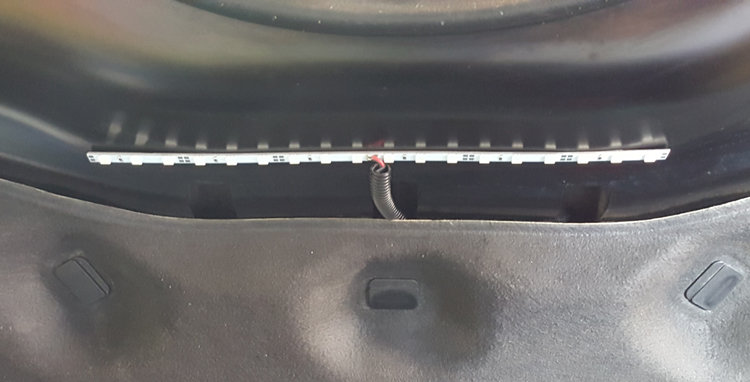
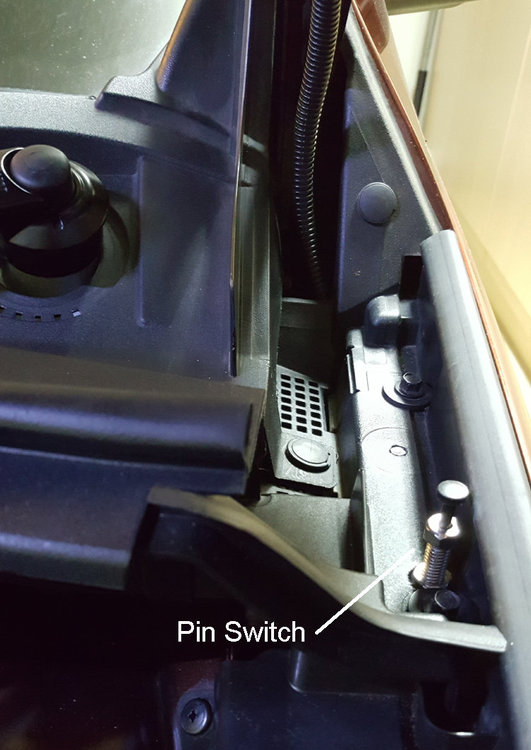
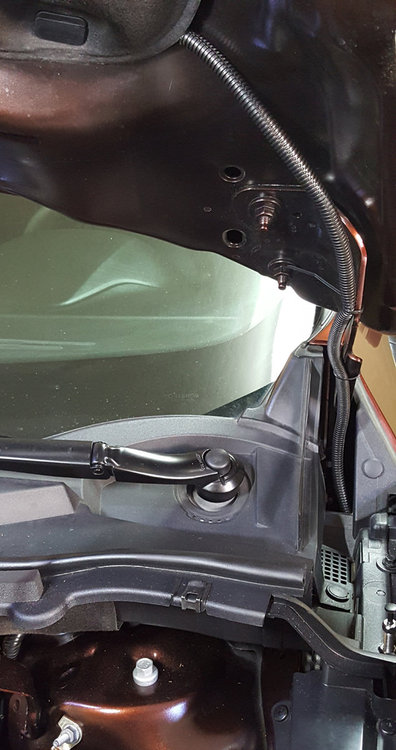
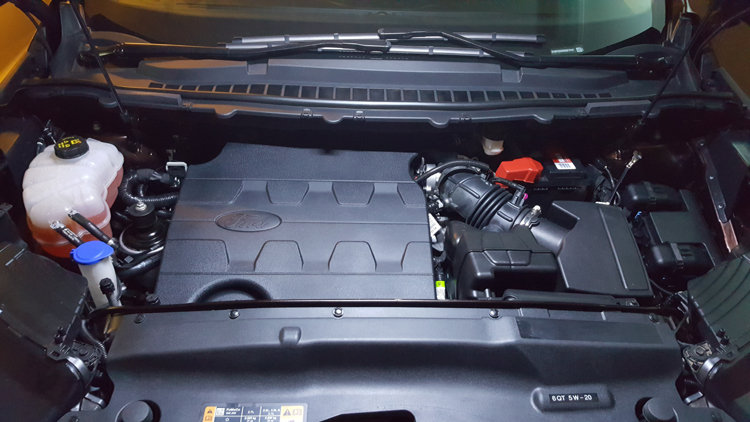
If you do your own maintenance under the hood of your Edge you've probably noticed it can get pretty dark in there. The solution is a simple LED light strip connected to a pin switch that completes the electrical path to ground when the hood is opened. Check out the photos below. Note, the last photo was lighted entirely by the under hood LED strip, no camera flash. How To: 1. Solder some extra wire to an LED strip so you have plenty to reach power and wherever you install your switch. Here's a link to the one I used. 2. Determine where you want to install your switch . (this is the time consuming part). Be sure there's metal under any plastic you'll mount the switch in/on or it won't work. The switch will be the path to ground. 3. Remove the hood pad clips on the driver's side to make it easier to run wiring to the base of the hood. Just squeeze and pull, they'll pop right out and they're metal so they won't break. Stick your LED strip to the hood (after cleaning thoroughly and wiping down with alcohol) and run your wire. Put the clips back. 4. Add wire loom to any bare wire (makes it look professional and protects the wire) and run the wire along the hinge then down through the plastic trim pieces on the side of the engine compartment. 5. Use clay or something else that's soft and squishy (I used Play Doh) to determine the height you'll need for your switch. Most pin switches require very little movement to break the connection so the trick is to compress the plunger just a little and never have it bottom out (which could dent something or break the switch). As always measure twice etc. 6. Connect the ground (black) wire from the LED strip to your switch. 7. Connect the power (red) wire from the LED strip to an 'always hot' power source. You can use the handy covered power stub next to the fuse box or use an add-a-fuse in the fuse box. Whatever way you do it, use a small (5 amp) fuse as close to the power source as possible just in case something goes horribly wrong. 8. With power connected your LED strip should be lighting your engine compartment very nicely. Now GENTLY close the hood one click.....did the light go off? Your switch may be a little high. Second click.....light off? No? Maybe you need to raise the switch a little. Try closing the hood completely so you have to use the normal lever to open it. Light still on (you might have to scoot under the Edge and look up into the engine bay to tell)? You 'definitely need to raise the switch. Just keep playing with it, eventually you'll find the magic height. 9. Done!
-

Forscan to enable tow lights
Gadgetjq replied to mr_jason's topic in Cargo, Hauling, Roof Racks & Towing
Mr Jason, Can you tell us where you found the 4-pin plug wiring for the harness? I'm getting ready for a hitch install and it'd be helpful to know where the harnesses and modules are located in advance. Thanks! -
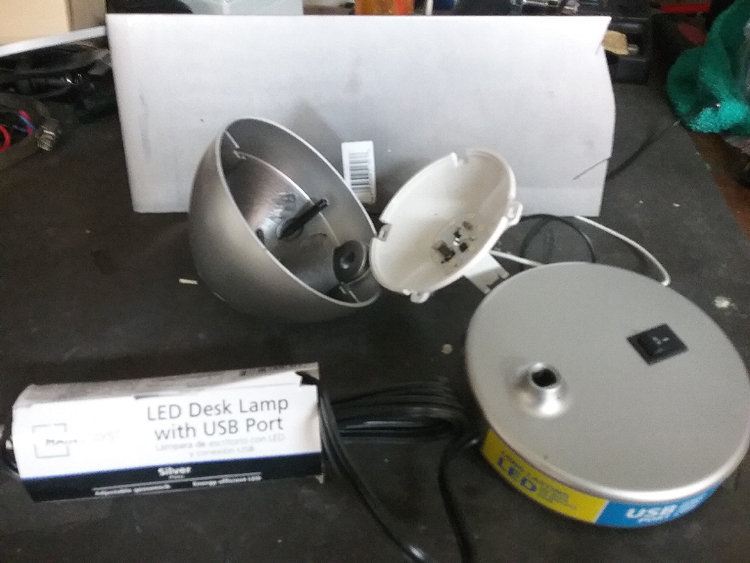
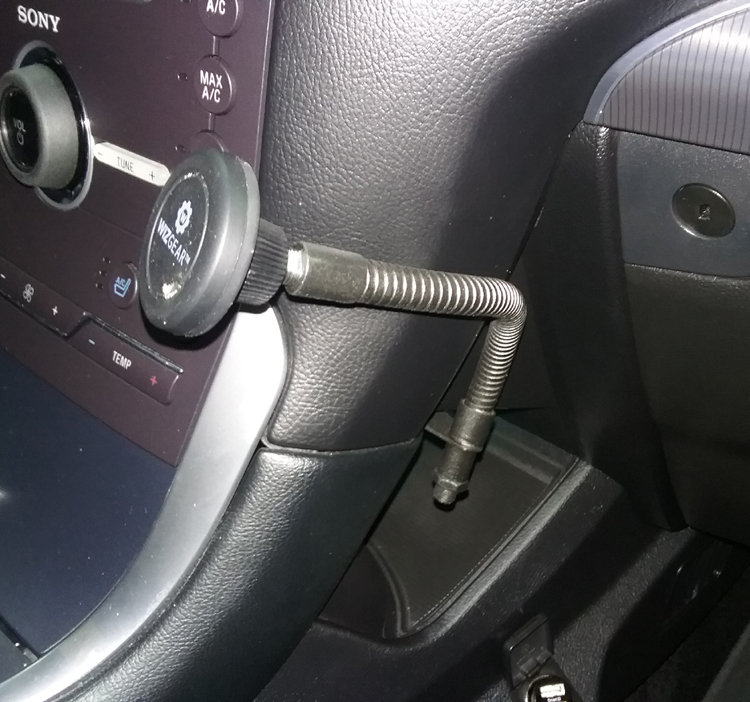
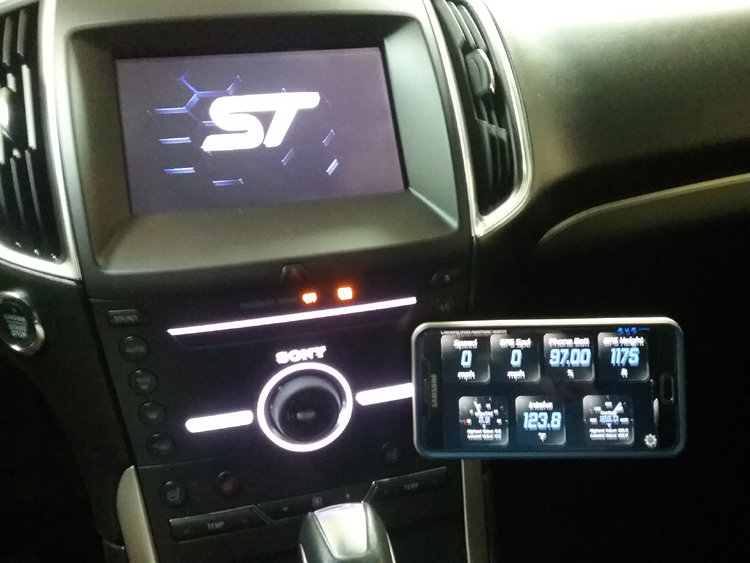
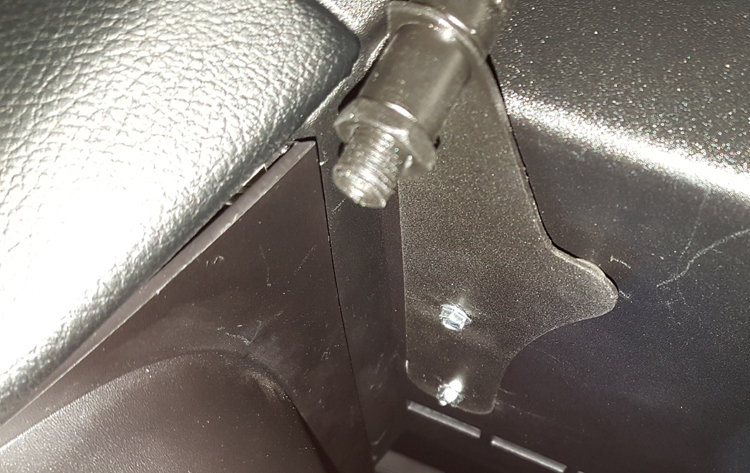
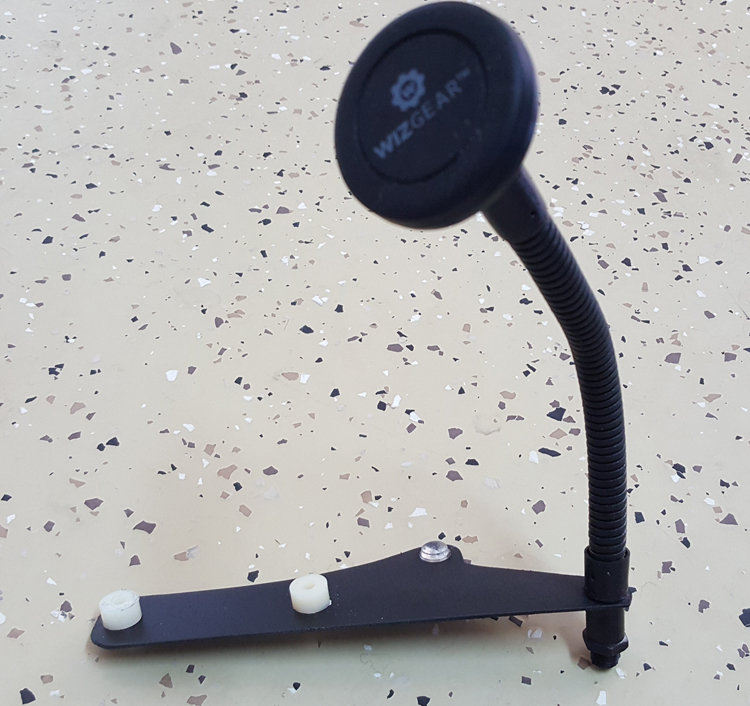
So, the forum is awash in recommendations for phone holders in the Gen2 Edge. I ordered a couple of them to try and they were found wanting. I live in the Desert Southwest (Phoenix) where giving up an air vent just isn't practical in the summer. Another really nice holder includes a bracket that wraps around the right side of the center stack and looks great.....but a little costly for me. Then I saw the CravenSpeed Gemini Phone Mount and said to myself....self, clear the workbench, you can do this. And so can you, probably for less than $15. Or, purchase the ready to mount.....mount from CravenSpeed. All you need is a piece of steel or aluminum stock to make a bracket with, a couple of screws, a bit of paint (PlastiDip works great), a desk lamp willing to give up its flexy bit, a couple of little 1\4" gel spacers and an actual phone holder/bracket that you probably already have laying around (or blocking an air vent). How To: 1. A desk lamp like the one shown in photo #1 below costs about $10 at WalMart. You can probably find one for 50 cents at a garage sale or swap meet. Take it apart so you have the flex arm and nuts/washers holding it to the lamp and base. Toss the lamp and base. 2. Make a bracket out of pretty much any metal stock you have lying around. It only needs to be a rectangle a couple of inches wide and about seven inches long. 3. At one end of the bracket, drill 2 holes matching the center to center dimension (2.36") of the two (existing) screws on the 'top' of the little cubby under the dash at the front of the center console. You can fudge this a little by creating a 'slot' for one of the screws. 4. Test fit your bracket by removing the existing screws (11mm) and using a couple of 1.25 or 1.50" #8 screws in their place to hold the bracket. This is just a loose fitting. You should have one end of the bracket sticking out from the right side top of the cubby. 5. Grab the flexy arm you liberated from the lamp and hold it atop the visible part of your bracket to determine where you'll drill the hole to hold that arm. Mark the spot and head back to the drill with your bracket to create an appropriate size hole for the arm. Cut or grind off excess metal to make the visible part of the bracket look pretty. 6. Test fit with the arm attached to the bracket. All good? Now, determine how you'll attach the actual phone 'holder.' This is going to vary a lot depending on what you're using so a bit of imagination will come in handy here. In my case the bracket is basically a magnetic puck with a ball joint and a stud off of that. I created a plastic plug that fit tightly into the flex arm inner diameter, drilled a hole in the center of that plug then screwed that stud into it. 7. With everything assembled install it in the car (again....getting pretty good at this by now eh?) to be sure everything fits and works the way you expect it to. Once you've determined it's all good clean everything really well with alcohol then paint. 8. Paint dry? Install your new bracket for (hopefully) the last time using a couple of 1/4" spacers between the bracket and top of the cubby, tightening those #8 screws that go 'through' the spacers. Not too tight though, they're probably going into something plastic 9. One more thing: If you don't think the flex tube will be strong/steady enough for the weight of your phone just shove a piece of welding rod (or other stiff wire) up into the flex tube before you bend it. That'll add some stiffness but still allows you to shape the flex tubing to your liking. Done! Please excuse the non focus of the photos, don't know whether it was the camera or me but it's over 100 degrees in the garage so I won't be taking another set
- 1 reply
-
- 3
-

-

-
I believe that one or two gallon 'reserve' is built in to protect us from ourselves. The fuel pump is in the tank and cooled by the fuel. If it's uncovered it's going to overheat and fail. That's a pricey fix so automakers tend to err on the side of caution. The best way to end the guessing game is to (at least once) fill up as soon as your low fuel light comes on. If it takes 16 gallons then you know you have a two gallon reserve when you see the light. From that point on you'll always know how much of a cushion you have assuming the fuel pickup can actually reach the last gallon. BTW that miles to empty readout is just for general guidance since it's constantly changing based on your actual current mpg. Cheers!
-
Thanks BFAzona, I've seen those pads (and discs) recommended before and will check them out. Your feedback is appreciated. Cheers!
-
I've read a lot on this forum about 'grabby' brakes, particularly on the early Gen2 Edge. A replacement brake booster was installed for those who complained. I'm not experiencing that 'throw passengers through the windshield during high speed deceleration' issue but do have a minor concern I'm hoping someone can help solve. My brakes tend to be grabby at very low speeds, I.E. stop and go or creeping up to the drive-through window at the local In-n-Out Burger. My son was with me a couple of days ago and commented "still getting used to the brakes?" as we inched our way to the bag of tasty grub. Maybe that's some of the issue but not all of it. These brakes are almost like an on/off switch when the Edge is creeping and I'm thinking it has something to do with the pads. My Edge is a '16 built past the May 'affected vehicles' date' so probably not the booster issue. I'm hoping someone has discovered an aftermarket brake pad that's a little more forgiving in this situation. Recommendations eagerly awaited! Cheers!
-
And it's all good. BTW thanks for that link to mactgarage.com. There's a lot of very useful info there. Cheers!
-
That's probably the easier way but at the local $140 an hour dealer rate plus extreme markup on materials it would be an expensive option. More importantly, I enjoy working on my own cars and (even at age 71) can handle a simple drain and refill.
-

What have you done to/with your Edge/MKX today?
Gadgetjq replied to WWWPerfA_ZN0W's topic in Accessories & Modifications
Changed transaxle (transmission) fluid at 33k miles. It was definitely time. Sample of drained fluid on right, new Mercon LV on left. Note, draining only removes 5 of the 11 quart capacity so another drain/refill will have to happen in a few hundred miles. -
My (new to me) '16 Ti has 33k miles on it so (despite Ford's claims of 150k before doing this) I decided to change the transaxle fluid. I'm sure glad I did and after seeing the photo (below) you might want to do the same. I guess it's obvious but the dish on the left is the 'new' Motorcraft Mercon LV and at right is the (eek) old fluid. Just pulling the plug drained almost exactly 5 quarts, the tranny capacity is 11 so a 'lot' is being held in the torque converter. After a few hundred miles another drain and fill will be in order I guess.
-
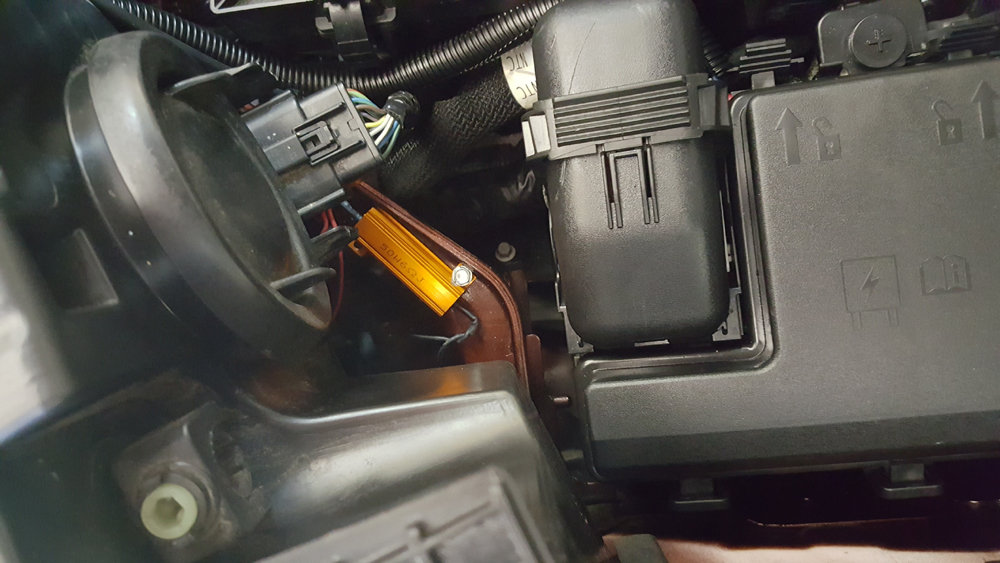
So, I'm an inveterate tinkerer, unable to leave any mechanical/electronic device in stock form (ask my long suffering bride (47 years next month she tells me). My '16 Ti is equipped with Halogen headlights that appear to be in the 3500k (yellowish) range and the amber turn signal bulbs are...well, not terribly attractive so fixes. Temporarily a set of Phillips Diamond Vision H11's have replaced the OEM bulbs and the amber turn signals are out, replaced by switchbacks which flash amber as turn signals but are otherwise around 6000k white. Both are experiments. The H11s will eventually be replaced by HIDs and the switchbacks.....well, how good could they be for 16 bucks? But they seem to be working fine. Installation is simple for the headlight bulb, just pull the rubber seal out, twist the bulb out of the housing (lefty loosey), disconnect from the plug, swap in the new bulb....done! The switchbacks are a little more involved. The headlight housing has to come out of the car (just two bolts and a plastic keeper), flip the housing over, pop out the old amber bulb, replace with the new LED bulb. Then you have to find power for the 'white' DRL which, as it turns out, can come from a 'spare' fuse 24 in the engine compartment fuse box. Switchbacks generally need a resistor to prevent hyper flashing when using turn signals. This setup comes with them so no problem. I 'did' try cutting the resistor out of one side and modifying the hyper flash setting with FORScan but it didn't work for me....resistor back in and mounted to a handy little 'shelf' behind the headlight assembly (see pic below) The end result looks great with a much whiter headlight/drl along with a combo amber turn signal/drl plus the signature LED array all yelling 'get out of my way slowpokes'
-
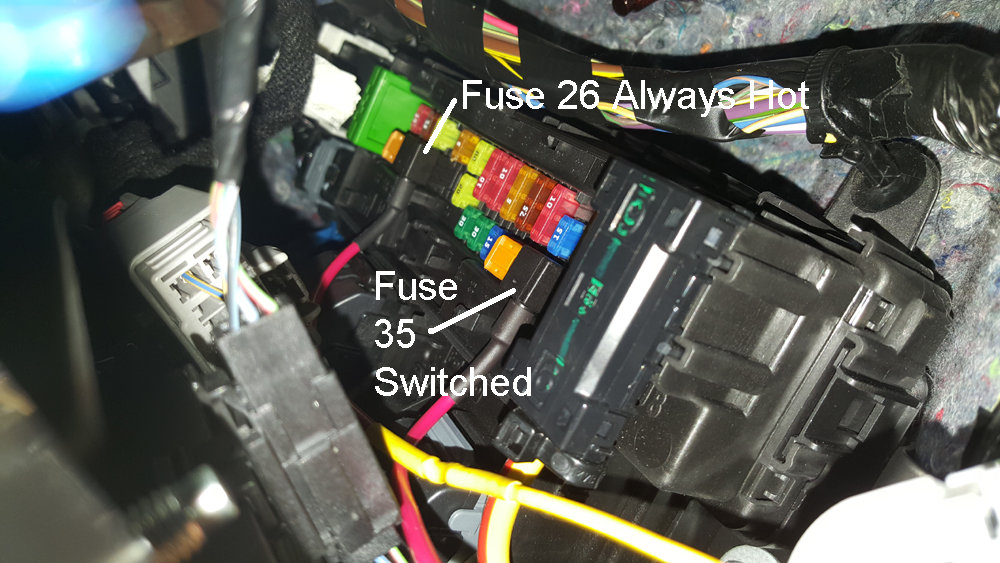
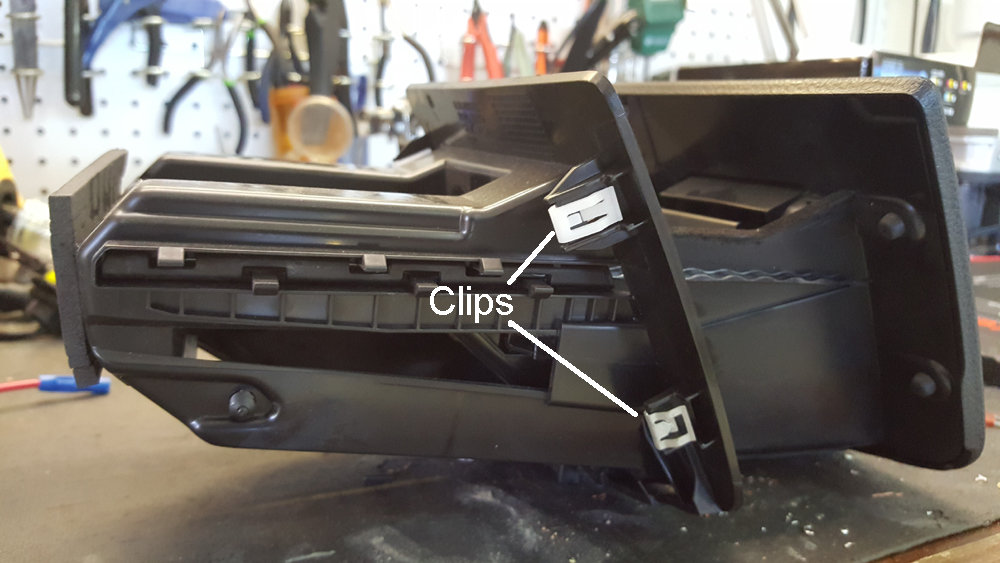
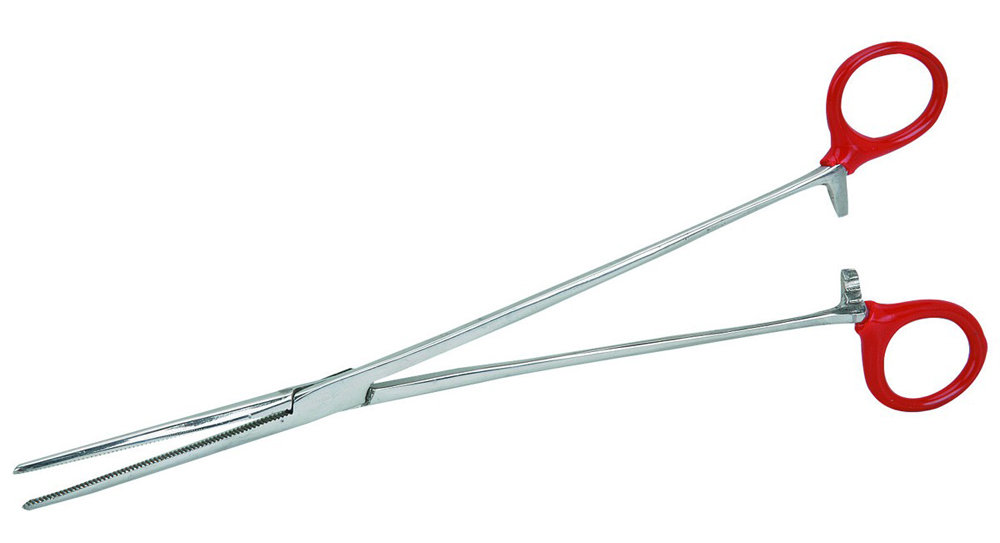
I'm officially one week into ownership of my (new to me) '16 Edge Ti and I've learned a 'lot' from this forum. I think it's time I gave a little back so here are a few photos of 'improvements' I've made where photos weren't available before. 1. There's a discussion about the cabin fuse box. Some asked about access, others about which fuses to use for accessories. Someone suggested crawling under the dash on your back and reaching up to the fuse box. I'm 71 and needed an alternative I'll show you my solutions with photos. I've installed a dash cam that uses two circuits, one switched for the normal continuous shooting mode, the other 'always hot' for parking security. I ended up using fuse 35 (labeled as a spare) for the switched circuit and 26 (passenger switch illumination) for the always hot. (photo below) A couple of reasons for these choices: 1. They're both in the left row so easier to reach 2. The add-a-fuse can be oriented properly (yes, there's a right and wrong way to use these) so the added fuse is protecting the accessory and not drawing juice through the 'primary' fuse. In both cases I pulled the original fuse using a long needle nose forceps (Harbor Freight, see pic below) gaining access through the (removed) change cubby portal. That drawer is only held in the dash by four metal clips (see photo). If you open the drawer and stick your hand inside (palm up) then pull toward the rear of the car those clips will release no muss, no fuss. Shove a good light up under the dash and you'll be able to see the fuse box easily. Just so you can get oriented, in the fuse box photo the 'top' of the box is at the left side. I couldn't get a decent angle with a camera. Here's a link to the add-a-fuse that works in the 15 and later Edge.
- 1 reply
-
- 5
-

-

-

What have you done to/with your Edge/MKX today?
Gadgetjq replied to WWWPerfA_ZN0W's topic in Accessories & Modifications


