-
Posts
1,754 -
Joined
-
Last visited
-
Days Won
252
Content Type
Profiles
Forums
Gallery
Everything posted by Xtra
-

What have you done to/with your Edge/MKX today?
Xtra replied to WWWPerfA_ZN0W's topic in Accessories & Modifications
Went for another drive with the Malibu Autobahn tonight. The promoter was trying for 1,000 cars. I don't know if there was 1,000 cars there but there was a hundred or more supercars there. Lamborghini, Ferrari, Mclarin, Corvette, Mustang, Maserati, Lotus you name it it was there, including my Edge Sport, everyone of them polished up and sounding awesome. Hundreds of people crowded the parking lot, and when the next stop at Rodeo Drive was announced, it was like an old Le Mans start with everyone running to their cars, raving them up and heading out . They started the event just a few minutes from my house at the Commons in Calabasas. It was an amazing drive on a beautiful warm Friday night. The one car I tangled with got a good look at my tail pipes lol. Mclarin Ferrari -
Loaded up my Edge Sport and took the CF and the mold to the plastic shop today. They said they would mold the intakes sometime during the week of the 5th. Once They are molded I am going to have my hands full for a while getting all the backorders orders shipped. I am having them mold up two extra V2 intakes of each; ABS and Carbon Fiber, that are available for whomever wants one. They fit like a glove . I love my do everything Edge .
-
Today I was at the plastic shop and the parts are scheduled to be molded by the end of next week or the beginning of the week after. So I it would be good to get all the parts made for the adaptor by then.
-
Today I used my drill press as an overhead mill, I had the correct bits and a drill press vice that I used as the table. The results are good enough to produce prototype parts that should be made by CNC or with a proper mill. what I did was to make the "Gate: for lack of another word, for the adaptor. The latches and the gate hold the top half of the intake to the adaptor. The gate slots are milled and it still needs to be cut to the finished shape. This is how the gate works to hold the top half to the adaptor. The ends need to be trimmed and rivet holes need to be drilled.
-
Wow ! i don't know what to say, but thank you everyone for your support. I did not post about the development costs to complain or ask for funds. This offer is a complete surprise, and to know that I have this kind of support is amazing. Although your offer is most generous I will have to decline at this time , but too know you guys are there for me if I do need some help with this project in the future is reassuring. Thanks you all And now a progress report to follow:
-
I got prices from the plastic shop today. To mold one adaptor it is going to cost me $134.68. To mold one patch it is going to cost me $129.21. Total of $263.89 just to test the molds and see if they work . Heck, the parts may not fit, or the molds may need modifying. If that happens then another round of prototypes must be made. I tell you this to give an idea of some of the costs incurred developing the V3. I also have a very large stack of receipts that i won't even get into. The parts still have to be cut out, trimmed, finished, latches , catches and other parts have to be fabricated and mounted. It is a long process, but testing the molds and getting them working properly is a major step forward, and I will be very happy when that part of the project is accomplished.
-
I just got up at 4: 15 am to beat the heat and did the polishing at first light as the sun came up.
-
???? the heat is dry but I am soaking wet?
-
Almost finished with the V2 mold refresh. It is 100 + degrees today as it has been for over a week now, and I can only handle a couple hours of work a day. I had to take the mold apart to refresh it After patching, I started sanding with 120 followed by 220, then 320 dry grit. I then switched to wet sand paper 400, 600 ,1000 and finished with 1200 grit. For those that were counting, the entire mold was sanded 7 times after patching to get to this point of the refresh. It is now ready for polishing compound. The fiberglass mold patched and wet sanded. It needs to be ready when the CF arrives to stay on track. .
-
CF UPDATE: Got tracking info on the CF, It should be arriving on Friday 7 -2. Finally !!! I will then take it to the plastic shop on Tuesday 7 -6 when they reopen from the long Independence Day weekend. As it is a short work week I can only hope they can mold some of them that week. If not by then by the next week for sure. ABS intakes will be part of that run and both Carbon Fiber and ABS V2 intakes will be available and in stock at that time. All my attention will be on finishing and shipping the backordered CF V2 intakes ASAP. I will continue to post my progress with this batch of V2s.
-
Thanks macbwt for posting your video. You did a great job and I appreciate you taking the time
-
It is amazing how accurate these molds need to be. I make them a tiny bit larger than needed then sand them down to size finishing it with 1200 grit wet sand and then polish to a gloss. When I remove too much I add fiberglass to build it up then sand it down again. It took me several weeks to make the adapter mold, a simple rectangular shape. To think something as small as a spark plug gap can cause problems helps explain why it takes so much time. I have tons of respect for old time sculptures that worked in marble. If they took off to much material they could not add anything to fix it. They had to get it right on the first try.
-
That is good news. Thanks for taking the time to data log that.
-
I dropped off the two molds at the plastic shop today and ordered one test part from each mold. The shop pointed out a mistake I had made on one of the molds, one spot was about 0.030 inch off. Not very much, but that 0.030 could keep the mold from releasing the part. Because it is off so little, the shop and I decided to try it anyway and see what happens, it could be just fine.
-
The CF vendor called and said it is being made today and is shipping tomorrow. They even sent me an invoice ( that I paid ) so I am sure that it is happening. I originally ordered the material back in early April. I will post again when it arrives.
-
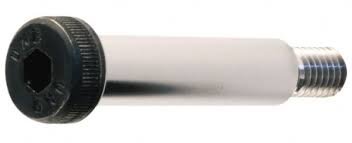
This is a shoulder bolt, my first idea. They are super expensive, have large heads that stick out, and require locking nuts. Shoulder Bolt The SS Binding Post's low profile heads, low cost, perfect axel diameter and length ended up being the way to go. I found something that could not be any better. SS Binding Posts. I can get a bag of these for the price of one Shoulder Bolt.
-
Finally found screws for the latch. First I looked at Shoulder bolts, but the cost was prohibitive at $7 to $15 each. I did not want to use machine screws and have a threaded axle. What I found was SS Binding Post Screws. Though they cost more than plain machine screws at $1.50 each, they are affordable and offer a smooth axel for the latch. They are perfect, exactly what was needed. The barrel diameter of the stainless steel binding post is spot on, and the latch moves freely without slop. The barrel length is also spot on and could not be better, as the threads are even with the outside edge edge of the bracket.. The barrel of the binding post provides a smooth axle for the latch. There is some wiggle room that allows it to compensate for any variances. I did this intentionally. I will probably make these myself as they are simple enough, and it will help control cost. I will clean them up some compared to this prototype. The low profile screw heads give a slick finish, and thread lock will keep them together. The finished latch Two of these latches will help hold the top half of the V3 to the adaptor. Each side of the adaptor will require a different specialized part that will allow it to clamp together the V3 top half to the OEM bottom half. There are four different parts needed, (1) a latch, (2) a catch, (3) a gate and (4) nubs I have the latch, one down, three to go.
-
That's fantastic, I wish I had access to technology like you work with, I am just winging it, and learning as I go. . die casting or injection molding of these things I am making would take them to the next level. I can dream. To be honest, I worry if the molds I made will work. Did I drill enough vacuum holes? Did I place them correctly? Will the part release? Are the draft angles correct? Will the parts even fit? The only way to know is to go for it. We will find out in the next couple weeks.
-
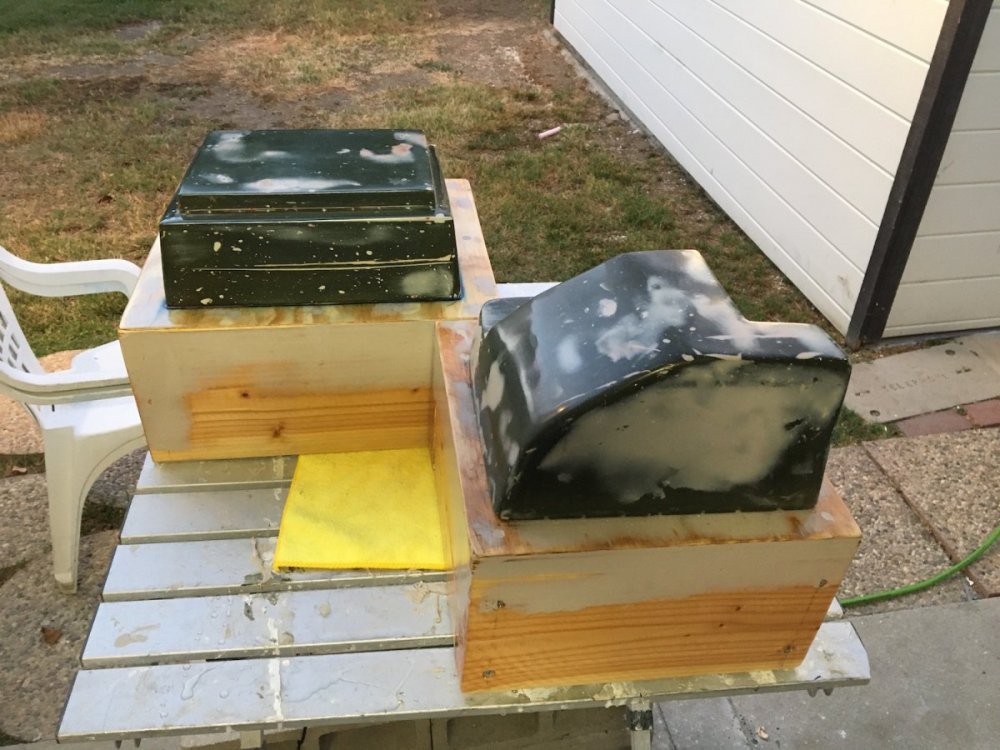
I could not wait to finish there was an hour or so of light left so I went for it .. As you can see in the photo i finished at dusk 06/22/21. Both molds are now complete and ready to make some parts. !! It took a lot of work, research and learning about vacuum forming tools to get to this point of the project, and it feels good to see those 2 molds sitting there...Next is to test the parts they make, hope the molds don't need refining, and if everything checks out, move into the next phase of the project.
-
Good news !! I spoke to the CF vendor today and was promised that the CF would ship on Thursday 6 - 24. I expect if they ship on Thursday, (and are not blowing smoke) then it should arrive around 7 -2. As soon as the CF arrives I will take it to the plastic shop and have it molded. No messing around, I will take off July 4, but other than that I intend to ship the CF V2 intakes ASAP. The ABS orders will be molded at the same time and they will start shipping after the CF is done.
-
Not much longer the end is within sight. I was able to finish the wood base for the V3 adaptor plate mold today. It is drying as I type this. Yes, today was a good day as the V3 patch mold is done. The V3 adaptor mold is almost complete, It just needs assembly. Next week both molds are off to the plastic shop to make some V3 parts. The design for the latches on the adaptor is done, but they need to be fabricated, and that is the last hurdle to production. If everything works out I would guess in 4 or 5 weeks I can start taking orders.
-
Worked on the wood base today , almost finished and ran out of light. Will let the Bondo set over night then sand and finish tomorrow. Fitting for the vacuum hose installed Screws ready to go in countersunk pre-drilled pilot holes Assembled box with Bondo applied ready for sanding
-
No one has any feedback like that yet.
-
Finished the fiberglass part of the adaptor mold today. All the vacuum holes are drilled, the slots are cut, and the mounting bolts are installed. .


