-
Posts
1,754 -
Joined
-
Last visited
-
Days Won
252
Content Type
Profiles
Forums
Gallery
Everything posted by Xtra
-
I have not set a price yet, but it won't be long now This air box fits the 2015 to 2018 2.7 Edge. I am working to fit the ST as well coming soon. .
-
The Bottom Half has water drain holes in it , and the small air gap where the snorkel fits will also allow water to drain if it ever gets into the system . As the V3 uses the stock OEM route for air it should be as safe as the OEM air box in regards to hydro locking. Even with the addition of the V2 and V3 together the air pathway is the same as stock so if you forge a river, and it floods the engine, it would have done the same if it was OEM stock. Now to answer the question of the Aux Air intake. Right now I am running the air intake hose above the left front tire. On top the finder liner and just below the the car hood. It is not the best place to get air, but it is easy enough to get to, requires little to no mods and does supply fresh air to the V3. The tip of the hose is above the tire so it would take a lot to have water reach it. If I were to use the punch out in the front bumper like snmjin did then a valve should be used to prevent hydrolock as the punch out is closer to the ground and splashing water can reach it when going through a foot or less of water. There is nothing better for reliability than stock. Car manufactures go to extremes to make their cars reliable no mater where they are used. The desert or the mountains the car will work great . The after market addresses this by making the car better for your individual needs. What is gained in one place is often at the expense of another area. Examples... the car is made faster, but milage went down. The car handles better, but the ride is stiffer. CAI systems are the exception to the rule, a well designed CAI can increase power and give better milage .. if you can control your lead foot. I hate this part but.... Now for the small print to save my beans from a litigious society . ... The V3 is a custom made race item, and is designed for track use only and not for use on the street . The V3 is defiantly not for off road adventures in the dirt, or for crossing rivers or streams. . The user assumes all liability in its use. The larger hole is the foot and need to be sealed. The small hole in the corner is for water to drain even if it is just condensation. There are 2 or 3 of these small drain holes in the Bottom Half.
-
The gasket on the Snorkel Adaptor Plate does its job, but is not an exact fit. I feel I need to show the warts as well as the beauty. lol. I do not believe that these little air gaps will have any adverse effect on the performance of the V3. If they do bother you, then the snorkel could be sealed to the V3 with a little silicon RTV or even the insulation. To give an idea on how small the gap is, the bolt hole in the flange is a 1/4 in hole and it dwarfs the gap.
-
This is how the Cleco fasteners are used, they allow me to pre assemble the parts and hold them in place. After assembly with the Clecos, I used the heat gun once more to form the patch to the bottom half.
-
-
First the gasket is installed on the Snorkel Adaptor Plate, and then the snorkel is test fit before final assembly.
-
Today I cut the elbows, and parts keep arriving. Cut to size, assembled, de-greased, and ready for welding. The Cleco fasteners and tool came in today, and will receive lots of use.
-
onyxbfly, I will address your question shortly.
-
Managed to do some work on the lower half today. I made the cutout for the Bottom Patch, and removed of all the excess parts. Lean and mean. Next step is to cutout the area for the Snorkel Adaptor. Test fitting the Bottom Patches, they are not attached yet.
-
I must admit I am curious myself.
-
Now that I know that the aluminum used in the elbows is good enough to pass my standards, I went and picked up enough to do all five V3s. Things are moving fast now, and I hope I can keep up the pace.
-
Just returned from the welder and the elbows welded fine. That is great news as these elbows cost half as much as the ones I used to fabricate my Elbow Reducers. I just ordered enough of these mandrel bent elbows to build all ten Reducers. Tack welded the Sensor Brackets as well.
-
No worries, every V3 is hand made to order, and because my operation is so small, it is no problem to accommodate any reasonable request.
-
After testing with the secondary air inlet. I believe all the V3s should have it. Using just the stock snorkel, a high flow filter and insulation helped a lot , but when the lid with the secondary air inlet was added I could feel a pronounced difference in power and the engine sounded smoother. I can say with confidence that the secondary air inlet along with the V2 will make the V3 project unique and perform better than any other CAI system currently on the market for the Edge 2.7EB platform. I am looking at two different options to collect the air.. First is the way I am running now, it is not ideal, but so far it is working great, and is easy to install. My butt-o- meter says my 91 tune now feels more like my 93 tune. .The second way is more difficult to install, and has direct access to ram air. I have not developed the adapter to the ram air part yet. The way I am running now is ready to go. Some of the parts to develop ram air secondary inlet are arriving today. I am attempting to design it so one can use the simple way until the ram air set up is ready, then just re-run the hose and attach the ram air adapter and keep everything compatible.
-
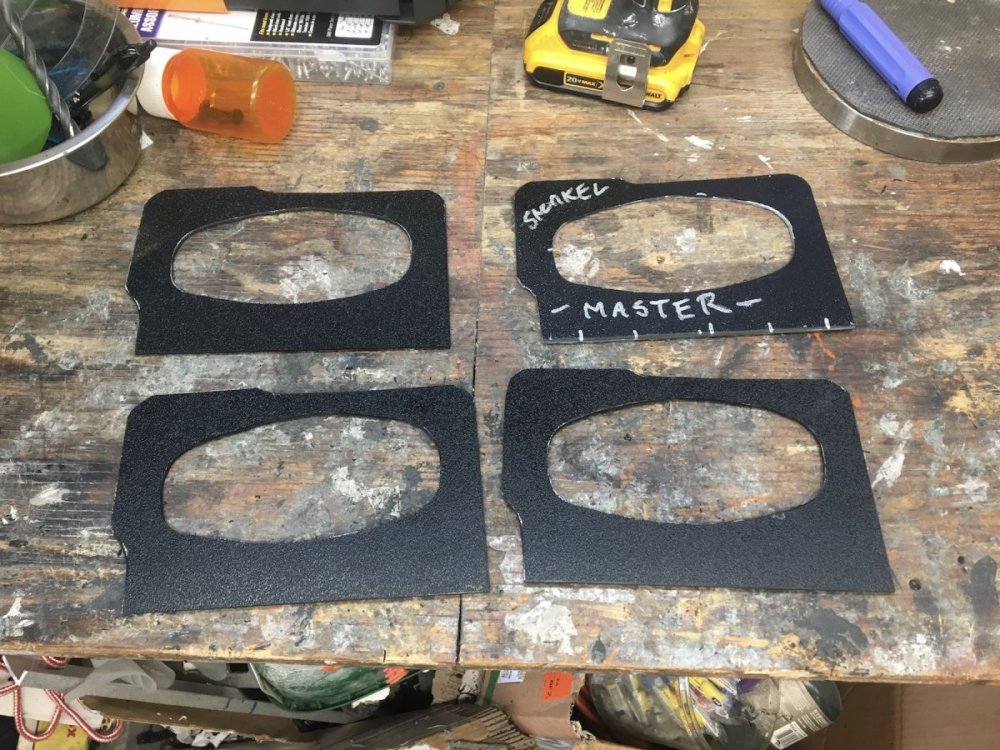
Cut out the Snorkel Adaptor Plates today. Rough cut out with the air saw. Snorkel Adaptor Plates finished and ready for the heat gun to bend into shape.
-
-
I am easy and if someone can DIY then it’s all good. It just is something that has to be done and can’t be skipped. I will take it up on an individual basis. ??
-
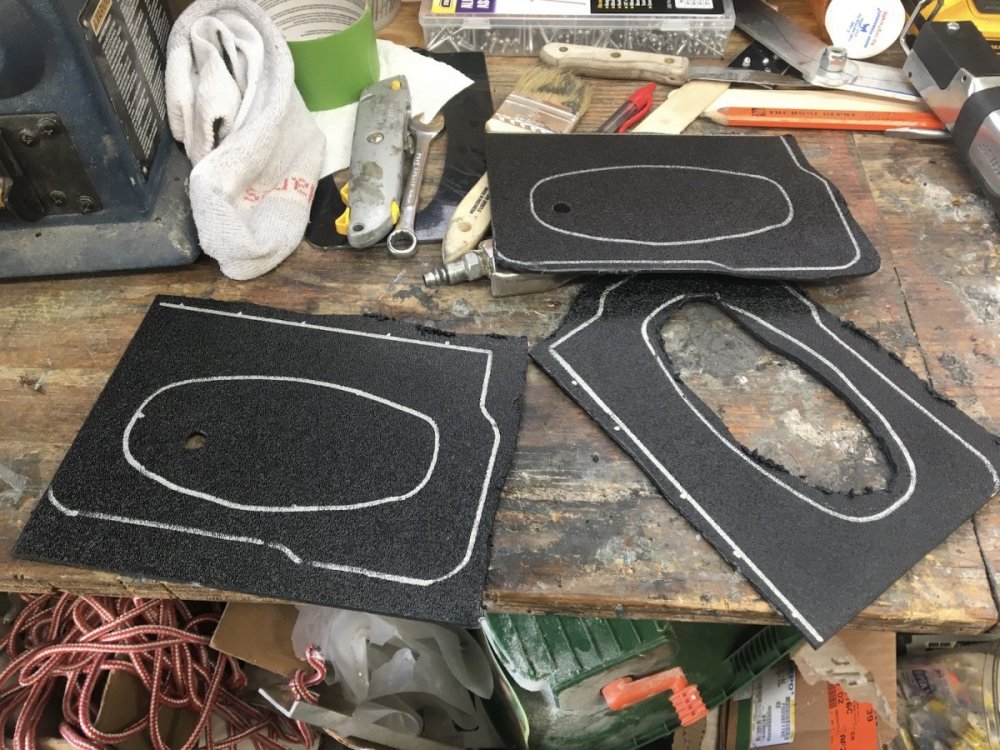
The Snorkel Adaptor Patch laid out, and getting ready to be cut out. The master templet is the part that says “fold” on it. There are starter holes drilled where the snorkel goes and you can see my trusty air saw. I love that saw, it is my go to tool when rough cutting the ABS to shape. Some more parts came in today. This is what I use to seal the V3 air tight. It takes an entire tube to do one V3.
-
This tool I made determined the angle of the mandral bent tubes that are used to fabric the Elbow Reducers. Used some scrap aluminum and created this. I cut the ends to form a point that a I use on the centerline . Just point to the start and the finish of the bend and read the angle. Once the angel is set on the tool A cheap plastic protractor displays the angel accurately . This is a 45* angel being demonstrated.
-
I agree that surface prep is an important and necessary step to applying the insulation. First, I used a dry clean rag to remove any dust, then cleaned the surface with a fresh rag and acetone before installing the insulation. Perhaps I received an older batch as I have not heard of Thermo-Tec ever having this problem before. It is absoullutly necessary for the insulation to be there to protect the thermoplastic used to create the BottomPatch, and I don't want anyone to use the intake without that patch being protected. So... I am up in the air undecided as if to leave the insulation for the customer to install or not.
-
TY Steve, thanks for sharing your experience with this insulation. It looks good with the golden finish, like something from NASA, and appears to be more flexible and stick better than the Thermo.Tec. I will look into it. Thermo-Tec is good for reflection of over 90 percent of the heat to 2,000* and can take up to 300* in direct contact . The specs are great, The glue not so much.
-
I have decided that I will not supply the Air filter with the V3. As the filter costs around $73 each, it will save me from investing another $365. And the lucky ones that obtain a V3 can order their filter on line, and choose if they want it to be wet or dry . Of course I will supply the links, so it is just a click away. There is no way I can invest in ten filters about $730 .. 5 wet and 5 dry so people would have a choice when ordering, then have 5 filters left over that I would have to return. I am also considering that the insulation be optional, as it is easy enough for most people to do and it lowers the overall cost. I will still install the insulation for those that want, but I did not like the Thermo-Tec backing because it did not stick that well, and I don't want to be responsible for another companies bad glue. I would have to try another brand and who knows if that would be any better? By not suppling the filter and insulation it lowers my material costs by around $140 each, thats $700 for all 5. The customer also saves on my labor charge of installing the insulation. I will supply directions, and give some tips I picked up when doing mine for those who DIY. Material costs so far for the first run of V3 is getting up there and approaching $2, 000 fast. I am doing my best to keep the price as low as possible and I hope that this update is not too much of an inconvenience or scare people away.
-
-
Here are all 5 of the Bottom Patches ready to install. All the holes have been drilled, and used the heat gun to hand form them to their final shape.
-
Started the next step in finishing the Bottom Patch. Here I have trimmed and drilled a hole for the feet. After this I will use that heat gun to modify the Bottom Patch to final shape.


