
Haz
Edge Member-
Posts
1,478 -
Joined
-
Last visited
-
Days Won
395
Content Type
Profiles
Forums
Gallery
Everything posted by Haz
-
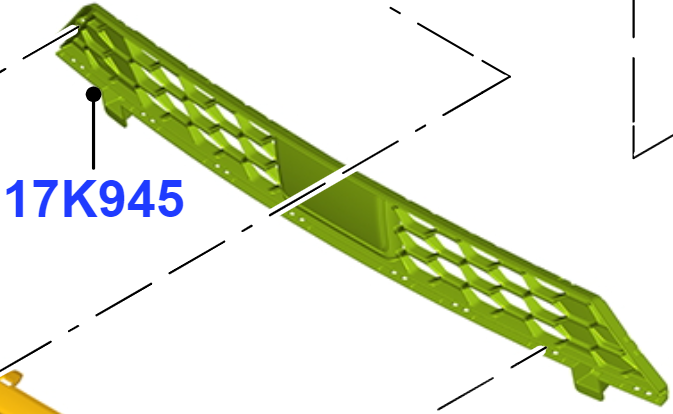
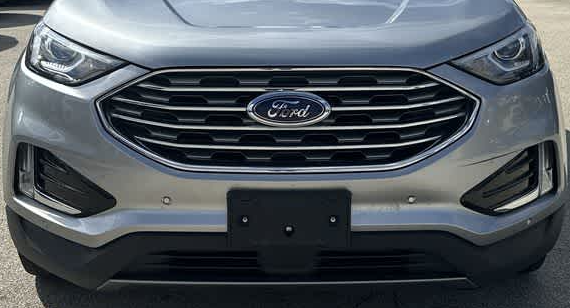
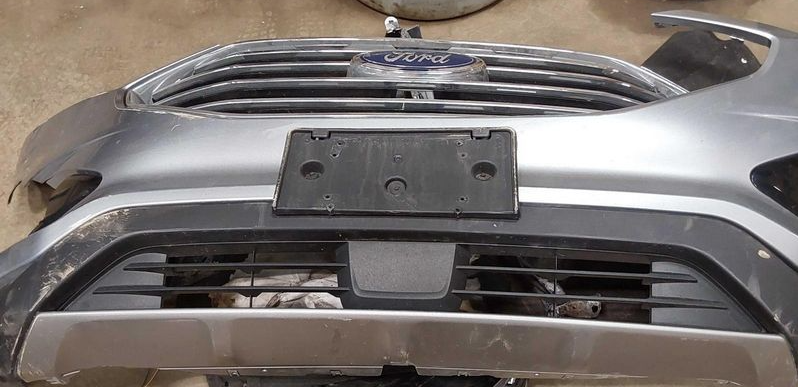
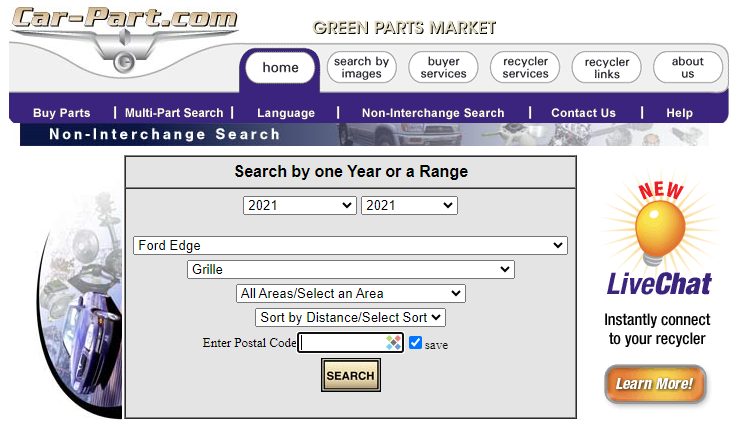
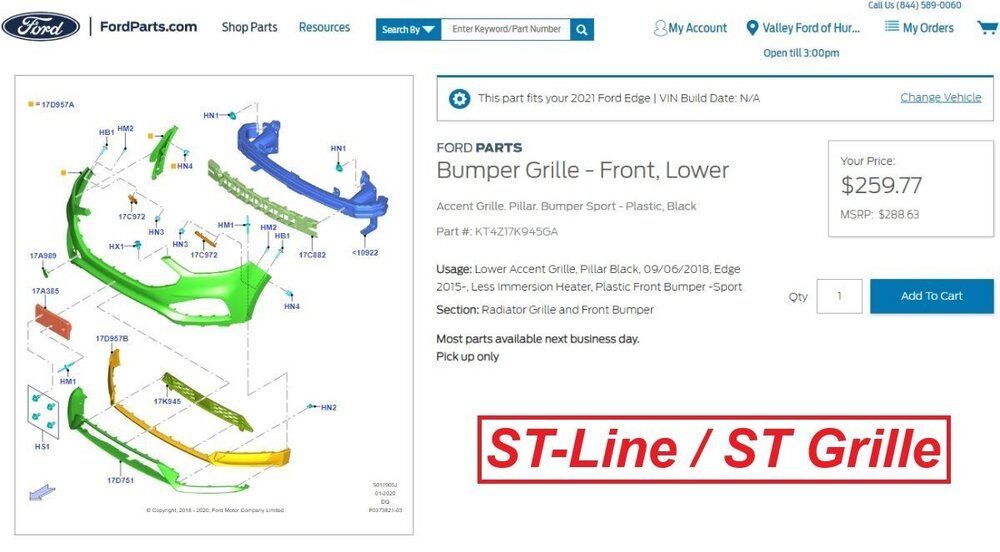
Good catch, @johnmarkp! The FordParts listing I cited is for ST-Line/ST Edge. I should have noticed the word 'Sport' in the listing, and also the honeycomb texture of the Lower Grille illustration as not being the horizontal bar design that @Wubster100 previously shared... The KT4Z-17K945-BA part cited by @johnmarkp matches the Historical Vehicle Bill of Material (HVBoM) using the VIN of a 2021 Edge equipped with Adaptive Cruise. The right new part at a comparably great price. Once again, bravo @johnmarkp!
-
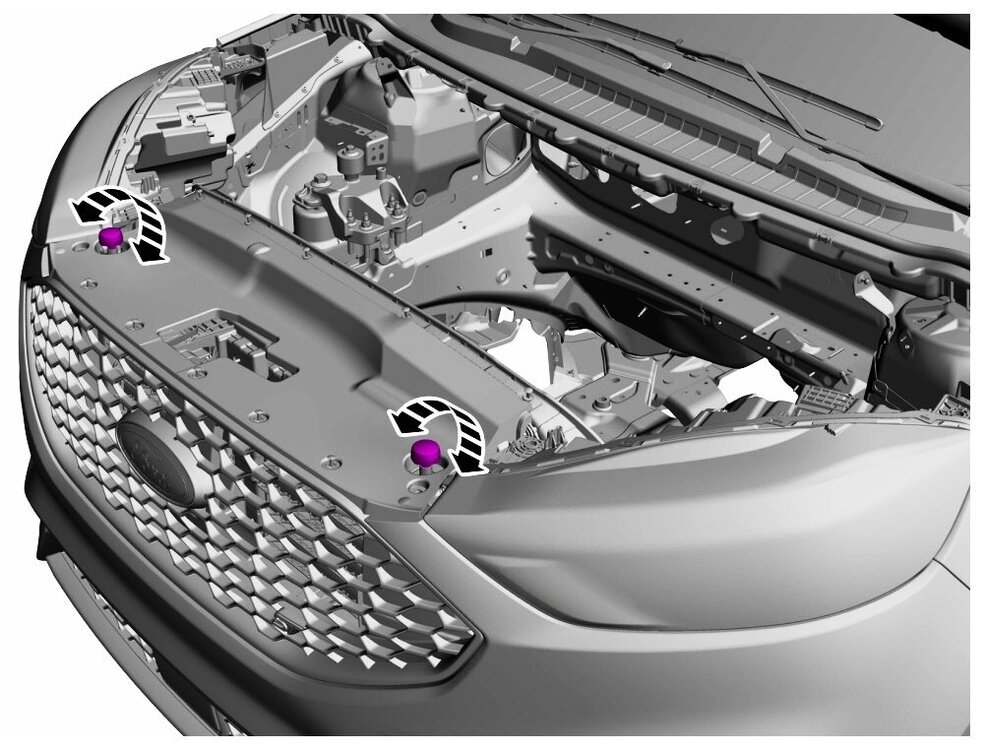
If installing a CCM-protecting lower grille insert interests you, and you prefer not to pay for a fully-new part, Car-Part shows a lower grille available for $140... Image edited to emphasize part's ST-Line/ST fitment.. Relevant section from 2021 Edge Workshop Manual attached below as PDF document... Good luck! Front Bumper Cover - Disassembly and Assembly - 2021 Edge Workshop Manual.pdf
-
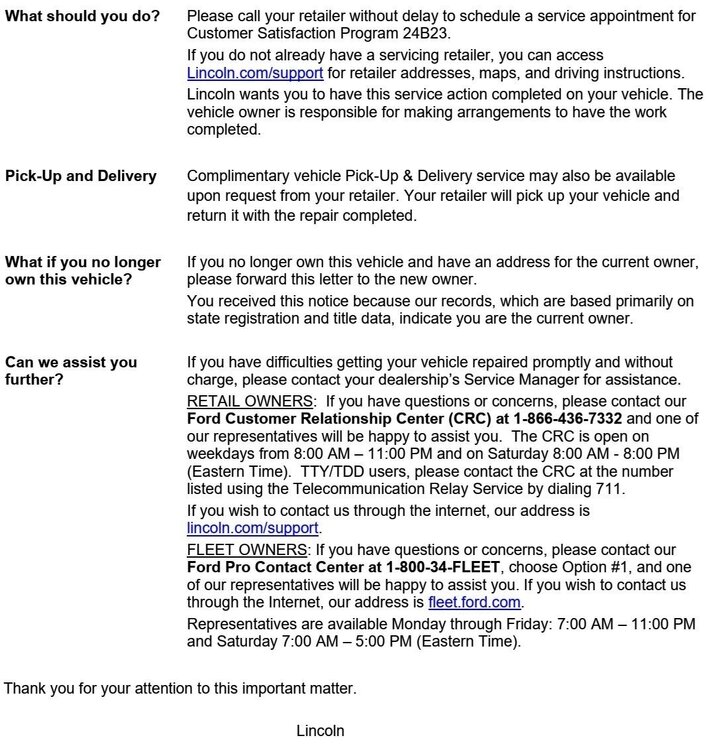
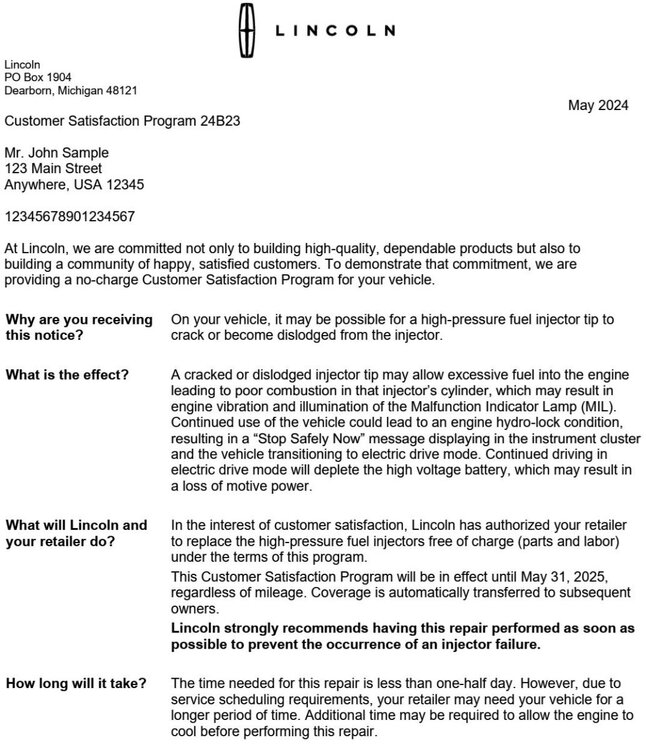
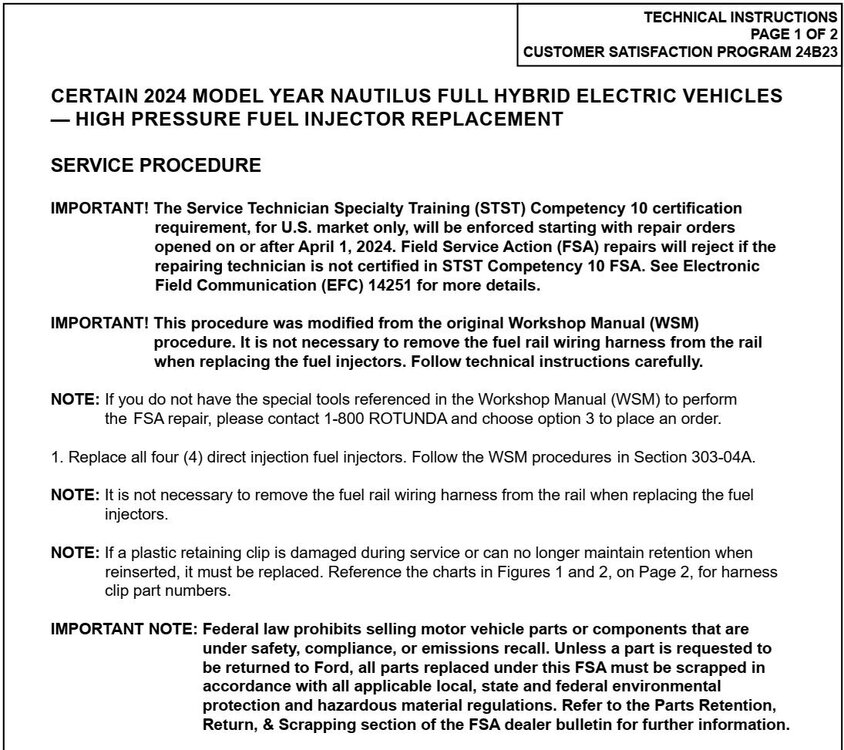
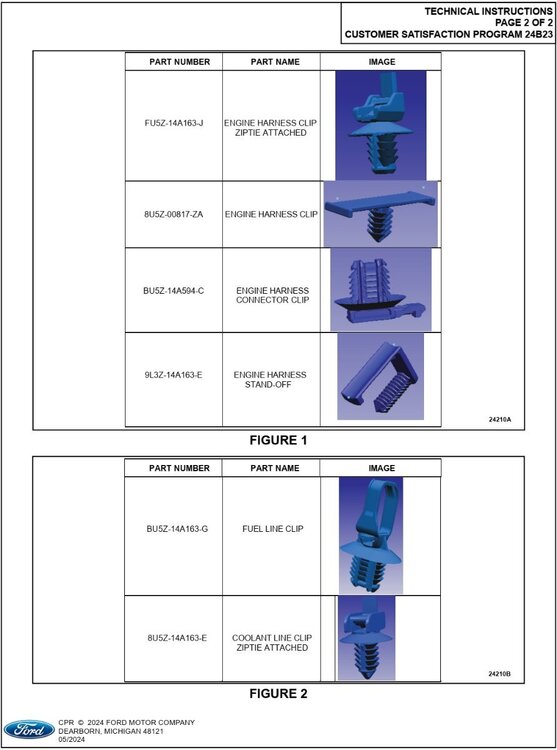
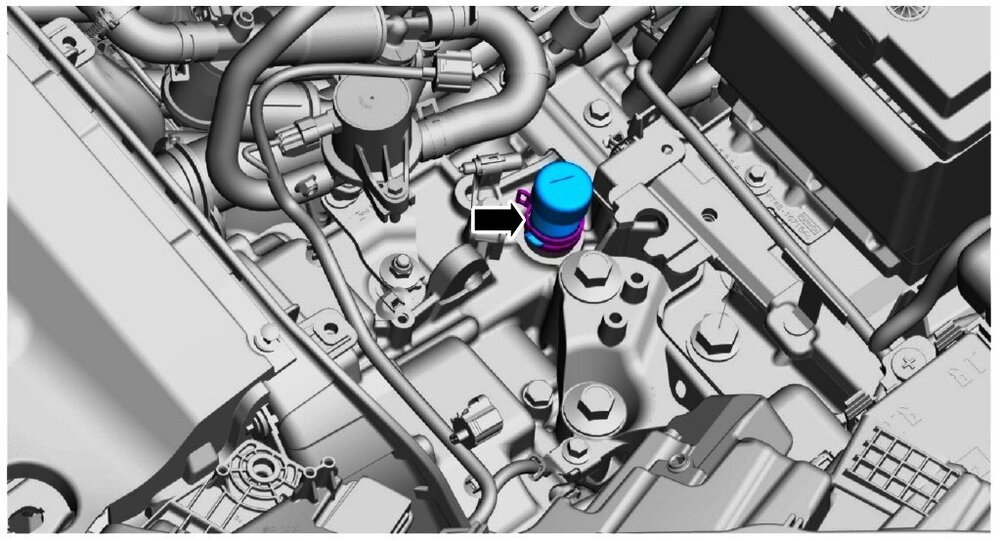
To provide an understanding of the scope of work involved, attached below as a PDF document is the 2024 Nautilus Workshop Manual section referenced in the above-shown CSP 24B23 Technical Instructions... Direct Injection Fuel Rail - 2.0L EcoBoost - Hybrid (FHEV) - Removal and Installation - 2024 Nautilus Workshop Manual.pdf Also, Ford of Canada continues to be in the Advance Notice phase of this Field Service Action.
-
Ford, once again, releases a Special Service Message relating to 2024 2.0L EcoBoost-Hybrid Nautilus direct fuel injector replacement, notable now for its lacking any range of vehicle Build Dates, unlike the above-referenced CSP 24B23 that addresses a finite population of vehicles... SSM 52568 2024 Nautilus - 2.0L EcoBoost-Hybrid - Direct Fuel Injector Replacement On 2024 Nautilus 2.0L EcoBoost-Hybrid vehicles, if engine damage or drivability diagnosis leads to replacement of any direct fuel injector assemblies, replace all 4 direct fuel injectors along with other necessary repairs. Refer to Workshop Manual, Section 303-04B Direct Injection Fuel Rail Removal and Installation for the procedure on replacement of the direct injectors. Do not replace the port fuel injectors for this condition. A fuller understanding of this Full Hybrid powertrain may be useful... 2.0L Turbocharged Hybrid Engine Newly available on all series is the efficient 2.0-liter Turbocharged Hybrid engine (FHEV) with a 100kW electric motor that offers Clients the choice of a capable, electrified powertrain. Hybrid Powertrain Features TBA-kWh lithium-ion battery 27-kW electric traction motor CVT Power Split transmission Regenerative Braking System HYBRID BATTERY PACK TBA-kWh lithium-ion battery pack Mounted under floor behind front-passenger seat Invisible to the owner Battery pack sits on chill plate that is liquid cooled and fully encased Electric water pump flows the coolant to a dedicated radiator located at the front of the vehicle Air conditioning refrigerant cools the lines that the battery coolant flows through Water-cooled battery has advantages over a fan-cooled battery No fan noise Heat from battery does not end up in passenger compartment DRIVING THE VEHICLE Electric Start-Up Engine starts automatically as you accelerate — sometimes immediately; at other times, the engine will delay starting up Engine start-up will occur if lithium-ion battery recharge is required or acceleration exceeds electric motor capability If the lithium-ion battery is very cold or very hot, the engine may engage sooner than under normal operating conditions — this is normal Coming To A Stop Engine may shut off as you come to a stop — this is normal and helps conserve fuel Do not attempt to restart the vehicle Engine may restart when you remove your foot from the brake Maintenance Requirements While repairs to the hybrid powertrain system should only be performed by a Lincoln Certified Technician, routine maintenance procedures such as oil changes or tire rotations do not affect the hybrid system Cost-effective operation can be traced to a distinct characteristic of its driving cycle: The engine is Off at stops and at other times when it is not needed This distinct operational mode contributes to a reduced rate of engine oil degradation(2) Compared to the “duty cycle” of a conventional vehicle, the Nautilus duty cycle with hybrid powertrain is less severe because the engine spends almost no time idling at stops;(2) sustained idling is particularly destructive to the detergent and anticorrosive properties of engine oils Regenerative Braking System increases brake pad life while it recharges the lithium-ion battery, because the hydraulically assisted friction brake components are relieved of part of the burden of slowing the vehicle, so there is less wear and tear on the brake pads(2) (1) Calculated via combined performance of the engine and electric motor(s) with peak battery power. The calculations utilize SAE J1348® engine results and Ford electric motor dyno testing. Your results may vary. (2) Driving habits vary — maintenance intervals based on normal driving conditions.
-
Welcome to the Forum, @scobecu! 8F57 Power Transfer Unit (PTU) sections from the UK Edge Workshop Manual are attached below as PDF documents... Good luck! Power Transfer Unit - 8F57 - Description and Operation - 2015-2022 Edge, Edge Vignale, Endura - UK Edge Workshop Manual.pdf Power Transfer Unit - 8F57 - PTU Draining and Filling - 2015-2022 Edge, Edge Vignale, Endura - UK Edge Workshop Manual.pdf Power Transfer Unit - 8F57 - PTU Fluid Level Check - 2015-2022 Edge, Edge Vignale, Endura - UK Edge Workshop Manual.pdf Power Transfer Unit - 8F57 - PTU Fluid Specifications - 2015-2022 Edge, Edge Vignale, Endura - UK Edge Workshop Manual.pdf All-Wheel Drive (AWD) Systems - 8-Speed Automatic Transmission – 8F57 - Overview - 2015-2022 Edge, Edge Vignale, Endura - UK Edge Workshop Manual.pdf
-
SSM 52556 2024 Nautilus - Grunt Noise From Front Brakes During Initial Brake Applications Some 2024 Nautilus vehicles may exhibit a grunt noise from the front brakes during initial brake applications that goes away after the brakes warm up. Lincoln is aware of the concern and a solution for this concern is expected by 3rd quarter 2024. Monitor OASIS for additional information and schedule service appointments for customers once the repair becomes available.
-

2010 Edge Limited AdvanceTrac button not lighting.
Haz replied to Hodgie's topic in Interior, A.C., Heat, Interior Trim
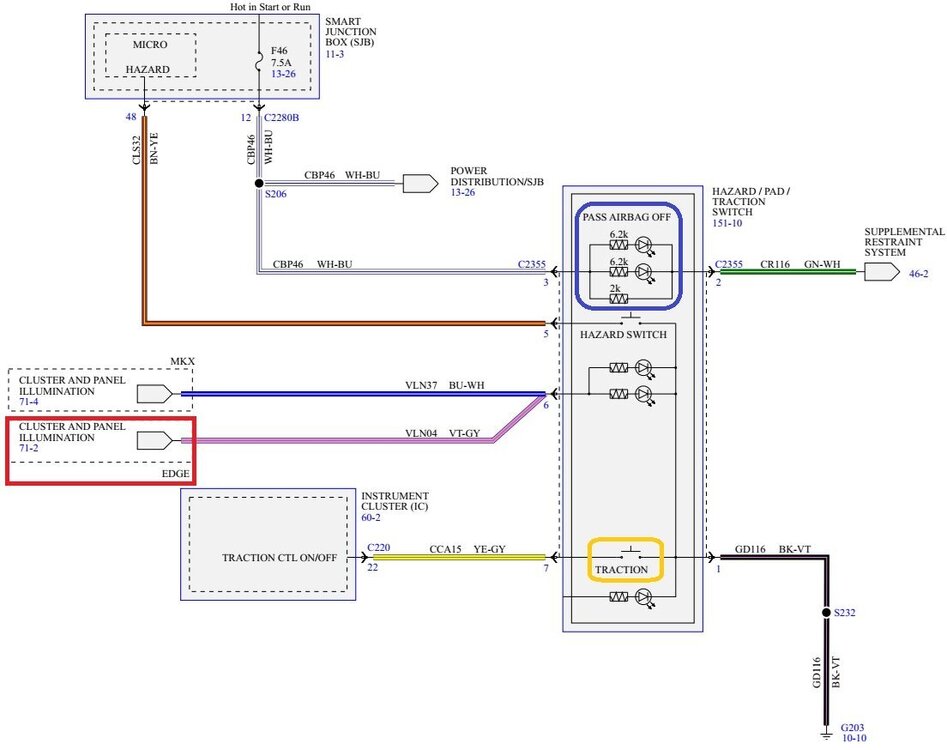
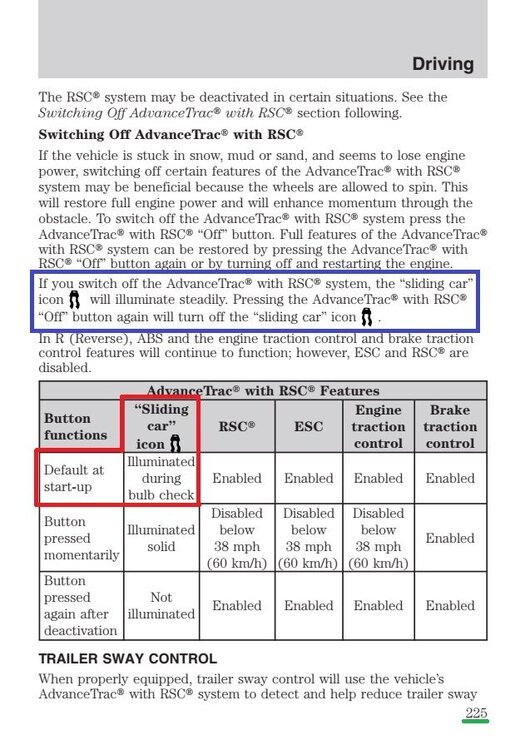
I understand that you expect the Traction Control switch to light up briefly at Engine Start-up, in conjunction with the Instrument Cluster's bulb-check routine. I also understand that your Edge is not showing any Diagnostic Trouble Codes (DTCs) on your Code Scanner/Reader, nor any Check Engine Light (CEL), nor any other adverse messages or indicators, so you are concerned that a faulty fuse or circuit breaker may be responsible for the lack of any Traction Control status expressed by the Traction Control Switch lighting up or extinguishing in response to your button pushing, highlighted by the red oval in the following photo... Looking to the 2010 Edge wiring diagram, which I've highlighted with blue, red, and gold boxes... You may notice the depiction of the Passenger Airbag Off switch within the blue box includes an LED symbol directly in the circuit that the switch interrupts or completes. When the switch completes its circuit, the LED lights up and illuminates the words Passenger Airbag Off to express the status of the passenger airbag on the face of that switch button. You may also notice the depiction of the Traction Control switch within the gold box does not include an LED symbol directly in that circuit, meaning the button itself does not provide any system status feedback by lighting up. Other LEDs depicted in the wiring diagram provide the Traction Control/Hazard/Passenger Airbag Deactivation switch assembly with nighttime backlighting, delivered by the red-boxed Cluster and Panel Illumination circuits that backlight the various switches and other controls inside the cabin. So, the wiring diagram shows the Traction Control switch is not designed to light up or extinguish in response to button pushes, and its behavior that you are seeing is normal, not faulty. Looking next to the 2010 Edge Owner Guide, page 225, which I've highlighted with red and blue boxes... Regarding your expectation of something Traction Control-related lighting up at Engine Start-up, the red-boxed and blue-boxed portions of the above Owner Guide page shows that the Sliding Car icon, representing in part the Traction Control system, does light up briefly during the Engine Start-up in the Instrument Cluster and in response to Traction Control button pushes, as shown as red-surrounded Item 26 in the below illustration... So, recapping in response to your initial question... The Traction Control switch has no capacity to light up in response to button pushes, and, the status of the Traction Control system and other Anti-Lock Brake System (ABS) attributes is expressed by the Sliding Car icon in the Instrument Cluster. Traction Control switch is operating as designed, with it not providing any direct system status feedback, so you don't need to be concerned about that. The Owner Guide provides a fairly comprehensive description of ABS features and their behavior. Included below is a portion of the 2010 Edge Workshop Manual that provides a more technical explanation of your Edge's ABS. And finally, because I understand you wish to learn more about about your Edge, attached at the bottom, as a PDF document, is the 2010 Edge section of the SourceBook, an informational reference supplied to dealership sales personnel, which you may enjoy reading. Good luck! Placing your device cursor over underlined acronyms may yield full-words descriptions of those acronyms, below. Principles of Operation Standard ABS The standard ABS module manages anti-lock braking to maintain vehicle control during deceleration. When the ignition switch is in the RUN position, the ABS module does a preliminary electrical check and, at approximately 20 km/h (12 mph), the hydraulic pump motor is turned on for approximately one-half second. During this time, a buzzing or humming noise may be heard and a vibration maybe felt in the brake pedal. This is a normal condition. Any malfunction of the ABS disables the stability control and the ABS warning indicator illuminates. However, the power-assist braking system functions normally. The ABS module monitors and compares the rotational speed of each wheel. Wheel speeds are measured by the wheel speed sensor, which electrically senses each tooth of the sensor ring as it passes through the magnetic field of the sensor. When the ABS module detects an impending wheel lock, the ABS module commands the hydraulic pump motor on and commands the Hydraulic Control Unit (HCU) to open and close the appropriate solenoid valves to modulate the brake pressure to the individual brake caliper(s). Once the affected wheel(s) return to the desired speed, the ABS module commands the HCU to return the solenoid valves to their normal position and normal base brake operation is restored. In extreme cold conditions (temperature less than -25°C [-13°F]), the ABS module will briefly operate the hydraulic pump motor when the accelerator is pressed. This is done to warm the brake fluid. Electronic Brake Distribution (EBD) On initial application of the brake pedal, full pressure is applied to the rear brakes. The ABS module then uses wheel speed input to calculate an estimated rate of deceleration. Once vehicle deceleration exceeds a predetermined threshold, the ABS module closes the appropriate isolation valves in the HCU to hold the rear brake pressure constant while allowing the front brake pressure to build. This creates a balanced braking condition between the front and rear wheels and minimizes the chance of rear wheel lockup during hard braking. As the vehicle decelerates, the valves are opened to increase the rear brake pressure in proportion to the front brake pressure. A slight bump sensation may be felt in the brake pedal when Electronic Brake Distribution (EBD) is active. If ABS is disabled due to DTCs being present in the ABS module, EBD will continue to function unless the DTCs are for wheel speed sensors or the HCU . When EBD is disabled, the ABS warning indicator and (if equipped) the Electronic Stability Control (ESC) warning indicator will be illuminated. ABS with Traction Control, Electronic Stability Control (ESC) and Roll Stability Control (RSC®) The ABS module with traction control and Roll Stability Control (RSC®) performs the same functions as the standard ABS module. It also performs additional functions specific to traction control and RSC® . Traction Control When the drive wheels lose traction and begin to spin, with vehicle speed under 100 km/h (62 mph), the ABS module commands the hydraulic pump motor on and commands the HCU to open and close the appropriate solenoid valves to modulate the brake pressure to the brake caliper(s) while simultaneously sending a request to the PCM over the High Speed Controller Area Network (HS-CAN) bus to reduce engine torque to maintain vehicle traction. The PCM accomplishes this by minor incremental timing changes and fewer fuel injector pulses until the ABS module ends the request. The request ends when the driven wheel speed returns to the desired speed. After the vehicle speed exceeds 100 km/h (62 mph), the traction control is accomplished only through the PCM torque control. Electronic Stability Control (ESC) The ESC system constantly monitors the vehicle motion relative to the intended course. This is done by using sensors to compare the steering input and the yaw rate sensor with that of the actual vehicle motion. The ESC system monitors information from the Steering Angle Sensor Module (SASM) (steering wheel angle and rate of change) and a yaw rate sensor (integral to the stability control sensor cluster) that measures changes in vehicle direction. If the ESC system determines from all these inputs that the vehicle is unable to travel in the intended direction, the system adjusts the brake torque at specific wheels in response to direct measurement of the vehicle motion and reduces engine torque to allow the vehicle to follow the intended course. When the ESC system activates, any of the following can occur: A rumble or grinding sound much like ABS or traction control A small deceleration or a reduction in the acceleration of the vehicle The stability/traction control indicator "sliding-car icon" flashes If the driver's foot is on the brake pedal, a vibration will be felt in the pedal much like ABS Roll Stability Control (RSC®) The RSC® system constantly monitors the vehicle motion relative to the intended course. This is done by using sensors to compare the steering input and brake application with that of the actual vehicle motion. The system does not activate when the vehicle is traveling in reverse; however, the standard ABS and traction control continue to function as usual. The RSC® system monitors information from the wheel speed sensors, the Throttle Position (TP) sensor, the SASM (steering wheel angle and rate of change) and a roll-rate sensor (integral to the stability control sensor cluster) that measures changes in vehicle motion. If the RSC® system determines from all these inputs that conditions exist for a potential roll-over event, the system adjusts the brake torque at specific wheels in response to direct measurement of the vehicle roll motion and reduces engine torque to make the vehicle more stable. By adjusting brake torque, the system can reduce the cornering forces and, therefore, the total roll moment acting on the vehicle. When the RSC® system activates, any of the following can occur: A rumble or grinding sound much like ABS or traction control A small deceleration or a reduction in the acceleration of the vehicle The RSC® indicator flashes If the driver's foot is on the brake pedal, a vibration will be felt in the pedal much like ABS Some drivers may notice a slight movement of the brake pedal when the system checks itself. The brake pedal moves when an active test of the brake booster is run. During this test a small amount of pressure is generated at the master cylinder, but no pressure is generated in the brake calipers. Stability/Traction Control Switch The stability/traction control switch is hardwired to the Instrument Cluster (IC) . The IC communicates switch status to the ABS module via the HS-CAN bus. The stability/traction control switch allows the driver to control use of the traction control system. This is independent of the ABS, ESC and RSC® functions, which cannot be switched off by the driver. Traction control system status is indicated by the stability/traction control indicator "sliding-car icon" in the IC . The system will automatically restore to full functionality when the ignition switch is cycled from OFF to RUN. Stability Control Sensor Cluster The stability control sensor cluster consists of the yaw rate sensor, roll-rate sensor, lateral accelerometer and longitudinal accelerometer. The lateral accelerometer measures the acceleration which corresponds to the force involved when the vehicle slides sideways. This acceleration has 2 forms. The first is the centrifugal acceleration which is generated when the vehicle travels around in a circle. The second is the acceleration due to gravity. On level ground there is no contribution from this acceleration. However, if the vehicle is parked sideways on a bank or incline, the sensor measures some lateral acceleration due to gravity even though the vehicle is not moving. The longitudinal accelerometer measures the acceleration corresponding to the force involved when the vehicle moves forward and rearward in the horizontal plane, along the centerline of the front and rear wheels. The yaw rate sensor measures the relative vehicle motion about the vertical axis through its center of gravity. The roll-rate sensor measures the rate of rotation along the front to rear horizontal axis. Steering Angle Sensor Module (SASM) The SASM measures the rate of rotation of the steering wheel by monitoring the steering wheel rotation ring as it passes through the sensor gap. The SASM uses the HS-CAN bus to transmit information to the ABS module about whether the steering wheel is being turned left or right and how far it is being turned. 2010 Ford Edge Sourcebook.pdf -
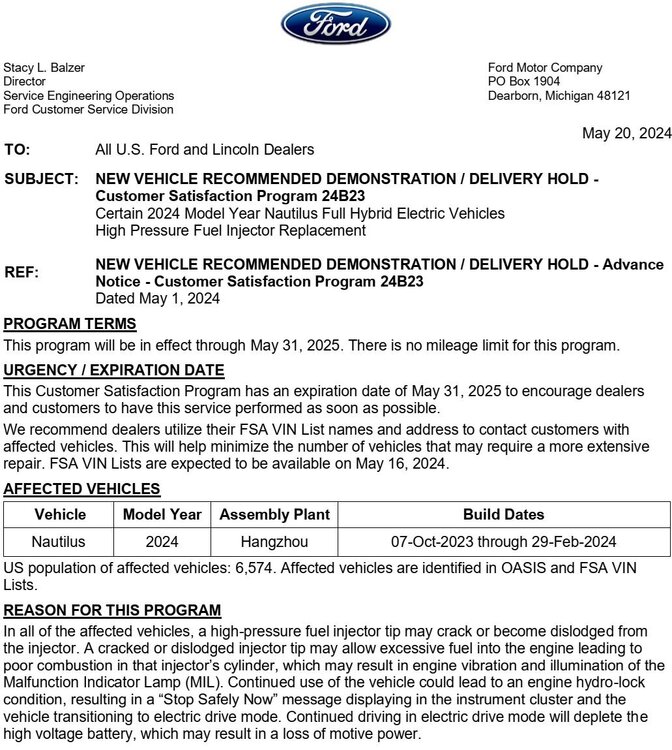
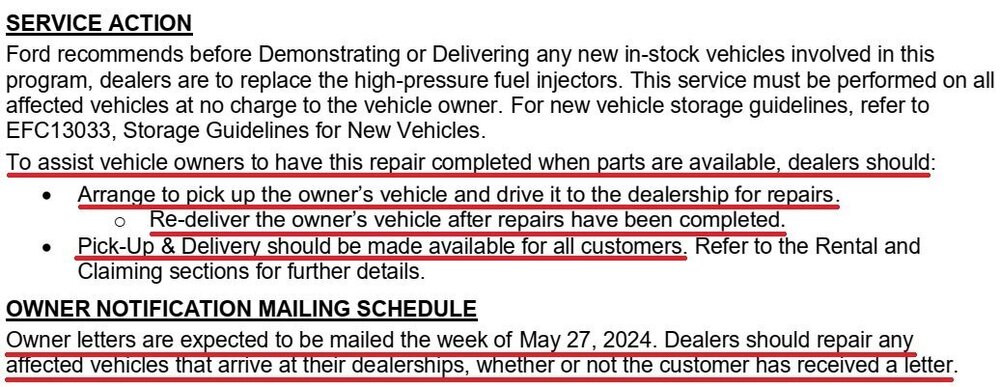
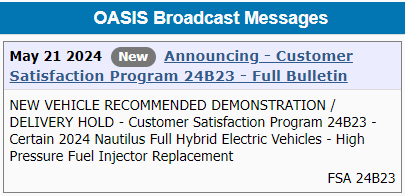
Full Dealer Bulletin follows as a supplement to @markfm's post, but without repeating markfm's above-posted page... The Full Dealer Bulletin and Technical Instructions were posted to the OASIS server, but have not been announced on the Professional Technician System (PTS) site. The PTS announcement will likely occur on the morning of May 21, 2024. Ford of Canada Full Dealer Bulletin has not yet been released, but it will be added here when it becomes available. Gratitude to @markfm for his sharing. 05/21/2024 Edit: As expected, from PTS... No Ford of Canada document or announcement yet, where 351 vehicles are affected.
-
This General Service Bulletin provides a download link that allows you to always know the latest SYNC 4 version for your vehicle... GSB 23-7146 - Determining Latest SYNC 4 Software Level **New downloadable document lists the latest SYNC 4 versions available for all Ford/Lincoln Models, by Model Year** Good Luck!
-
Welcome to the Forum, @Oifvet138! @atulo solves the mystery! From the 2019 Edge Workshop Manual... Link to this FordParts,com web page Good luck!
-
So, as you prepare to move beyond researching Stop and Go ACC, to the next step of ordering parts and investing money to retrofit your current Edge... What is your plan for sourcing initial modules' software upgrades and eventual software updates, like the IPMA tar strip tweak you previously cited. Is there a Ford Modules bootleg software-sharing community out there, to serve that ongoing need? Ford says to their Dealers... SSM 51055 - Adding/Removing Features Using Programmable Parameters Due To Vehicle Modifications Ford and Lincoln vehicle owners may request modifications to their vehicle such as enabling daytime running lamps (DRL), adding navigation, changing tire/axle sizes, and/or adding trailer brake control modules. A list of programmable parameters that are available for alteration is shown in Workshop Manual (WSM), Section 418-01A > Module Configuration. Parameters available for alteration will vary by model and model year. If the desired parameter is not listed in the right column of the Module Configuration and Parameter Chart, alteration of that parameter is not supported by Ford Motor Company. A list of supported parts that can be added to the vehicle is available at accessories.ford.com. Adding/removing accessories and/or programming vehicle features is not warrantable. Have you calculated Retrofitting versus Selling & Replacing costs, toward factory-installed Stop and Go ACC in a different Ford Edge driven by you? Good luck!
-
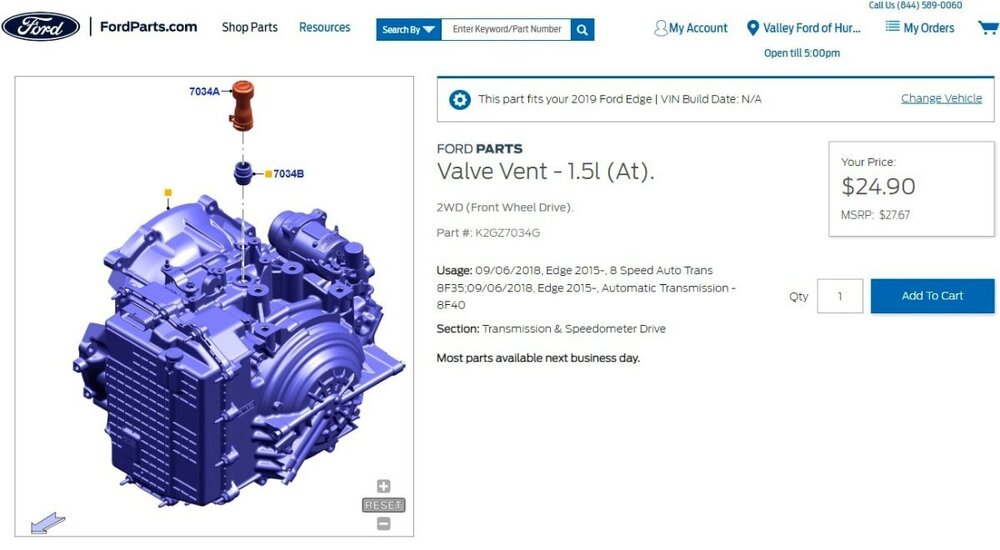
See this post for part numbers and FordParts.com listings. Good luck!
-
Reply to above question posted here. Good luck!
- 1 reply
-
- 1
-

-
Replying to question about Brake Booster types installed on 2019-2024 Edge - Vacuum versus Electric. 2007 through 2024 Edge: Vacuum Brake Booster only, regardless of whether Cruise Control is conventional or adaptive. Brake Booster illustration from 2015-2024 Edge Workshop Manuals... Typical cross-generational Brake Booster component test descriptions... Per your 2020 Workshop Manual description, all Edge/MKX, and Nautilus (thru 2023) Adaptive Cruise Control systems utilize the ABS Module and Hydraulic Control Unit (HCU) to accomplish Adaptive Cruise braking. So, no, an Electric Brake Booster is not required for Adaptive Cruise Control on an Edge, MKX, or Nautilus (thru 2023). With that said, the 2024 Nautilus is equipped with an Electric Brake Booster which is utilized by its Adaptive Cruise Control system. From the 2024 Nautilus Workshop Manual... Placing your device cursor over underlined acronyms may yield a full-words description of the acronyms. Electric Brake Booster (EBB) Assembly The EBB is serviced as a single assembly and should NOT be disassembled. The EBB assembly contains the ABS module, solenoid valves, pressure sensor and hydraulic pump motor ( HCU ); the EBB also takes the place of the brake master cylinder and the vacuum booster. The ABS module is serviced as an assembly with the EBB . The ABS module is the ECU for the ABS and stability control systems. The module monitors all sensor inputs and all CAN messages relating to ABS and stability control, then directly controls the solenoid valves and the hydraulic pump motor in the EBB . When a new EBB assembly is installed, the ABS module must be programmed with the current vehicle configuration information. Electric Brake Booster (EBB) The cruise control deactivator switch is integrated in the EBB and opens when the brake pedal is applied and removes the ground signal from the PCM input circuit releasing the throttle and immediately deactivating the ACC system. Electric Brake Booster (EBB) - Isolated Component Illustration - 2024 Nautilus Workshop Manual Electric Brake Booster (EBB) - Installed Component View Showing Electrical Connectors - 2024 Nautilus Workshop Manual Electric Brake Booster (EBB) - Installed Component View Showing Brake Lines Attached - 2024 Nautilus Workshop Manual and... The ACC system has the capability for the driver to change from ACC to standard cruise control. The steering wheel switches are used to switch from the ACC system to standard cruise control system within the message center. For information on selecting the standard cruise control in the message center, refer to the Owner's Literature. Once the driver has selected the standard cruise control in the message center, the ACC indicator is replaced by the standard cruise control indicator. The vehicle no longer responds to lead vehicles or automatic braking. Upon the next ignition cycle, the vehicle defaults back to the ACC system. Good luck!
-

Installing Sunvisor 2018 Edge
Haz replied to crazywater's topic in Interior, A.C., Heat, Interior Trim
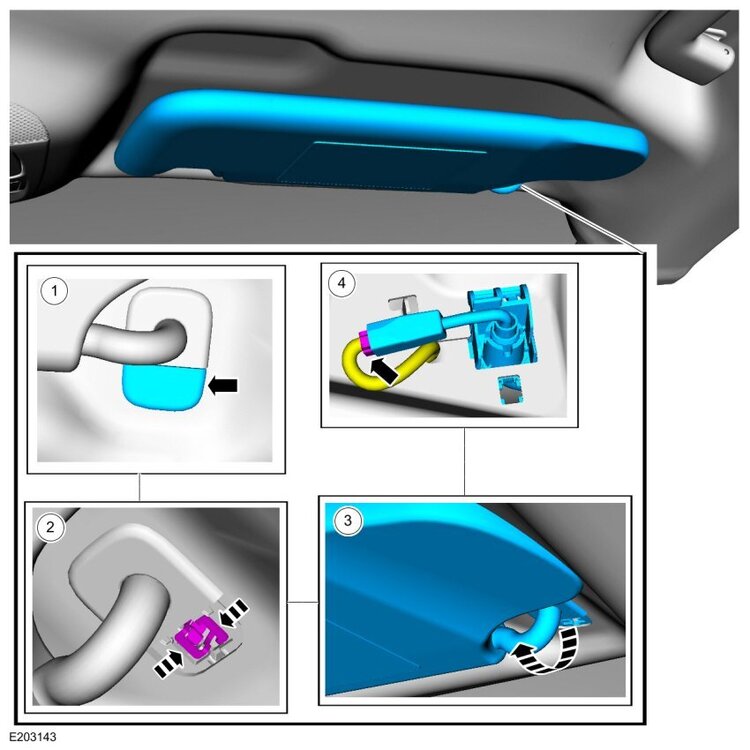
Welcome to the Forum, @Dougbobo! From the 2018 Edge Workshop Manual... Remove Sun Visor Remove the sun visor retainer cover. Remove the sun visor retainer. Remove the sun visor. If equipped. Disconnect the sun visor electrical connector. Good luck! -
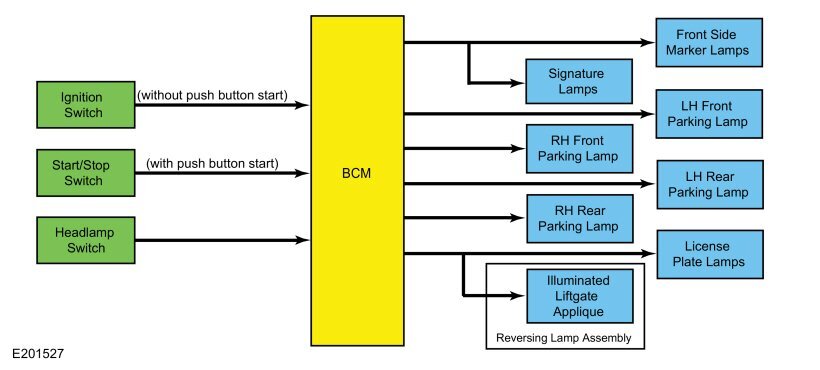
Attached below as PDF documents are Headlamp-related 2017 Edge Wiring diagrams, Connector details and Ground circuit termination locations , and an Exterior Lighting system description, which provides the following explanation... Placing your device cursor over underlined acronyms may yield a full-words popup description of those acronyms. Parking, Rear, and License Plate Lamps System Diagram Parking Lamps The BCM monitors the headlamp switch position by sending voltage signals on multiple circuits to the headlamp switch. There is one circuit for each headlamp switch position. At any given time, one of the signal circuits is switched to ground to indicate the headlamp switch position. If the BCM detects a fault from the headlamp switch or loses communication with the headlamp switch, the BCM turns the parking and headlamps on. This is normal behavior of the BCM when a fault has been detected with the inputs from the headlamp switch. When the BCM receives an input requesting the parking lamps on, it provides voltage to the parking lamps. The BCM also provides Field Effect Transistor (FET) protection of the parking lamps output circuits. When an excessive current draw is detected, the BCM disables the affected parking lamps circuit driver. Signature Lamps Each of the signature lamp assemblies consist of multiple Light Emitting Diodes (LEDs) that receive fused voltage when the ignition is in ON or START. When the signature lamps receive fused voltage from the BJB , and the parking lamps are OFF, the signature lamps illuminate at full intensity. When the parking lamps are activated and the BCM sends a second voltage to the signature lamps to indicate the parking lamps are activated, the signature lamps operate at a reduced intensity. Field Effect Transistor (FET) Protection The BCM utilizes an Field Effect Transistor (FET) protective circuit strategy for many of its outputs, for example, lamp output circuits. Output loads (current level) are monitored for excessive current (typically short circuits) and are shut down (turns off the voltage or ground provided by the module) when a fault event is detected. A Field Effect Transistor (FET) is a type of transistor that the control module software uses to control and monitor current flow on module outputs. The Field Effect Transistor (FET) protection strategy prevents module damage in the event of excessive current flow. Output loads (current level) are monitored for excessive current draw (typically short circuits). When a fault event is detected the Field Effect Transistor (FET) turns off and a short circuit DTC sets. The module resets the Field Effect Transistor (FET) protection and allows the circuit to function when the fault is corrected or the ignition state is cycled off and then back on. When the excessive circuit load occurs often enough, the module shuts down the output until a repair procedure is carried out. Each Field Effect Transistor (FET) protected circuit has 3 predefined levels of short circuit tolerance based on a module lifetime level of fault events based upon the durability of the Field Effect Transistor (FET). If the total tolerance level is determined to be 600 fault events, the 3 predefined levels would be 200, 400 and 600 fault events. When each level is reached, the DTC associated with the short circuit sets along with DTC U1000:00. These Diagnostic Trouble Codes (DTCs) can be cleared using the module on-demand self-test, then the Clear DTC operation on the scan tool (if the on-demand test shows the fault corrected). The module never resets the fault event counter to zero and continues to advance the fault event counter as short circuit fault events occur. If the number of short circuit fault events reach the third level, then Diagnostic Trouble Codes (DTCs) U1000:00 and U3000:49 set along with the associated short circuit DTC . DTC U3000:49 cannot be cleared and the module must be replaced after the repair. Please consider posting a photo or two of your Raptor-style grille, after its installation is complete. Good luck! Headlamp, Left Hand - Wiring Diagram - 2017 Edge.pdf Headlamp, Right Hand - Wiring Diagram - 2017 Edge.pdf Headlamp, Right Hand - Connector C1285 Pin-Circuit Details - 2017 Edge.pdf Headlamp, Left Hand - Connector C1284 Pin-Circuit Details - 2017 Edge.pdf Headlamp, Left Hand - G111 Ground Circuit Termination Location - 2017 Edge.pdf Headlamp, Right Hand - G114 Ground Circuit Termination Location - 2017 Edge.pdf Exterior Lighting - System Operation and Component Description - 2017 Edge Workshop Manual.pdf Daytime Signature Lamps - Wiring Diagram - 2017 Edge.pdf Daytime Signature Lamp, Left Hand - Connector C1750 Pin-Circuit Details - 2017 Edge.pdf Daytime Signature Lamp, Right Hand - Connector C1751 Pin-Circuit Details - 2017 Edge.pdf
-
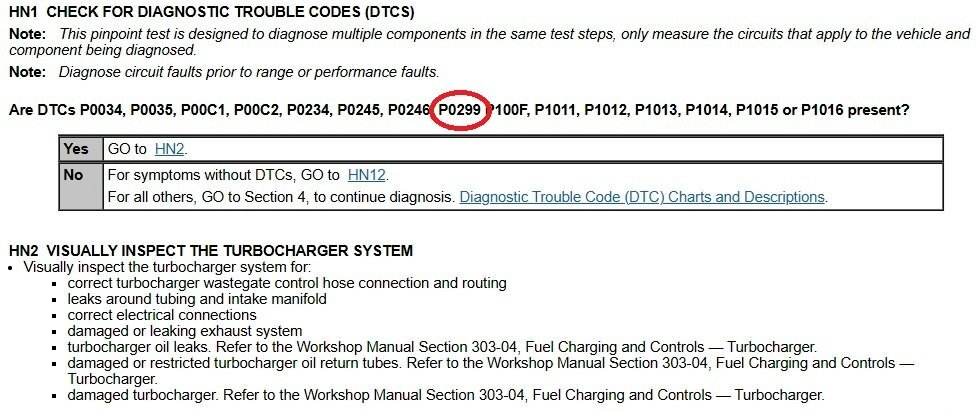
Welcome to the Forum, @Murtaza! The following description of Diagnostic Trouble Code (DTC) P0299 is from Ford's 2012 Gasoline Powertrain Control/Emissions Diagnosis (PC/ED) Manual... The following PDF file attachment is the above-mentioned diagnostic Pinpoint Test HN which evaluates for P0299 and other Turbocharger DTCs... 2012 Edge 2.0L EB DTC P0299 - Turbocharger Diagnostic Pinpoint Test HN - Ford PC-ED Manual.pdf And this excerpt from that document... While your mechanic may have already applied these diagnostic steps toward your 2012 Edge, you might discuss this document with your mechanic to deepen your confidence in your mechanic's advice. You may also want to read this past post: 2012 Troubleshooting P0299 (link to discussion) originated by Forum member @TxBucki. Good luck!
-
Remaining documents... Good luck! Inline Connector - Connector C139 Location - 2019 Edge.pdf Inline Connector - Connector C192 Location - 2019 Edge.pdf Inline Connector - Connector C193 Location - 2019 Edge.pdf Inline Connector - Connector C193 Pin-Circuit Details - 2019 Edge.pdf Inline Connector - Connector C192 Pin-Circuit Details - 2019 Edge.pdf Inline Connector - Connector C139 Pin-Circuit Details - 2019 Edge.pdf Inline Connector - Connector C134 Pin-Circuit Details - 2019 Edge.pdf Inline Connector - Connector C913 Pin-Circuit Details - 2019 Edge.pdf
-
Attached below and in an immediately following post are requested documents... Cruise Control Module (CCM) - Removal and Installation - 2019 Edge Workshop Manual.pdf Image Processing Module A (IPMA) - Removal and Installation - 2019 Edge Workshop Manual.pdf Image Processing Module A (IPMA) - Connector C9224 Location - 2019 Edge.pdf Image Processing Module A (IPMA) - Connector C9224 Pin-Circuit Details - 2019 Edge.pdf Image Processing Module A (IPMA) and Cruise Control Module (CCM) - Adaptive Cruise with Stop and Start - Wiring Diagram - 2019 Edge.pdf Image Processing Module A (IPMA) - Module Communications - Wiring Diagram - 2019 Edge.pdf Image Processing Module A (IPMA) - Power Distribution - Wiring Diagram - 2019 Edge.pdf Image Processing Module A (IPMA) - Grounds - Wiring Diagram - 2019 Edge.pdf Cruise Control Module (CCM) - Connector C1582 Location - 2019 Edge.pdf Cruise Control Module (CCM) - Connector C1582 Pin-Circuit Details - 2019 Edge.pdf Cruise Control Module (CCM) - Power Distribution - 2019 Edge.pdf Cruise Control Module (CCM) - Grounds - 2019 Edge.pdf Auto Stop and Start - Wiring Diagram - 2019 Edge.pdf Cruise Control Module (CCM) - Ground G111 Location - 2019 Edge.pdf Image Processing Module A (IPMA) - Ground G304 Location - 2019 Edge.pdf Inline Connector - Connector C913 Location - 2019 Edge.pdf Inline Connector - Connector C134 Location - 2019 Edge.pdf
-

Rear washer fluid not spraying
Haz replied to Rlahnan0121's topic in Glass, Lenses, Lighting, Mirrors, Sunroof (BAMR), Wipers
Additional related Workshop Manual PDF documents attached below... Good luck! Washer Hose Coupling - General Procedures - 2019 Edge Workshop Manual.pdf Washer Hose Repair - General Procedures - 2019 Edge Workshop Manual.pdf -
Link to recent Forum discussion on the hood flutter issue. Good luck!
-
Hood alignment procedure attached below... Good luck! Hood Alignment - General Procedures - 2024 Edge Workshop Manual.pdf
-
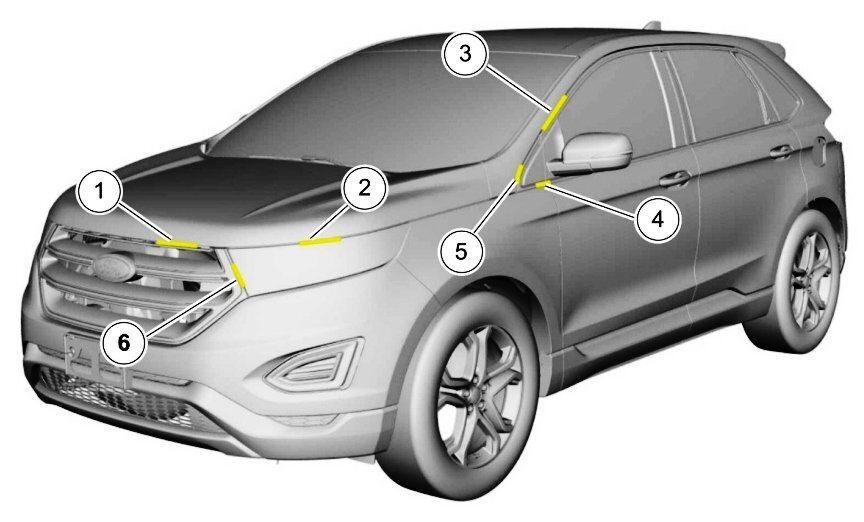
Welcome to the Forum, @GTEyes! Image to supplement @garycrist's comment... If adjusting the bump stop does not correct the excessive headlamp-to-hood margin, or, you just prefer to have your dealer perform the corrective work... The 2024 Edge Workshop Manual provides the following illustration and table of body component margin and flushness tolerances: Your dealer should be able to correct the condition, possibly by aligning the hood and/or adjusting the bumper cover and headlamp assembly to satisfy the above margin & flushness dimensional tolerances. Simply for your awareness of potential corrective process, the Hood Alignment procedure is attached below as a PDF document. Please note that due to PDF formatting, the action-step description at the bottom of all except the last page, applies to the illustration on the following page. Good luck!
-
From the 2019 Edge Workshop Manual... Good luck! Ignition Coil-On-Plug - Removal and Installation - 2.7L EcoBoost - 2019 Edge Workshop Manual.pdf Spark Plugs - Removal and Installation - 2.7L EcoBoost - 2019 Edge Workshop Manual.pdf Air Cleaner Outlet Pipe RH - Removal and Installation - 2.7L EcoBoost - 2019 Edge Workshop Manual.pdf





-IllustrationandFeaturesLegend-2010Edge.thumb.jpg.80d600d3bda772f4ea676701cc63c3ce.jpg)


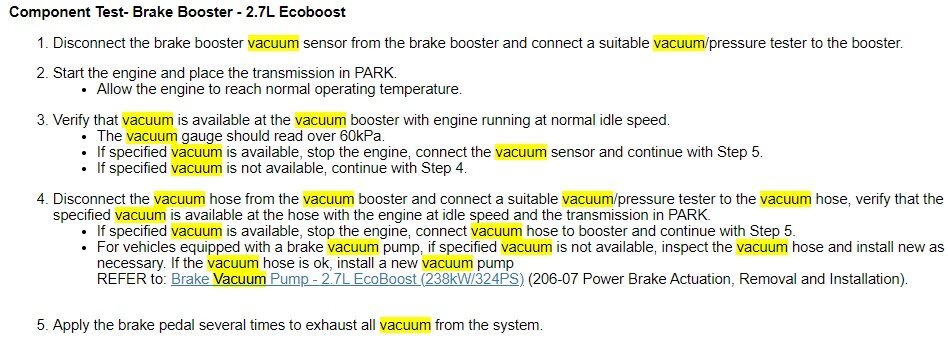
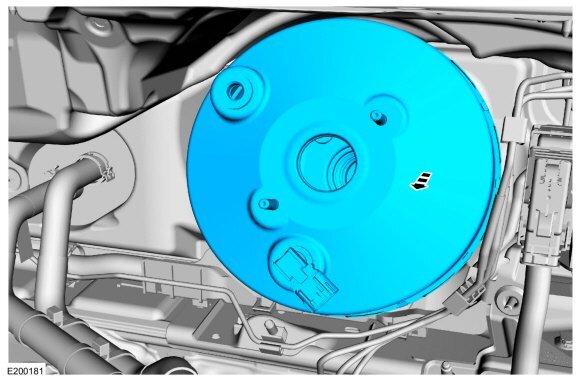
-IsolatedComponentIllustration-2024NautilusWorkshopManual.thumb.jpg.a309887f3d48ed43692bfa6808cdf277.jpg)
-InstalledComponentViewShowingElectricalConnectors-2024NautilusWorkshopManual.thumb.jpg.31a49f9e69fc9773bfdcc1731b992277.jpg)
-InstalledComponentViewShowingBrakeLinesAttached-2024NautilusWorkshopManual.thumb.jpg.314c96bca18fefe6a1e0cb87bc721dae.jpg)

