-
Posts
11,144 -
Joined
-
Last visited
-
Days Won
269
Content Type
Profiles
Forums
Gallery
Everything posted by WWWPerfA_ZN0W
-

What to expect at 200,000+ miles
WWWPerfA_ZN0W replied to macbwt's topic in Brakes, Chassis & Suspension
I'm sure the OC will be well into the 300's by then -
The power points are ALWAYS ON. The OM for the 2007 & 2011 both state that nothing active should be left plugged in too long when engine is not running, otherwise the battery runs the risk of being discharged.
-

What to expect at 200,000+ miles
WWWPerfA_ZN0W replied to macbwt's topic in Brakes, Chassis & Suspension
Haven't checked for overlap in labor between the two processes, but if there isn't much, then doing it separately should work fine. If you can determine what seems to be causing the majority of the movement, I'd take care of that first. Maybe your trusted mechanic can help with that determination? -
Pic?
-

What to expect at 200,000+ miles
WWWPerfA_ZN0W replied to macbwt's topic in Brakes, Chassis & Suspension
OEM is relatively expensive, but then, truthfully, I haven't heard much good about Anchor parts. They die easily! That's why I had the original mounts on my '95 rebuilt instead. Don't see that option for the Edge yet. I checked Levittown's site and saw TWO engine mounts listed, the FSM shows only one: No. Part # Part # / Description List Price Price 1 8T4Z-6038-A 8T4Z-6038-A / FRONT MOUNT, RIGHT $175.90 $119.26 2 7A1Z-6038-AA 7A1Z-6038-AA / FRONT MOUNT, LEFT $136.23 $ 92.37 Transmission Mount (build date dependent) but the B part should be fine for all: 9 8T4Z6068A 8T4Z6068A / TRANS MOUNT TO 1/10/08 UNAVAILABLE 9 8T4Z-6068-B 8T4Z-6068-B / TRANS MOUNT $91.53 $62.06 FROM 1/11/08 -

What to expect at 200,000+ miles
WWWPerfA_ZN0W replied to macbwt's topic in Brakes, Chassis & Suspension
No question some trans mounts at least are in order. That deer hit probably pushed it over the ..... -
Fingers crossed there are no leaks to deal with! Hopefully just underfilled at the factory ...
-

What to expect at 200,000+ miles
WWWPerfA_ZN0W replied to macbwt's topic in Brakes, Chassis & Suspension
Us bozos always underestimates 'em wimminfolks -

What to expect at 200,000+ miles
WWWPerfA_ZN0W replied to macbwt's topic in Brakes, Chassis & Suspension
Well, I hope you can negotiate a way to surMOUNT this problem! ok ok don't hit me! -

What to expect at 200,000+ miles
WWWPerfA_ZN0W replied to macbwt's topic in Brakes, Chassis & Suspension
-

What to expect at 200,000+ miles
WWWPerfA_ZN0W replied to macbwt's topic in Brakes, Chassis & Suspension
Ummm ... yeah ... no, I would NOT turn off the wifi in the house. That's like extracting a tooth without painkiller for some people! -

What to expect at 200,000+ miles
WWWPerfA_ZN0W replied to macbwt's topic in Brakes, Chassis & Suspension
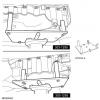
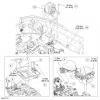
Transaxle Support Insulator (looks worse than it is by number of steps (installation is mostly reversal of removal) but that's the way the FSM says) Special Tool(s) Oil Pan Holding Fixture 303-1295 Item Part Number Description 1 14A464 Electrical connector — mass air flow (MAF) sensor 2 6758 Tube assembly — crankcase vent 3 N606678 Bolt — air cleaner bracket 4 9C632 Clamp — air cleaner outlet pipe 5 9C662 Air cleaner assembly 6 13A506 Fastener — wiring harness 7 13A506 Fastener — wiring harness 8 W503924 Bolts — battery tray 9 10723 Battery tray 10 W711873 Through bolt — transaxle support insulator 11 W709234 Bolts — transaxle support insulator (4 required) 12 6F020 Transaxle support insulator Removal With the vehicle in NEUTRAL, position it on a hoist. For additional information, refer to Section 100-02 .Loosen the exhaust flexible pipe clamp and disconnect the 2 exhaust hangers. Remove the 4 nuts and the exhaust flexible pipe and Y-pipe as an assembly. Discard the nuts and the gasket. Remove the 2 nuts and the roll restrictor heat shield. Loosen the engine roll restrictor-to-subframe through bolt. Remove the 3 bolts from the roll restrictor bracket. Remove the 3 bolts and the roll restrictor bracket. Disconnect the mass air flow (MAF) sensor electrical connector and the wiring harness fastener from the air cleaner assembly. Disconnect the brake booster vacuum hose from the air cleaner outlet pipe. Disconnect the engine breather from the air cleaner assembly. Remove the air cleaner assembly bracket bolt. Loosen the air cleaner outlet pipe clamp at the throttle body and remove the air cleaner and air cleaner outlet pipe assembly. Remove the battery. For additional information, refer to Section 414-01 . Remove the battery tray. Disconnect the wiring harness fasteners. Remove the 3 bolts and the battery tray. CAUTION: The special tool must be carefully aligned to the mounting bosses on the oil pan. Failure to follow these instructions may result in damage to the oil pan. NOTE: The special tool and floor jack are used to raise and lower the engine to access the engine front cover and engine mount bracket fasteners. Position a floor jack and the special tool under the oil pan and raise the floor jack high enough to release the pressure on the transaxle support insulator. Remove the transaxle support insulator through bolt. Remove the 3 nuts, the bolt and the transaxle support insulator bracket. Lower the jack until the transmission fluid cooler tube clears the lower transmission support insulator bolts. Loosen the battery tray support bracket bolts. Remove the top transaxle support insulator bolts. Remove the bottom transaxle support insulator bolts. Installation Install the bottom transaxle support insulator bolts. Tighten to 55 Nm (41 lb-ft). Install the top transaxle support insulator bolts. Tighten to 55 Nm (41 lb-ft). Tighten the battery tray support bracket bolts. Tighten to 10 Nm (89 lb-in). Using the jack, lift the transaxle into place. Install the transaxle support insulator bracket, install the bolt and the 3 nuts. Tighten to 63 Nm (46 lb-ft). Install the transaxle support insulator through bolt. Tighten to 175 Nm (129 lb-ft). Install the battery tray. Install the 3 bolts. Tighten to 10 Nm (89 lb-in). Connect the wiring harness fasteners to the battery tray. Install the battery. For additional information, refer to Section 414-01 . Position the air cleaner assembly in place and install the bolt. Tighten to 11 Nm (8 lb-ft). Tighten the air cleaner outlet pipe clamp at the throttle body. Tighten to 5 Nm (44 lb-in). Connect the engine breather to the air cleaner assembly. Connect the brake booster vacuum hose to the air cleaner assembly. Connect the MAF sensor electrical connector and connect the electrical harness fastener. Check the transmission fluid level and fill with clean automatic transmission fluid to the correct level. Position the roll restrictor bracket on the transaxle and install the 3 bolts. Tighten to 90 Nm (66 lb-ft). Position the roll restrictor in place, install the bracket and the 3 bolts. Tighten to 90 Nm (66 lb-ft). Install the engine roll restrictor-to-subframe through bolt. Tighten to 103 Nm (76 lb-ft). Install the roll restrictor heat shield and the 2 nuts. Tighten to 9 Nm (80 lb-in). Position the exhaust Y-pipe assembly in place and install the 4 nuts. Tighten to 40 Nm (30 lb-ft). Install the 2 exhaust hangers and tighten the exhaust clamp. Tighten to 40 Nm (30 lb-ft). -

What to expect at 200,000+ miles
WWWPerfA_ZN0W replied to macbwt's topic in Brakes, Chassis & Suspension
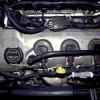
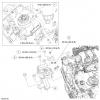
My personal advice is to leave this to the professionals, but that's me You have access to pros + lift at the shop, so ... Here's a pic of the engine mount Oil Pan Holding Fixture 303-1295 Item Part Number Description 1 W807658 Degas bottle-to-fender bolt (2 required) 2 W709603 Degas bottle-to-washer bottle bolt 3 8A080 Degas bottle 4 W520102 Engine mount brace nut 5 6K075 Engine mount brace 6 W712334 Engine mount-to-engine nut (4 required) 7 W712511 Engine mount brace bolt 8 W712507 Engine mount-to-frame bolt (3 required) 9 6F012 Engine mount Removal and Installation With the vehicle in NEUTRAL, position it on a hoist. For additional information, refer to Section 100-02 . Loosen the exhaust flexible pipe clamp and disconnect the 2 exhaust hangers. To install, tighten to 40 Nm (30 lb-ft). Remove the 4 nuts, the exhaust flexible pipe and the Y-pipe as an assembly. Discard the nuts and the gasket. To install, tighten to 40 Nm (30 lb-ft). Remove the 2 nuts and the roll restrictor heat shield. To install, tighten to 11 Nm (8 lb-ft). Loosen the roll restrictor-to-subframe through bolt. To install, tighten to 103 Nm (76 lb-ft). Remove the roll restrictor through bolt and the 2 roll restrictor-to-transaxle bracket plate bolts. To install, tighten to 90 Nm (66 lb-ft). Remove the 3 bolts and the transaxle bracket. To install, tighten to 90 Nm (66 lb-ft). CAUTION: The special tool must be carefully aligned to the mounting bosses on the oil pan. Failure to follow these instructions may result in damage to the oil pan. Position a floor jack and the special tool under the oil pan. Remove the 3 bolts and position the engine coolant degas bottle aside. To install, tighten to 9 Nm (80 lb-in). Remove the nut, bolt and engine mount brace. To install, tighten to 20 Nm (15 lb-ft). Remove the 4 engine mount nuts. To install, tighten to 63 Nm (46 lb-ft). Remove the 3 bolts and the engine mount. To install, tighten to 90 Nm (66 lb-ft). To install, reverse the removal procedure. -
A little offtopic, but where are you moving to, tamugrad?
-

What to expect at 200,000+ miles
WWWPerfA_ZN0W replied to macbwt's topic in Brakes, Chassis & Suspension
If it's the motor mounts, then if you watch the engine when you have it in Park or Neutral and rev it, the engine will move a bit. That's the easiest way to tell. If the subframe bushings are shot, then you will find it "noisy"/clunky especially when accelerating into turns, but hard acceleration for sure. -
For the EcoBoost engines, yes. I think it is still 5W20 for the NA engines.
-
A. Battery issues - still original, or did you have it changed recently? B. Ignition cylinder issues - would need to be replaced C. Key fob battery issues - unlikely but worth a shot if A & B don't provide a solution.
-
It's possible the check valve in the booster is going bad. You should be able to get at least one good pump out of the brakes after shutoff. After than, lack of vacuum would create lack of assist i.e. stiff pedal feel. Brake BoosterThe power brake actuation system includes a vacuum assisted brake booster, vacuum check valve, vacuum hose and aspirator. The vacuum hose delivers engine vacuum to the vacuum check valve. The vacuum check valve is a one-way valve that allows engine supplied vacuum to the booster, and closes when engine vacuum is removed. The brake booster utilizes engine vacuum to reduce the amount of effort required at the brake pedal to actuate the foundation brakes.
-

Takata Airbag RECALL 34 million cars to be recalled
WWWPerfA_ZN0W replied to CinnamonEdge's topic in Lounge
It wasn't in the first round, let's hope the luck holds! http://www.nhtsa.gov/About+NHTSA/Press+Releases/Vehicle-owners-with-defective-airbags-urged-to-take-immediate-action http://www.safercar.gov/rs/takata/index.html -
Welcome and congrats on the '14 SEL Pix to share? I'll have to drive a v6 RAV to see what the "hot rod" factor is about
-

Answeres for all Audio/Video questions
WWWPerfA_ZN0W replied to Vfords's topic in Audio, Backup, Navigation & SYNC
Sounds like the unit is shorting and needs to be replaced. Still under warranty? -
Happy with their product for my '07 so far
-
Sounds like a real lemon, mjb, but certainly not characteristic of the entire Edge line or the Ford offerings. Unfortunately this is a 3-part game: Ford, dealership & customer. Any of those parts doesn't play well, and you end up with a bad experience


