-
Posts
11,144 -
Joined
-
Last visited
-
Days Won
269
Content Type
Profiles
Forums
Gallery
Everything posted by WWWPerfA_ZN0W
-

2016 Ford Edge SEL 3.5 AWD H6 Battery Fit?
WWWPerfA_ZN0W replied to Edgy_Ford's topic in 2016 Edge & MKX
i assume you saw omar302's post on the topic of bigger battery already? -

2016 Ford Edge SEL 3.5 AWD H6 Battery Fit?
WWWPerfA_ZN0W replied to Edgy_Ford's topic in 2016 Edge & MKX
check physical size info for this specific battery vs the one found to fit in the info you found. best way to do it. -
oh no! hope it is not a water pump leak. noticeable leaks usually are from above the alternator area (passenger side of engine). if the leak is on drivers side, check the LOWER thermostat housing. these rot away on occasion. i would pressure test the system for at least 30 minutes. if it comes out from above the alternator, you are in for a water pump/timing job. you can use universal antifreezes like Peak 10X or Prestone 300K coolants, since you will be flushing the engine anyway. if you REALLY want to stay Motorcraft, go with the Yellow, as it is supposed to be backwards compatible all the way to GOLD (2007 MY).
-

Cold Air Intake Edge ST & Sport 2.7EB
WWWPerfA_ZN0W replied to Xtra's topic in Accessories & Modifications
now you can offer whole house duct cleaning services! -

Cold Air Intake Edge ST & Sport 2.7EB
WWWPerfA_ZN0W replied to Xtra's topic in Accessories & Modifications
very nice -
good info, nice writeup.
-
Welcome, nice ride now get to learning about keeping that pano working right
- 1 reply
-
- 1
-

-
worst thing is losing confidence in your ride. sorry to see the edge go, wish the best with your Sorrento.
-
you will at least need to verify the coils are in good working order, and even then, move them to the front so if they do go, its easy to replace. best plan is to buy the motorcraft coil kit from any online ford dealer and keep the old coils as a backup. BA5Z-12259-A. not listed openly, you have to search for it. swagperformance on ebay is another option. the PCM can be repaired by circuitboardmedics.com , see their website for pricing/shipping/etc.
- 1 reply
-
- 1
-

-
all gen 2+ have drain plugs on the PTU. they might be well concealed by the downpipe, but they are there.
-

Cold Air Intake Edge ST & Sport 2.7EB
WWWPerfA_ZN0W replied to Xtra's topic in Accessories & Modifications
that cover is mouse fodder anyway lol -
-
an upholstery shop might be able to do it significantly cheaper. i assume you are referring to the TED or thermoelectric device https://parts.levittownfordparts.com/v-2012-ford-edge--limited--3-5l-v6-gas/body--front-seat-components Seat Cushion Thermo-Electric Device Removal and Installation NOTE: The air bag warning indicator illuminates when the correct Restraints Control Module (RCM) fuse is removed and the ignition is ON. NOTE: The Supplemental Restraint System (SRS) must be fully operational and free of faults before releasing the vehicle to the customer. NOTE: The cushion Thermo-Electric Device (TED) filter is detachable from the TED assembly housing from underneath the seat cushion. Remove the front seat cushion. For additional information, refer to Seat Cushion — Front in this section. Release the cushion trim cover retainers from the cushion frame and remove the cushion trim cover and cushion foam pad. Remove the 3 cushion TED -to-cushion frame screws. Remove the cushion TED -to-climate control seat cushion adapter screw and remove the TED . To install, reverse the removal procedure. For correct front passenger seat cushion wire harness routing, refer to Seat Wire Harness Routing — Front Passenger Cushion in this section. Seat Backrest Thermo-Electric Device Removal and Installation WARNING: Always carry a live airbag with the deployment door, trim cover or tear seam pointed away from the body. Do not place a live airbag down with the deployment door, trim cover or tear seam facing down. Failure to follow these instructions may result in serious personal injury in the event of an accidental deployment. NOTE: The air bag warning indicator illuminates when the correct Restraints Control Module (RCM) fuse is removed and the ignition switch is ON. NOTE: The Supplemental Restraint System (SRS) must be fully operational and free of faults before releasing the vehicle to the customer. NOTE: The backrest Thermo-Electric Device (TED) filter is detachable from the TED assembly housing and can be replaced without TED removal. Remove the front seat. For additional information, refer to Seat — Front in this section. NOTE: The seat backrest trim cover and foam pad have been removed to show the backrest trim panel retainers. Remove the backrest trim panel. Release the 2 pin-type retainers at the bottom of the backrest trim panel. Slide the backrest trim panel down to release the upper clips. Turn the backrest trim panel to release the middle clips and remove the backrest trim panel. NOTE: Lower outer J-clips are unfastened to show inner J-clips. Release the backrest trim cover outer and inner J-clips attached to the backrest frame. Push the release button in on each of the head restraint guide sleeves and remove the head restraint. Pull out and remove the 2 head restraint guides. Discard the secondary head restraint guide. For installation, install a new secondary head restraint guide. NOTICE: When installing, make sure the side air bag module wiring harness is not pinched between the side air bag module and backrest frame or damage to the wiring harness can occur. Through the rear of the seat, remove and discard the 2 side air bag module bolts and separate the side air bag module from the seat backrest. For installation, install 2 new side air bag module bolts. Tighten to 23 Nm (17 lb-ft). NOTICE: Do not pull the side air bag module electrical connector out by the locking button. Damage to the locking button can occur. NOTICE: Do not install the side air bag module electrical connector by the locking button. Damage to the locking button can occur. NOTICE: The side air bag module electrical connector locking button must be in the released position when the connector is being installed or connector damage may occur. NOTICE: The side air bag module electrical connector is unique and cannot be reversed when connected to the side air bag module. Match the electrical connector key to the keyway in the side air bag module. Do not force the electrical connector into the side air bag module or damage can occur. Using a small screwdriver as shown, lift up and release the locking button on the side air bag module electrical connector. With the locking button released, remove the electrical connector and the side air bag module. Separate the backrest frame from the backrest foam pad. Release the 3 clips, disconnect the electrical connector and remove the backrest TED . To install, reverse the removal procedure.
-

Cold Air Intake Edge ST & Sport 2.7EB
WWWPerfA_ZN0W replied to Xtra's topic in Accessories & Modifications
hopefully the body shop will do a 100% restoration and won't take too long. probably asking too much lol, but ... -
rumble/grind is never good - almost always a failing differential involved. a thud CAN be due to the programming needing to be updated.
-
seems like the radio needs to be replaced. if it has a cd player, the player can fail, start skipping, and drain the battery, just like a faulty door latch or even the shift switch. the battery saver system may or may not pick up the issue.
-
when its a temperature problem, and the reset fails to work, the options are to a) have ford recalibrate it for you, or b ) replace the offending actuator no air blowing at all is a different issue. it could be the front controls interface module (FCIM), blower motor failure, or resistor failure (usually just defaults to high speed, but ...). the HVAC module itself is rarely the issue. fuse definitely worth a check.
-
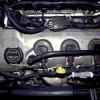
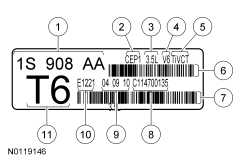
@igna Engine Identification For quick identification, refer to the safety certification decal. The decal is located on the LH front door lock face panel. Engine Code Information Label The engine code information label, located on the front side of the valve cover, contains the following: Item Description 1 Engine part number 2 Engine plant (Cleveland) 3 Engine displacement 4 Engine configuration 5 Twin independent Variable Camshaft Timing (VCT) 6 Bar code 7 Bar code 8 Running number 9 Engine build date (DDMMYY) 10 Plant shift line 11 Derivative code
-

Ford Edge Driver Door Latch recall?
WWWPerfA_ZN0W replied to Latrece370's topic in Recalls, TSBs & Warranty
https://drive.google.com/file/d/1IsCOd6ym6nm-rwAd5fhg0VG3DRsz92wi/view?usp=sharing -

Whinning noise when letting off gas around 40 MPH
WWWPerfA_ZN0W replied to Edge 2016's topic in 3.5L
this is the only transmission related bulletin i can find that might possibly apply for your vehicle https://drive.google.com/file/d/1ska26YITryYl1aUdEGh7cswf74xLeg_h/view?usp=sharing i hope it is not this, as it is a serious matter, requiring transmission disassembly. could be the pump also. check the fluid to make sure it is pinkish red, at the right level, and clean. maybe just low fluid ... -

Group 65 Battery in 2nd Gen Possible?
WWWPerfA_ZN0W replied to omar302's topic in 2015+ Edge & MKX Generation II
should at least see if the 850 cca 65 battery is available. heat kills batteries faster. also put it on a charger/tender regularly, which one depends on how much/what kind of driving you do. AGM batteries should not need to be topped up (as much), but there IS a difference between those that use recycled lead and those that use virgin lead. -

Group 65 Battery in 2nd Gen Possible?
WWWPerfA_ZN0W replied to omar302's topic in 2015+ Edge & MKX Generation II
What brands are available to you? Odyssey, Northstar, ... maybe ...?


